Category Archives: Ramblings

Simple Single Page Site with Secure Log Access

3 minutes, 36 seconds

And image of the sticker with a ".xyz" TLD

A friend of mine created some fun stickers for use at the most recent DEF CON. They were sly commentary about how corporate a lot of the stickers are and how maybe we should get back to our DIY roots. But…what’s this? There’s a .xyz in there…is that a TLD…is there domain I could go to?! IS THIS STICKER AN AD ITSELF?!?!?!?!1!

(Sticker image is marked with CC0 1.0)

It’s all of those things and none of those things – that’s why I love it so much. Best of all, when you go to website, you get just what you deserve ;)

The website was initially setup on a free hosting provider, but they didn’t provide any logs – something my friend was curious about to see how much traffic the non-ad ad was generating. I have a VERY cheap VPS server that already had Ubuntu server and Caddy on it, and I figured I could help by hosting a wee single file static web site and be able to easily offer the logs. Let’s see what we can do!

Step 1: One HTML file + Four Caddy config lines = Web server

I frickin’ love Caddy! I made a single index.html file and then added these 4 lines of config:

the-domain-goes-here.xyz {
        root * /var/www/the-domain-goes-here.xyz
        file_server
}

After I restarted Caddy (systemctl restart caddy) – I was all set! As DNS had already been changed to point to the IP of my lil’ server, Caddy auto-provisioned a free Let’s Encrypt cert, redirected all traffic from port 80 -> 443 and the site worked perfectly!

By default Caddy has logs turned off – let’s fix that!

Step 2: Turn up the (log) volume

Unsurprisingly, Caddy makes enabling logs very straight forward. Just add these three lines

  log {
    output file /var/log/caddy/the-domain-goes-here.xyz-access.log
  }

I reloaded the config in Caddy (systemctl reload caddy) and checked for log activity in /var/log/caddy/. It was there! Oh…it was there in full repetitive, verbose JSON…OK, cool, I guess that’s a sane default in our new cloud init all JSON/YAML all the time world. However, how about common log format though?

This was the first time Caddy surprised me! While it was easy enough to do (huge props to “keen” on Stack Overflow), it was a bit more convoluted and verbose than I expected. You have to change the log deceleration to be log access-formatted and then specify both a format and a transform. The final full server config looks like this:

the-domain-goes-here.xyz {
	root * /var/www/the-domain-goes-here.xyz
	file_server
	log access-formatted {
    		output file /var/log/caddy/the-domain-goes-here.xyz-access.log
		# OMG - thank you!! https://stackoverflow.com/a/76988109
		format transform `{request>remote_ip} - {request>user_id} [{ts}] "{request>method} {request>uri} {request>proto}" {status} {size} "{request>headers>Referer>[0]}" "{request>headers>User-Agent>[0]}" "host:{request>host}"` {
          time_format "02/Jan/2006:15:04:05 -0700"
       		}
  	}
}

Now let’s figure how to to add secure access to download those logs.

Step 3: Rsync via Authorized Keys FTW!

A straight forward way to give access to the logs would be to create a new user (adduser username) and then update the user to be able to read the files created by the Caddy process by adding them to the right group (usermod -a -G caddy username). This indeed worked well enough, but it also gave the user a full shell account on the web server. While they’re a friend and I trust them, I also wanted see if there was a more secure way of granting access.

From prior projects, I knew you could force an SSH session to immediately execute a command upon login, and only that command, by prepending this to the entry in the authorized_key file:

command="SOME_COMMAND",no-port-forwarding,no-user-rc SSH-KEY-HERE

If I had SOME_COMMAND be /usr/bin/rsync then this would be great! The user could easily sync the updates to their access log file at /var/log/caddy/the-domain-goes-here.xyz-access.log. but then I realized they could also rsync off ANY file that they had read access too. That’s not ideal.

The final piece to this Simple Single Page Site with Secure Log Access is rrsync. This is a python script developed specifically for the use case of allowing users to rsync only specific files via the Authorized Keys trick. The full array of security flags now looks like this:

restrict,command="/usr/bin/rrsync -ro /var/log/caddy/",no-agent-forwarding,no-port-forwarding,no-pty,no-user-rc,no-X11-forwarding SSH-KEY-HERE

As there’s no other logs in /var/log/caddy – this works great! The user just needs to call:

rsync -axv username@the-domain-goes-here.xyz: .

Because of the magic of rrsync (two rs) on the server forcing them into a specific remote directory, the rsync (one r) on client is none the wiser and happily syncs away.

Happy web serving and secure log access syncing and Happy Halloween!

Easy Pi-Hole and Stubby on Orange Pi Zero & Raspberry Pi 3

4 minutes, 8 seconds

Skip to the install guide if you just want to know how to set up your Pi easily ;) Otherwise, read on for a little background.

Introduction


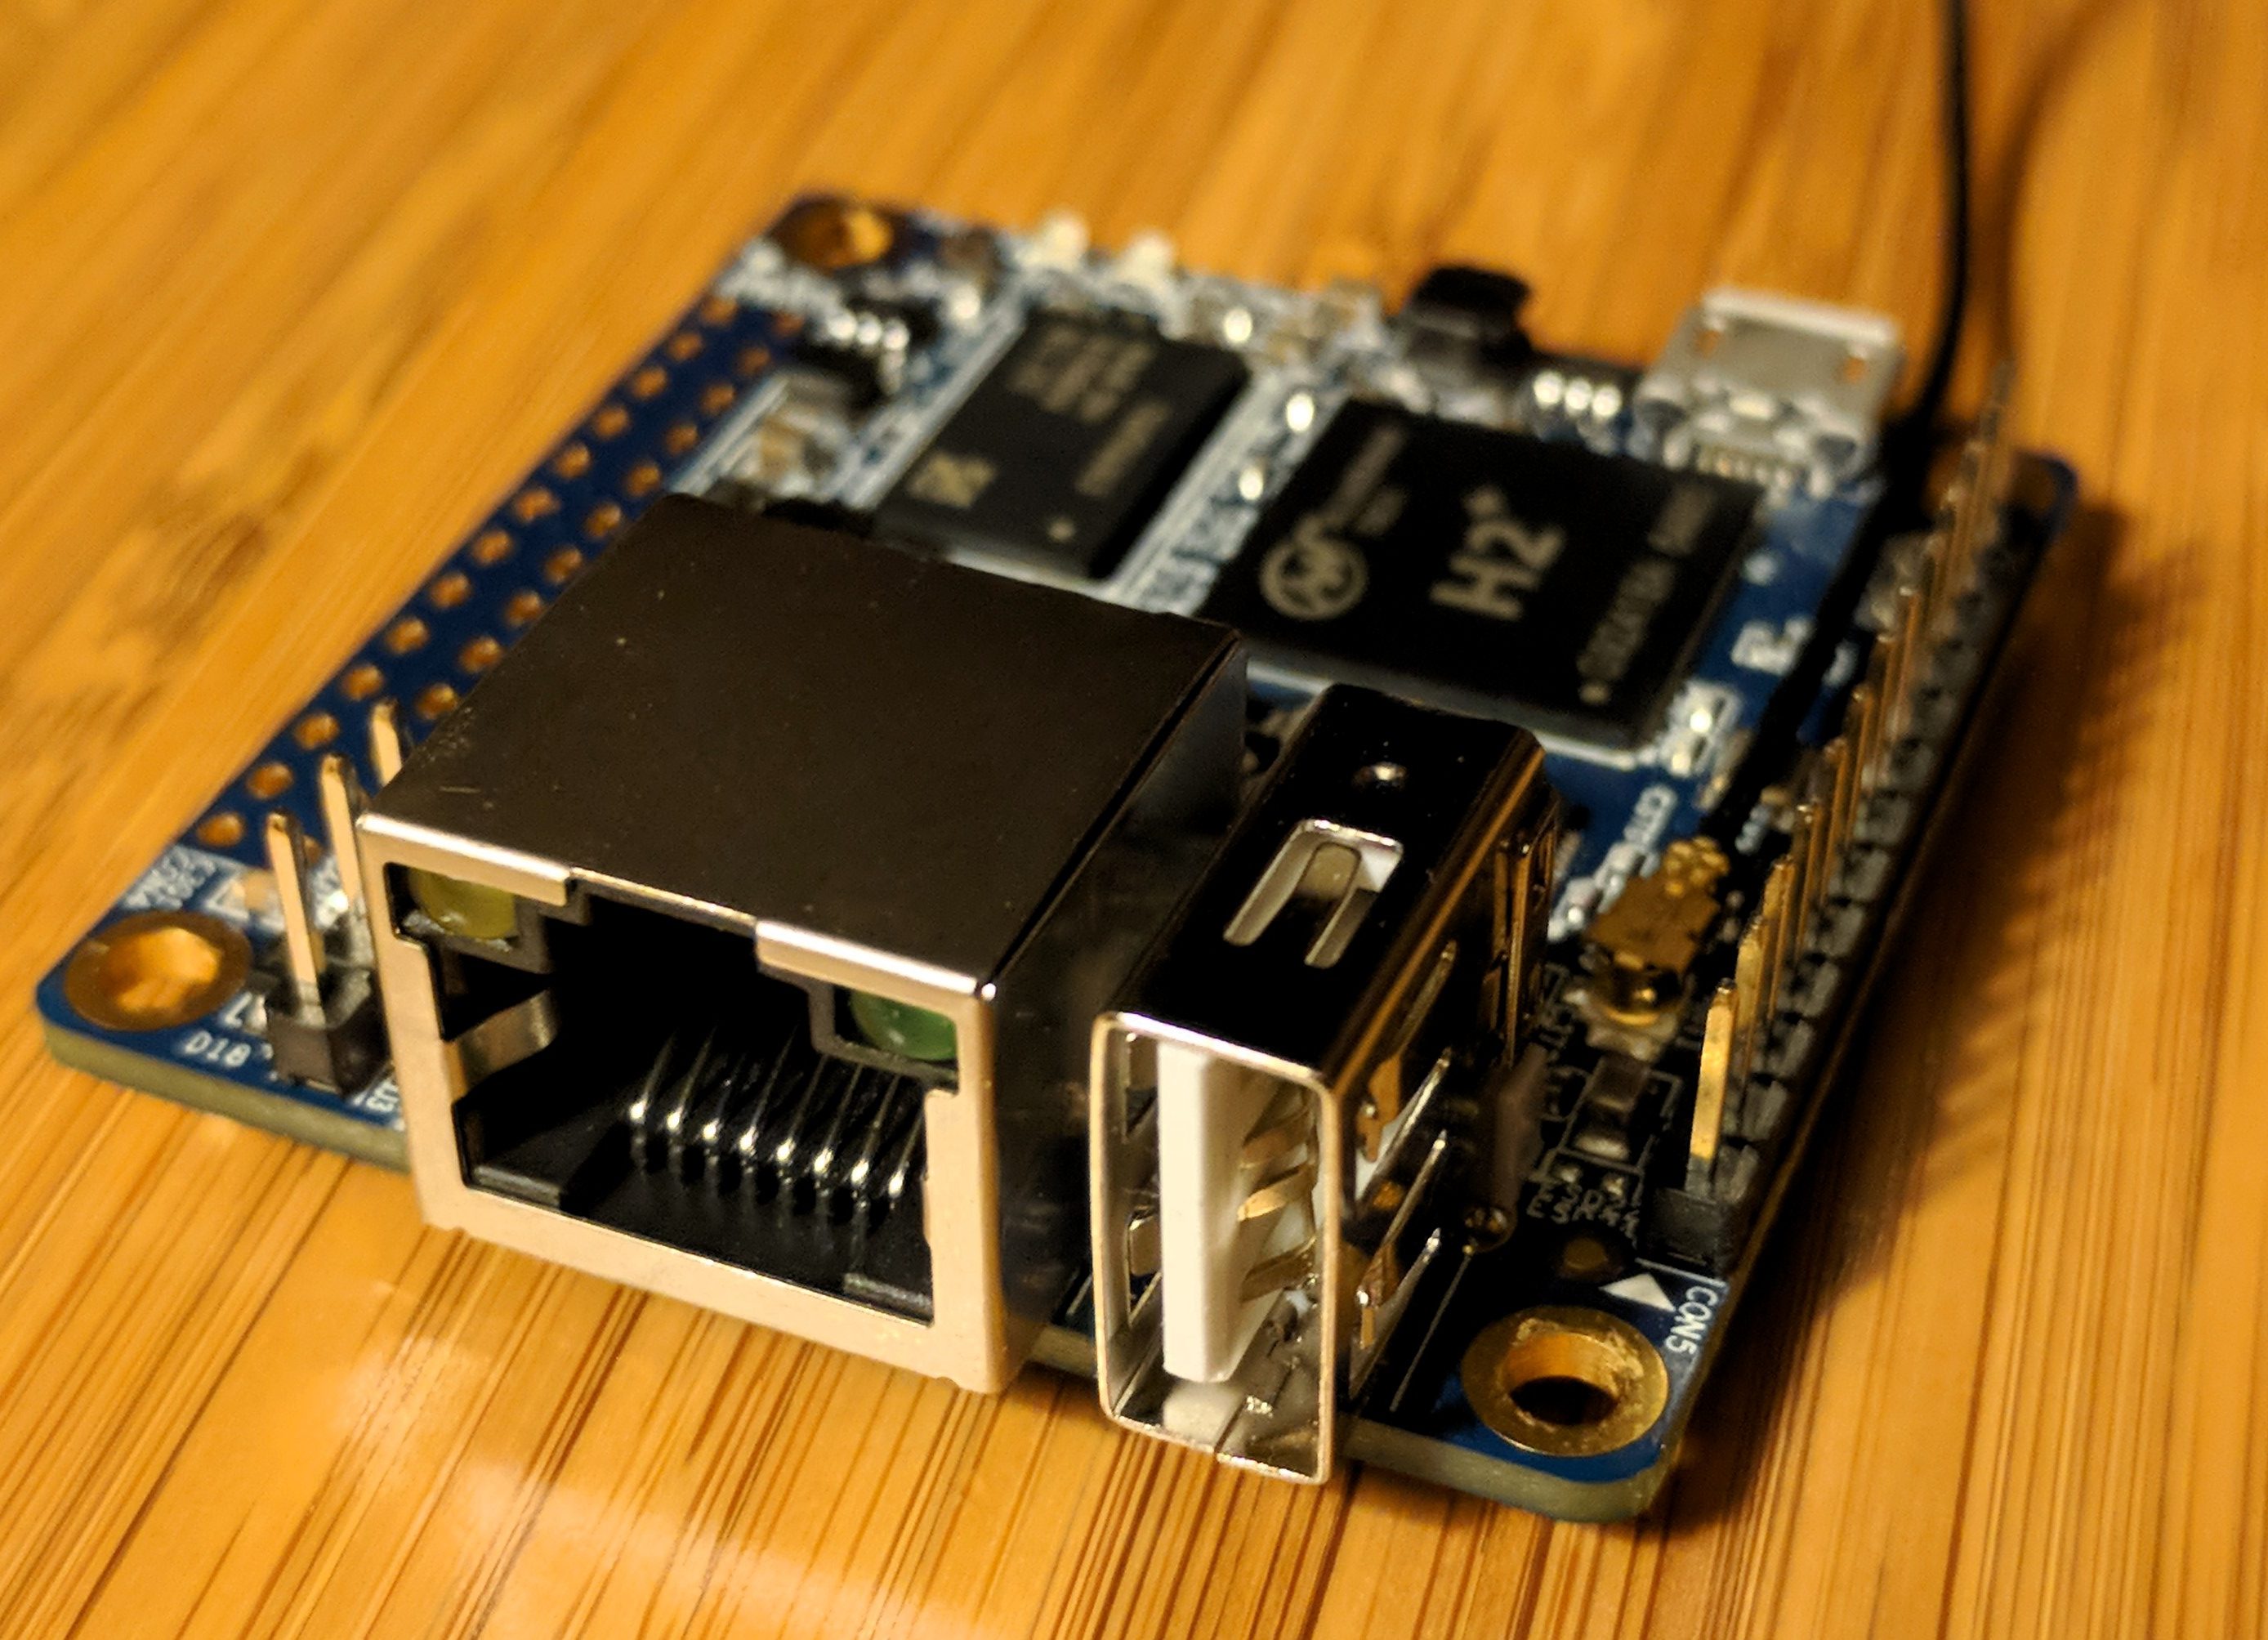
I’ve been deep in DNS land of late. At work I’m working on DNS Stats and helping QA/release/document a packet capture tool for DNS stats. I even, just today, automated a complete Pi-Hole install to have a reliable dev environment for DNS stats. At the shop, I’ve set up the same encrypted DNS + Pi-Hole + LXD + Quad9 as I have at home. It’s all DNS all the time here is what I’m trying to say ;)

I’ve yet to find the magic sauce to compile Stubby on the Orange Pi Zero board though. It’s so cheap ($20 shipped), has a built in Ethernet, and is just so dang cute! So, I was looking around at stubby posts and Linux posts and Ubuntu posts and found this great write up on Ubuntu 18.04 and stubby and it said,

Stubby is in Ubuntu 18.04 repository

-linuxbabe.com

This was awesome! This means my previous trickery of having to compile stubby from source on Ubuntu wasn’t needed! However, the revelations about easy DNS set up and encryption were only just getting started.

The next one I found was that the 4.0 release of Pi-Hole from early August, had a new feature: custom ports can be used for upstream servers. Wham! This double awesome! Now, in the GUI of Pi-Hole, you could safely add a the IP of stubby and specify a random port to use! But we’re done yet, no sir, two more revelations to go.  Hold on.

The penultimate revelation was BOTH the Orange Pi Zero AND the Raspberry Pi 3 b had a release of Ubuntu 18.04 for them. This means that you not only don’t have to compile stubby for your x86 LXD environment, but you don’t have to do it for ARM SoC setups either! Yay!

The final revelation dates back to a long, LONG time ago, and I’m just late to the party.  I’m talking proto-internet long time ago.  The legend Jon Postel decided that not only would IPv4 have a reserved IP address of 127.0.0.1 for localhost, but in RFC 790 in 1981, he said it would actually be a /8, so you get just over 16 million localhost IPs just for your bad ass self. This means you don’t actually need the new port specifying feature of Pi-Hole – you can just set up Stubby on port 53 on 127.1.1.1 and Pi-Hole on port 53 on 127.0.0.1. Ugh – this makes it so much easier – if I only was more a network guy!

Now that my rambling background on my recent revelations is done, let’s get to the technical write up.  Though, honestly, this part will be pretty short and sweet.

Installation Guide

This guide assumes you’ve downloaded and installed Ubuntu 18.04 for either your Orange Pi Zero or Raspberry Pi 3 B. Note that both the official download page of both Orange Pi and Raspberry Pi Foundation, do not list 18.04 options. It also assumes you’re running everything as root. The instructions are identical for both boards:

  1. Ensure you’re up to date:
    apt-get update&&apt-get upgrade
  2. Install Stubby: apt-get install stubby
  3. Edit /etc/stubby/stubby.yml so that it’s listening on 127.1.1.1:
    listen_addresses:
     - 127.1.1.1
  4. Restart Stubby: systemctl restart stubby
  5. Install Pi-Hole. Use what ever upstream DNS server you want when prompted, we’re going to override it with Stubby:
    curl -sSL https://install.pi-hole.net | bash

    IMPORTANT
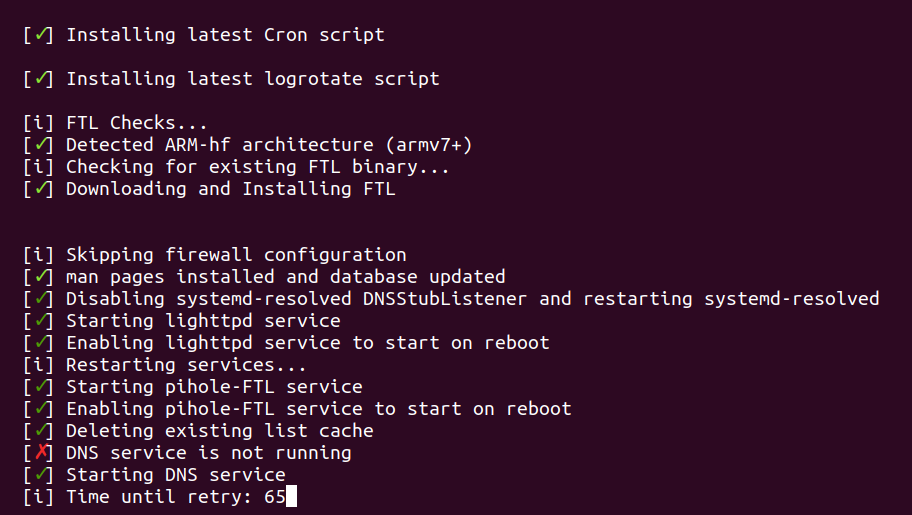
    – See Troubleshooting below if you get stuck on “Time until retry:” or “DNS resolution is not available” when installing Pi-Hole

Pi-Hole DNS settings
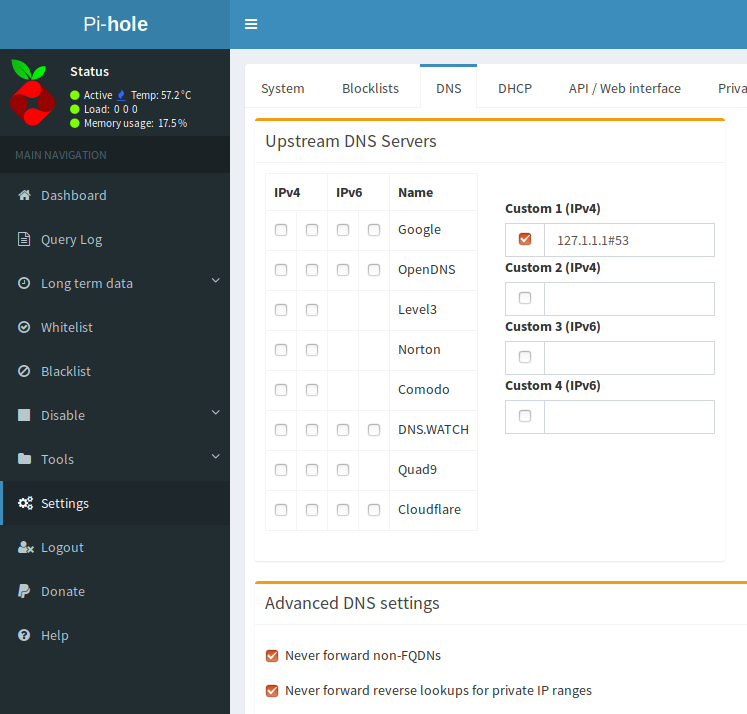
  1. Log into your new Pi-Hole at YOUR_PI_IP/admin and go to Settings -> DNS. Uncheck any DNS servers and enter a Custom 1 (IPv4) of 127.1.1.1:

Coming full circle, the Reddit thread I cited in my original write up, now has a comment that Ubuntu 18.04 has a Stubby package.

Quad9

If you want to use Quad9 (and I think you should ;), in step 3, while you’re in stubby.yml, comment out all the other servers in upstream_recursive_servers: and un-comment Quad9 so it looks like this::

upstream_recursive_servers:
  - address_data: 9.9.9.9
    tls_auth_name: "dns.quad9.net"
  - address_data: 2620:fe::fe
  tls_auth_name: "dns.quad9.net

Full disclosure, I work for PCH which sponsors Quad9.

Troubleshooting

A few things I found while researching this post that might help you:

  • The login on the Raspberry Pi is Ubuntu with password is Ubuntu. The login on the Orange Pi Zero is root and password is 1234. Check out my SSH Bootstrap trick as well.
  • The Orange Pi Zero didn’t get an IP via DHCP the first boot. A reboot solved that.
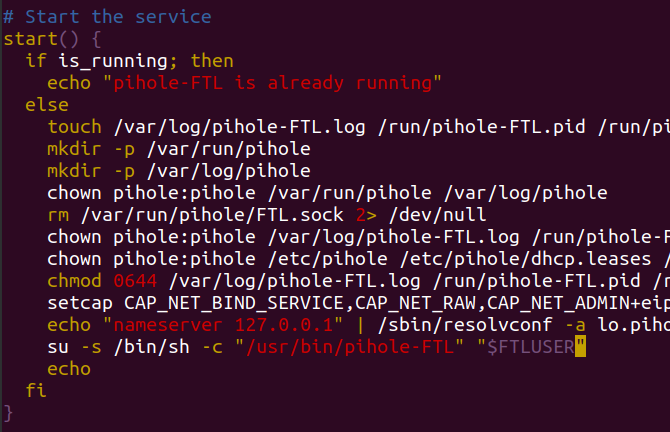
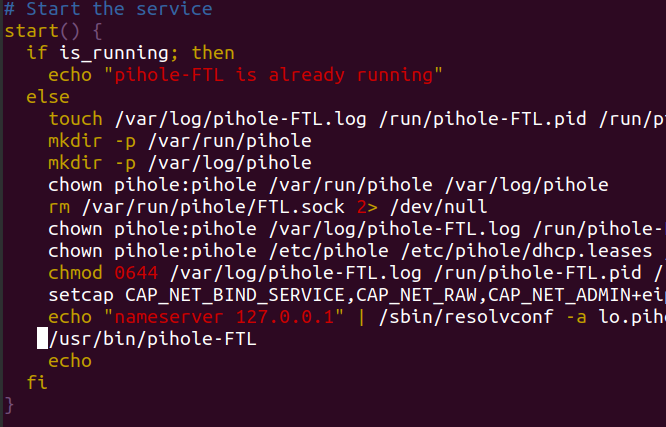
  • The Pi-Hole script gave me a headache when installing. Near the end of the install it said, “Starting DNS service” and then was waiting to retry. I found a post on the Pi-Hole boards that solved it perfectly. To work around this, edit /etc/init.d/pihole-FTL so that this line:

    su -s /bin/sh -c "/usr/bin/pihole-FTL" "$FTLUSER"

    is replaced by this line:

    /usr/bin/pihole-FTL


    After that, be sure to reload your init script with:

    systemctl daemon-reload

    Finally you should be able to complete your install just by restarting Pi-Hole:

    systemctl restart pihole-FTL
     

  • Even though I followed step 4, during one my tests stubby was still blocking port 53 on 127.0.0.1. If that happens, restart stubby:

    systemctl restart stubby
     

  • At any point you can test that stubby or pi-hole is working. These are good to intersperse with each install and configuration change:

    dig @127.1.1.1 plip.com +short # stubby
    dig @127.0.0.1 plip.com +short # pi-hole

Poon Hill Trek

3 minutes, 53 seconds

Be sure to read my prior post about attending the APRICOT 2018 conference in Nepal before the trek!

Intro & Highlights

This was my first time trekking and my first time trekking in Nepal. While we had considered a more rigorous route of the Annapurna Base Camp (ABC), the max elevation of 4130m (13,400ft) had me concerned. I opted for a much more tame Poon Hill route, which tops out at 3210m (10,000ft) which was more my speed. In the end the elevation ended up being a non-issue. In fact, just about all my concerns were non issues ;)

We started on day 1 with celebrating Holi. At first we were reticent, but then joined the festivities by having the local kids do us up. It was lovely.

My favorite day for views was day 3. Poon Hill was clear for our pre-dawn hike and the sunrise and Annapurna mountains were breath taking. Bring money to pay for the entrance fee and hot drinks at the top of the hike! The rest of the day the mountain views kept us company and they were epic. Thanks Nepal!!

The rest of the trip was amazing. While you can feel modern amenities creeping in every town, the both benefit the towns folk and pull the “rural-ness” away from what you can tell was once a remote village. You know, the old man in me wants to have no tech when I hike/trek. I’m there to experience the place and nature, not check me email ;)

Farm animals where everywhere and it was a delight to see them. All the locals were nice, though some drove a harder bargain for their tea house prices. Check around a bit and don’t settle for the first one.

Click any of the photos in this post to see the gallery! Note, you’ll see pictures of my work conference too ;)

Finally, there was a really…oddly comforting I guess, moment when the cabi on the way to Pokhora put on “Like a Virgin“. I loved it (it’s the second clip in this video). Sorry I was too lazy to edit this video down, it’s 3 min long:

Route

Based on this write up, among others, we ended up doing this route (all prices in US Dollars and are per person):

  • Day 1: Kathmandu -> Pokhora – 30 Minute Flight $250
  • Day 1: Pokhora -> Nayapul – 1.5 hour Taxi $30
  • Day 1: Nayapul -> Hile – 1 hour Jeep $30
  • Day 1: Hile -> Uleri – trek
  • Day 2: Uleri -> Ghorepani -> Poon Hill -> Ghorepani (day hike to Poon Hill after dropping packs ;)- trek
  • Day 3: Ghorepani -> Poon Hill -> Ghorepani -> Tadapani – trek
  • Day 4: Tadapani -> Taulung -> Chomrong -> Taulung -> Chinu/Jhinudanda – trek
  • Day 5: Chinu/Jhinudanda -> Tolka – trek
  • Day 5: Tolka -> Pokhora – 1 hour Jeep $15
  • Day 5: Pokhora -> Kathmandu – 30 Minute Flight paid for on first item

I strongly encourage you pick up a map in Kathmandu or Pokhora. They’re cheap and really handy to have. We got this one which was readily available in map stores in Thamel.

Packing list

My pack was 9.5kg. I think if I didn’t carry spare running sneakers, USB battery, as fully stocked first aid kit, and micro 4 3rds camera, I’d have been around 7.5 or 8. I have no regrets though! My list is taken (and culled) from wanderingsasquatch.com. The “two shirts, one for hiking, one for not” was really great. During the warmer months you could totally skip the sleeping bag to save some real weight. The tea houses all had blankets. While I took photos with my nice camera I mentioned above, I actually was fine with cell phone’s pictures, given it’s a newer phone. Walking poles are optional, but I loved them. My gaiters and rain pants went unused the entire trip.

Hiking Clothes

  • Hiking Pants
  • 2 short sleeve shirt (preferably a “technical” shirt with synthetic fibers to help keep you dry)
  • 2 pairs of socks (in case one pair gets wet during the day, you can change socks)
  • upper and lower base layer
  • Down jacket
  • Sun hat
  • warm hat
  • Gloves (look for ones with Gore-Tex)
  • Raincoat
  • Rainpants
  • gaiters
  • Hiking Boots Water proof
  • Sunglasses
  • running shoes/flip flops

Gear

  • Backpack
  • Phone & Cord (doubles as camera)
  • Map
  • Sleeping bag
  • Water purification tabs
  • Water bladder (2 liter size)
  • Headlamp
  • Pack rain cover
  • Passport & Permits (you’ll be asked for these at every checkpoint)
  • Cash –
  • Ziplock bags for organizing/waterproof

Toiletries

Toothpaste, soap and TP can be bought along the way if you want.

  • Toilet Paper
  • Soap
  • Toothbrush
  • Toothpaste
  • Sunscreen
  • Lip balm with SPF
  • nail trimmer
  • ear plugs (tea houses can be LOUD)
  • First aid kit with at least: band aids, moleskin, ibuprofen, antidiarrheal, tweezers

Optional

  • Power Plug adapter (just about every tea house had a universal outlet that fit every wall charger)
  • Pillowcase
  • Trekking poles
  • Real Camera & Extra battery

You’ll want a small pack – no bigger than 40L likely – to fit this in. That big-ass “I fit it all on my back” pack that you carry your tent, stove, pots and pans and food for a week is too big! Here’s my pack (foot for scale) and a day pack I checked at my hotel in Kathmandu with a change of clothes and other stuffs I didn’t want to bring with:

4k Mac Plus

0 minutes, 17 seconds

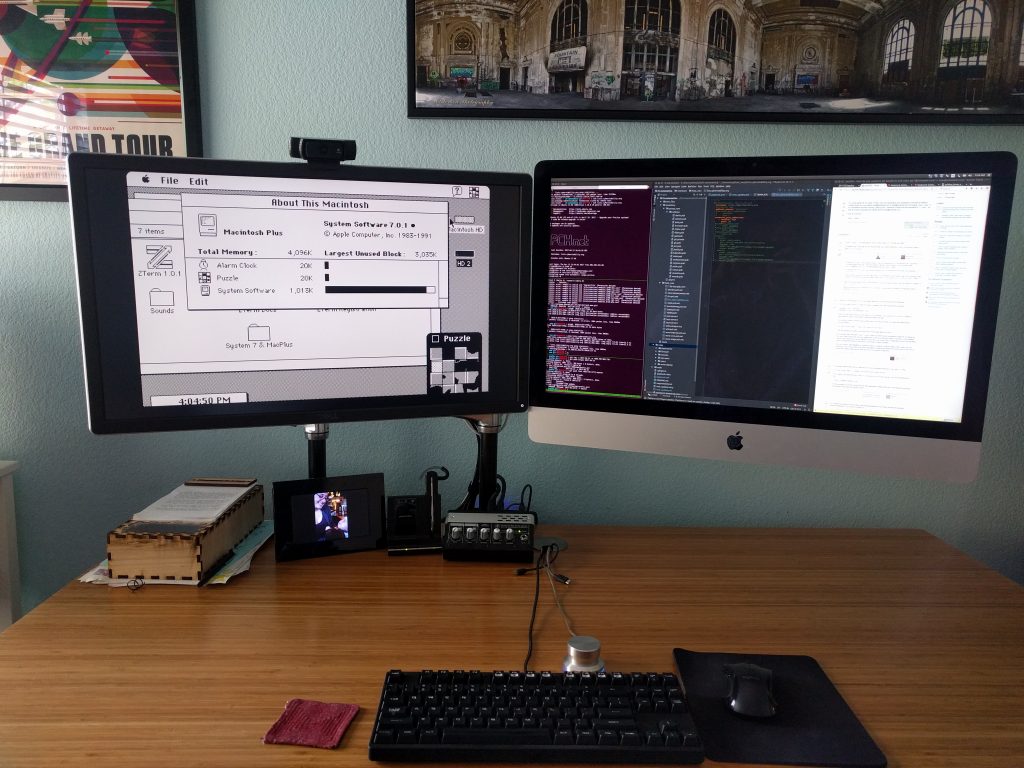
The amazing Archive.org just posted a Mac OS 7 emulator and it’s amazing.  See, “Early Macintosh Emulation Comes to the Archive“. Given my first computer was a “Fat Mac“, seeing this operating system brought to life brought so many memories back.  Thank you archive.org!!  The even support full screen so you can run a 512×342 resolution emulator on a 4k monitor in a browser under Ubuntu ;)

Laser Cut Acrylic SYN Shop Dice

2 minutes, 19 seconds

Back in May for this past Las Vegas Science and Technology Festival, the SYN Shop hosted an open house. It was awesome!

first.draftI volunteered to show folks our Laser Cutter. This is by far one of, if not *the*, most popular tool at the SYN Shop. In preparation of showing folks how it worked, I made a bunch of cubes. Not just any cubes though! I started with a 1.6″ cube at Maker Case with finger joints. I then added our logo. I did a test run and quickly saw that the translucent side of the acrylic I was using looked much better when viewing it from through the oppisite clear side, instead of viewing it directly. close.upI reversed our logo and as well added a very small mark in the upper left. This mark would allow me to run two discrete jobs: an engrave job and then a cut job. If you do them as one the laser cutter will engrave all your cuts and then cut them – a huge waste of time. The mark in the upper left allows me to keep the registration the same as long as I don’t move the bed or the piece on the bed.

1.6.inch.box After feeling confident I had a good prototype design and size, I embellished it a bit by adding the 5 dice sides 1-5, the sixth would be our logo. I then laid it out as many up on the design as our laser cutter would handle, 4 x 3. Each sheet took over an hour to engrave the logos and dice faces and cut. I think I ended up making 48.

IMG_20160429_142319I learned after doing one sheet later on that though you get a bit less burn marks when you leave the protective sheets of paper on – it takes WAAAAAAY longer to peel when it has a logo engraving into it one side and then the cube face cutting it too. I pre-peeled both faces to save time. However, my son was totally into the production of peeling, stacking, and rubber banding the whole thing. I didn’t even need to tell him that he and his sister would get one to share after we ere done. We had fun!

IMG_20160504_231512During the event it self, I wanted to keep the laser cutter running to show how it works. As well, we quickly ran out of acrylic dice, so I needed another design to cut. I found a good, butterfly image that I traced in Ink Scape to create a nice looking SVG. From that, I made a bunch of test cuts and then just left it running during the day. As soon as the job was done I could pop open the lid and hand out hot, freshly cut butterflies.

OPEN.house.butterfly.trimAll of the SVGs in this post are free to use for what ever purpose you want. It’d be great to hear of any uses though! I actually have a huge backlog of SVGs I’ve created over the past 1+ year that I should share…

Finally, here’s a video of my kids very much enjoying two octopi 3D printed with heat sensitive filament (also free handouts that day ;)

https://vimeo.com/179411667

Blogs I Read

1 minute, 54 seconds

After my upgrade to my new phone, I accidentally deleted the list of all my RSS feeds I follow. It took some months to remember all the different ones, but I’ve finally recreated the entire list and re-subscribed to them all. I use RSS Reader on Android with pro version (no ads, no tracking!).

After completing the great resubscribe of ’16, I decided to make a post about my list mainly so I have a backup but also so my friends who sometimes ask where I get my news can follow along if they so desire.

A list of blogs I follow, non-personal:

Blogs I follow, personal (people I know):

Punk Rock Band Names

1 minute, 16 seconds

For some time now, I’ve been thinking that I need to add a category to this blog that is for cataloging and giving away for use punk rock band names. I guess I should really call them just “band names”, as they’re not all categorically for punk or punk rock bands. However, for even longer, I’d say back in school when I was hanging out with Scott at the old location of the Bike Doctor, we’d say something funny and say, “man, that’d be a great punk rock band name!” So, this is the first in a series of names that I think some one should use as their, possibly punk rock, band name. Any names in this category are free to use with no reservations and what not. But maybe you’d like to give me a t-shirt of your band? A couple of tickets when you come to town?

For each post in this category I’ll give the name and any background on how I came up with it. Enjoy!

Punk Rock Band Name:Promiscuous Profusion of State

Background: I was reading up on Fathom and came across this passage (emphasis mine):

A study of existing projects like Readability and Distiller suggests that purely imperative approaches to semantic extraction get bogged down in the mechanics of DOM traversal and state accumulation, obscuring the operative parts of the extractors and making new ones long and tedious to write. They are also brittle due to the promiscuous profusion of state. Fathom is an exploration of whether we can make extractors simpler and more extensible by providing a declarative framework around these weak points. In short, Fathom handles tree-walking, execution order, and annotation bookkeeping so you don’t have to.

Web App Security Cheat Sheet

1 minute, 36 seconds

I recently documented best security practices for writing a web app. Since I was most of the way there for a nice tidy blog post on the topic, I’m using the contents of those docs as a cheat sheet for web app security. Best to refer to OWASP for a more exhaustive list, but here’s mine in PHP/Apache:

title description sample
No Traffic on Port 80 Always use an encrypted channel for web traffic, never send a session cookie in the clear RewriteEngine On
RewriteCond %{HTTPS} off
RewriteRule (.*) https://%{HTTP_HOST}%{REQUEST_URI}
HSTS Set header so after 1st redirect, client goes directly to SSL connection Header always set Strict-Transport-Security
“max-age=15768000”
Forward Secrecy Use ephemeral keys for TLS connections to prevent wholesale decryption if private key is compromised SSLCipherSuite EECDH+AESGCM:EDH+AESGCM:AES256+EECDH:AES256+EDH
SSLProtocol All -SSLv2 -SSLv3
SSLHonorCipherOrder On
Anti-Clickjacking Prevent your site from being included in an iframe Header always set X-Frame-Options DENY
Anti-CSRF Nonces No one getting tricked to submit pre-filled forms using their existing session cookie $_POST[$NONCEKEY] == $_COOKIE[$NONCEKEY]
(but more to it – see this gist)
XSS escaping NEVER TRUST USER INPUT, save raw values to DB, cleanse on display print htmlspecialchars($user_string_here, ENT_QUOTES, ‘UTF-8’)
Secure cookies Never transmit cookies in the clear, works well with HSTS setcookie( ‘session’, $sessionId, 0, ‘/’, ‘www.example.com’, isset($_SERVER[“HTTPS”]), true);
HttpOnly cookies don’t allow JavaScript/XSS to access your cookies setcookie( ‘session’, $sessionId, 0, ‘/’, ‘www.example.com’, isset($_SERVER[“HTTPS”]), true);
bcrypt hashes Use a *slow* hashing method instead of a *fast* one (I’m looking at you MD5…) password_hash(“rasmuslerdorf”, PASSWORD_DEFAULT)
Though Argon2 is up and coming!
strong session ID don’t store anything but pseudo random ID in the cookie. Again NEVER TRUST USER INPUT! bin2hex(openssl_random_pseudo_bytes(50))
no session fixation on logout, delete cookie **and** server side entry in DB so session is dead dead dead NA
re-prompt for passwords on email, password or username change or when showing/changing sensitive data NA
no SQL injection still NEVER TRUST USER INPUT, parameterize all queries $dbh = new PDO(…);
$stmt = $dbh->prepare(‘SELECT * FROM users where username = :username’);
$stmt->execute( array(‘:username’ => $_REQUEST[‘username’]) );

Penance for forgetting basic debugging

1 minute, 56 seconds

I was working on implemented a nonce to fight CSRF requests on all our forms. The nonce worked liked you expect: by setting a cookie and then putting the same value in the form. When the form was submitted, the back end checked that the form nonce matched the cookie nonce and, bam, bob is your uncle.

The HTML for the form was hosted on foo.domain.com and was fetched via an AJAX call to render it in a modal on bar.domain.com. It used a JavaScript function that looked like this:

  $('.login_action').click(function(){
    Modal.init({
      id: "login",
      primary_button_action: function(){
        $('form #loginform').submit();
      },
      url: URL_ROOT + "modal/login",
    }).open();
  });

Now, you can’t quite tell, but this is ultimately a wrapper for Twitter’s Bootstrap’s Modal call:

$('#login').modal(options)

For the life of me I could not figure out when the AJAX call from foo subdomain to bar subdomain was not setting the nonce cookie. I thought it would be a CORS issue, but quickly dismissed that because we all know that “AJAX Requests Get And Set Cookies Like Any Other HTTP Request“, right. RIGHT?!!?

I did follow the best practice of putting in poor man’s PHP break points to trace the $_POST and $_COOKIE values, but to no avail.

After far too long, but after a healthy discussion with a friend about how we learn and how we trouble shoot, I remembered my mantra I always tell junior engineers: “Simplify the problem! Distill it down. Ideally, continue to cut the code in half again and again until just the bare minimum manifesting the problem remains.”

This lead me to reproduce the problem in two lines of code on foo.domain.com to call bar.domain.com:


The problem was still there! No nonce cookies getting set. Let’s remove jQuery then and go to raw JS requests:

var xhr = new XMLHttpRequest();
xhr.open('GET', 'https://bar.domain.com', true);
xhr.withCredentials = true;
xhr.send();

Wait ah second! What was that I see in the console?!@@!#%$:

Cross-Origin Request Blocked: The Same Origin Policy disallows reading the remote resource at https://bar.domain.com. (Reason: CORS header 'Access-Control-Allow-Origin' does not match '*').

Oh…CORS…the thing I dismissed upfront. So, yes, AJAX calls are just HTTP requests per bennadel.com’s blog post, but of course if foo subdomain is calling the modal on bar subdomain via AJAX, it’s an XHR request to another (sub)domain which needs to play by CORS rules.

If any one is interested, I published a gist with our PHP code to do nonces.