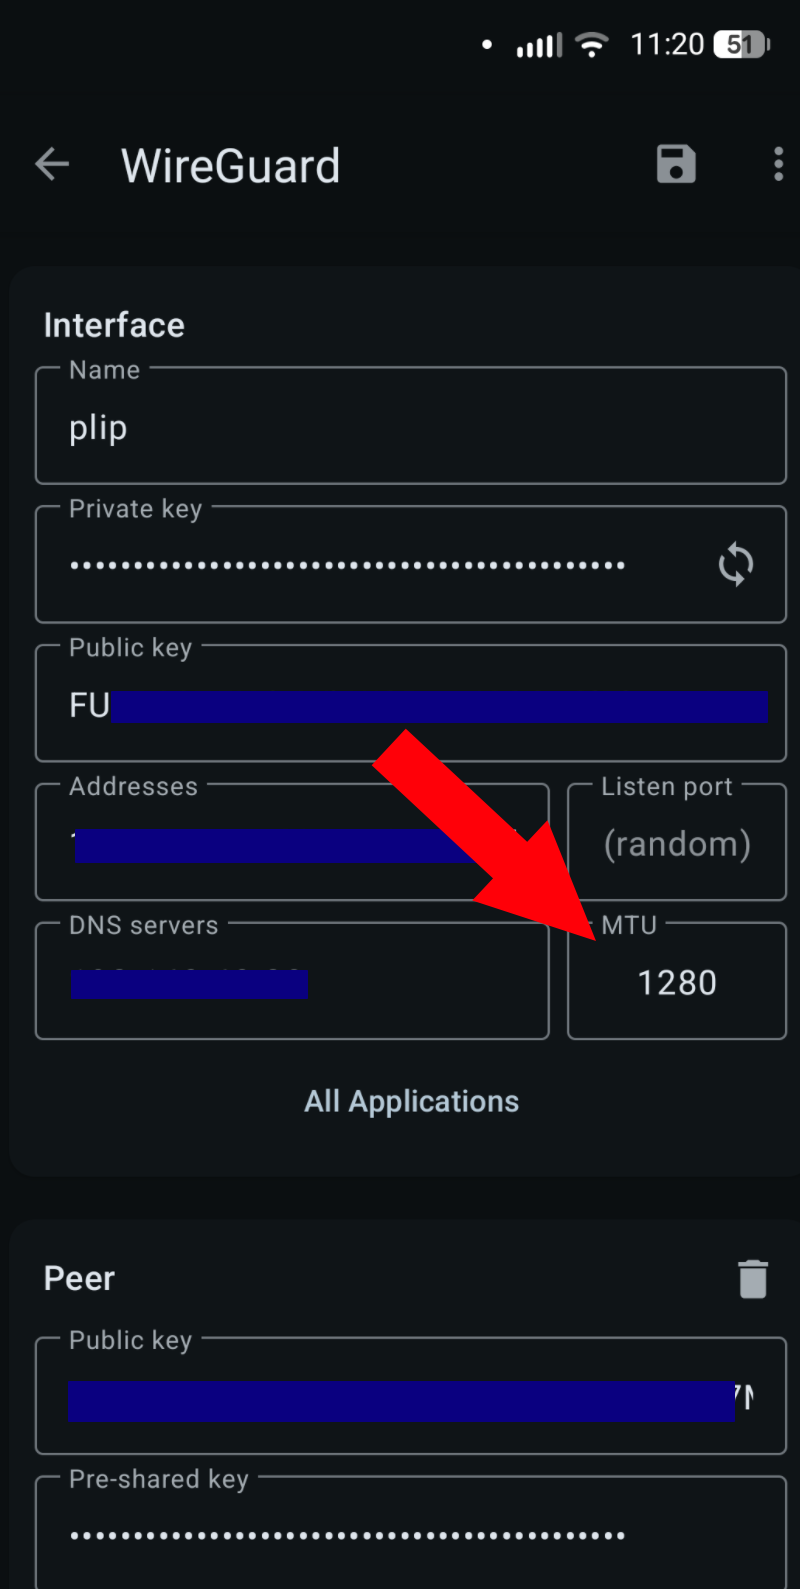
Change your MTU from 1420 to 1280 if your Android device is having issues connecting to your Wireguard VPN over cellular data. This MTU value should work on both WiFi and cellular data.
Slowly discovering the solution
For some time now I’ve been baffled why my Wireguard VPN doesn’t work on my phone. I was a looser and not actively troubleshooting it, so instead I spent months slowly unraveling what is going on with these discoveries:
I found my phone VPN didn’t work – odd – that’s frustrating
A few weeks later, I realized that my laptop worked fine. OK, so it’s endemic to the phone – noted
A few weeks after that I had a big breakthrough – my VPN on my phone worked on WiFi but did not work on cellular data. So odd!
Finally, one morning over a tasty coffee, I started DDGing for something like wireguard not working on mobile data, works on wifi
I found a Reddit post (not this one, but like this one) that said changing the MTU can fix this issue
There’s a trope among computer nerds that any complex problem that you’re struggling to figure out WTF is going on, was probably caused by DNS. There’s a whole slew of sites that capture this sentiment including itwasdns.net , itwasdns.io/was-it-dns, itwasdns.org and it’s even available as a T-Shirt!
Wait – was it DNS?
I was recently reminded of “it was DNS” during a server upgrade I was doing. For the self-hosted setup I run at home, I have two identical Ubuntu servers. This allows me to easily move services between the two servers to do potentially destructive maintenance on one and the other will still be up and running. This prevents family from complaining, “The Internet is down!! I need the Internet!!!” (which of course has never happened…noooope, no self inflicted internet outages here).
In preparation for the Ubuntu 22 -> 24 upgrade I’d been putting off, I had just moved the main file server and the DNS server (Nextcloud, Pi-Hole and Stubby) from primary to backup servers. Notably, the services keep the same IP address on either server.
After moving all the services, I checked that both DNS and Fileserver were working, like the good little sys admin I am. I completed the Ubuntu uplift from 22 to 24 (hello sudo do-release-upgrade). After the uplift completed, I stopped the services on the backup server and started up on the main server. I immediately checked if DNS worked – all good there! Then I checked Nextcloud. Nope, down on the desktop. Um… a little panic is setting in… Ah hah! I’ll double check on another device – my phone! Also not working there. Ok, stomach just dropped, sinking feeling that I’ll have to fail back over to backups and have a day of troubleshooting ahead. Ugh.
Parenthetical aside: Why might it be DNS
(The title of this blog post already tells how this story ends, but let’s have a brief interlude to talk a little bit about DNS works. For a big explainer, I highly recommend Julia Evan’s DNS blog post series (or her DNS Zine!). Specifically, her post DNS “propagation” is actually caches expiring is especially applicable here. Otherwise, when your client queries a DNS server it hands back a “time to live” (TTL). This is then cached locally for the TTL duration. A common value might be 3600 (60 minutes) or possibly 86400 (1 day). Parenthetical aside over!)
Back to our hero fighting a possible outage and fail-over to backup
I was baffled how the file server was unavailable. I the used digtool to check from 3rd system that wasn’t my desktop or my phone. Something odd happened: it resolved fine. What!?! I then did a curl to the Nextcloud URL and it worked perfectly.
This was baffling.
When things get baffling I try to artificially induce a shower thought. I stepped away from the keyboard, took a deep breath and played a game of boggle.
180 seconds later, with no shower thoughts forming over boggle, I retraced my steps. And then it hit me: I didn’t refresh the backup of the DNS server! Aha!! An NXDOMAIN no doubt was cached. Here was my theory
I deployed the Nextcloud server on the main server, including a Local DNS Host entry – an A record that only works on my home LAN on my Pi-Hole. The A records has a TTL of 0
Notably, I did NOT sync the Pi-Hole to the backup server
In preparation of bringing down the main server, I copied the file server’s data to the backup server and then started the file server and DNS server on the backup.
I tested both DNS and file server worked, presumably using a client cache of DNS*
I upgraded Ubuntu 22 -> 24
Somewhere in here, both my phone and my desktop, running the Nextcloud clients, queried the out of sync Pi-Hole for the Nextcloud IP.
Since there was no A record for Nextcloud, the Pi-Hole dutifully returned an NXDOMAINresponse with a TTL of 3600 to both my phone and my desktop.
Upgrade completes in 10 minutes later, I stop services on the backup server, start them on the production server
Nothing works
I feel terrible
So if I had just synced DNS to the backup server, my two main clients wouldn’t have had the problem on step 7 above.
Conclusion
The most baffling thing of all of this, and a bit embarrassing to only find out now, is this fact:
Records added using [local DNS] feature always get served with TTL=0
Wait…what?! So every query to local DNS records on my LAN are NEVER cached?! Further, NXDOMAIN entries are cached for a full hour?! This is a big DNS footgun! Every successful lookup is rewarded with a request to please check again the very next time you need to know this address. Every failed lookup is cursed to remember that failure for an hour. Yay?
In the end, I’m going to change my TTL of local DNS records to be 3600 like a sane person. And I’m going to be extra sure my DNS is synched to my backup server first!
May the next SysAdmin benefit from my failures ;)
Postscript
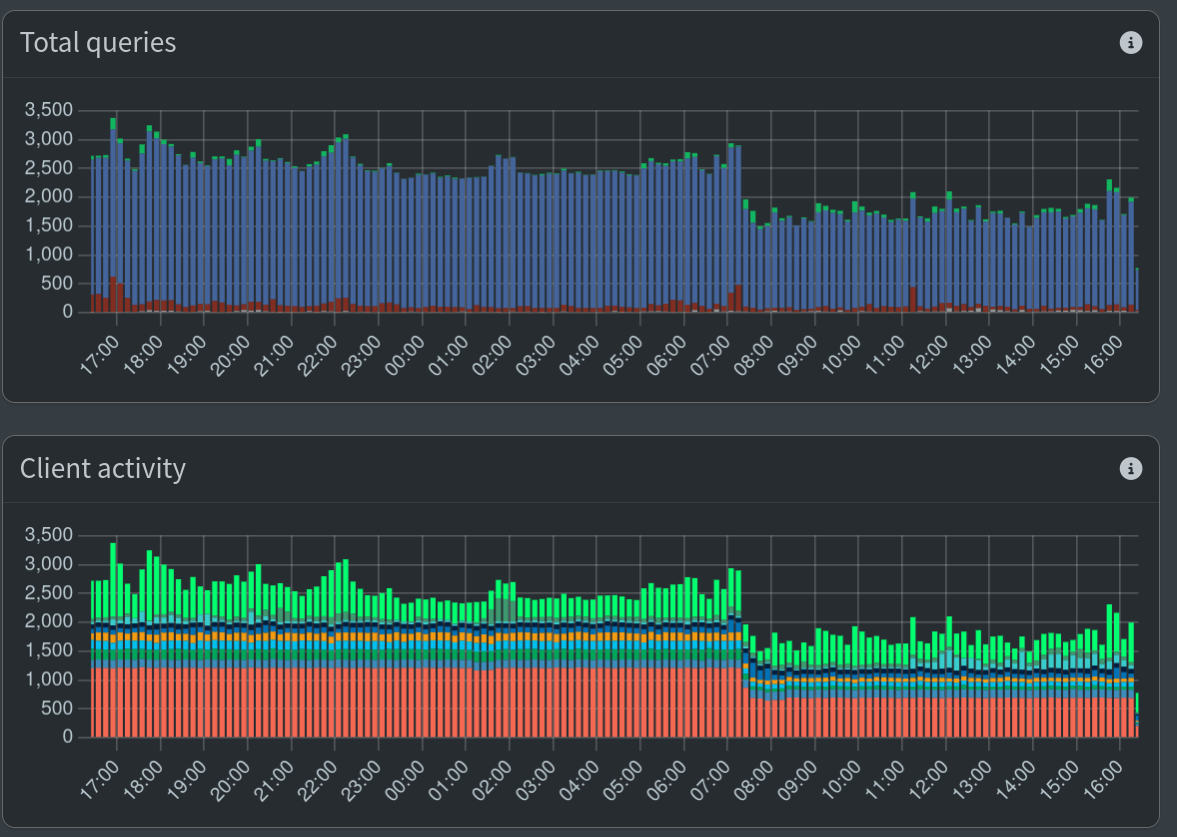
Some hours later I checked the Pi-Hole admin dashboard and was happy to see that the queries had gone down quite a bit (see graph at the top of the post). However, I’m still not 100% sure why it didn’t go down dramatically more. If every query is cached for 60 min where before it was never cached, I would have expected a bigger drop.
In the end queries take 5ms or less (see dig and the Query time result) and the load average on the server is really good (0.07, 0.13, 0.18) so it’s OK if I solve this problem another day!
* I’m also not sure why, at the end of the “Wait – was it DNS?” section why the tests didn’t fail immediately. If before the move, all DNS lookups were not cached and after the move the backup DNS server didn’t have the fileserver entry, it should have failed immediately. Input from my dear readers welcome!
A quick post to spread the love about the watchcommand – it’s amazing!
Prior to your knowledge of watch, maybe you wanted to run a command every 2 seconds, like say hello (credit to SO for this one):
$ while true
> do
>    echo "hello"
>    sleep 2
> done
But this is tedious and awkward. Maybe you collapse into the ol’ bash oneliner:
while true; do echo "hello";sleep 2;done
This is a small improvement, but A better way is with watch!
watch echo "hello"
So much nicer, right?! Watch runs any command you follow it with ever 2 seconds – boom!
But the real power comes when your checking the progress of something over time. Maybe you want to see when the login for a website comes backup with a 200 ? You’d of course reach for curl, but it’s a pain to run over and over. Again, watch makes short work of this:
But the real REAL REAL power, in my opinion, is when you want to do multiple things at a time. So instead of switching back and forth between terminals to do so, just chain them together with a bit of echo for spacing. This makes it trivial to watch the load average, get the last few lines of a debug log and tail a docker container all in one spot like so:
The beauty of this Is that I started quickly with just one command running in watch. Then I could iteratively add another one and anothe rone. The longer the job ran, the more I could add in, like the nice labels in echo and such. I’m SSHed in to a remote server and I’m tmux`ed up to my neck and in one of the panes, this watch job dutifully runs, keeping “watch” on all things (see what I did there?).
The fact that watch handles the refresh (configurable too!) and redraws the content in place without any flickering is just lovely! watch on!!
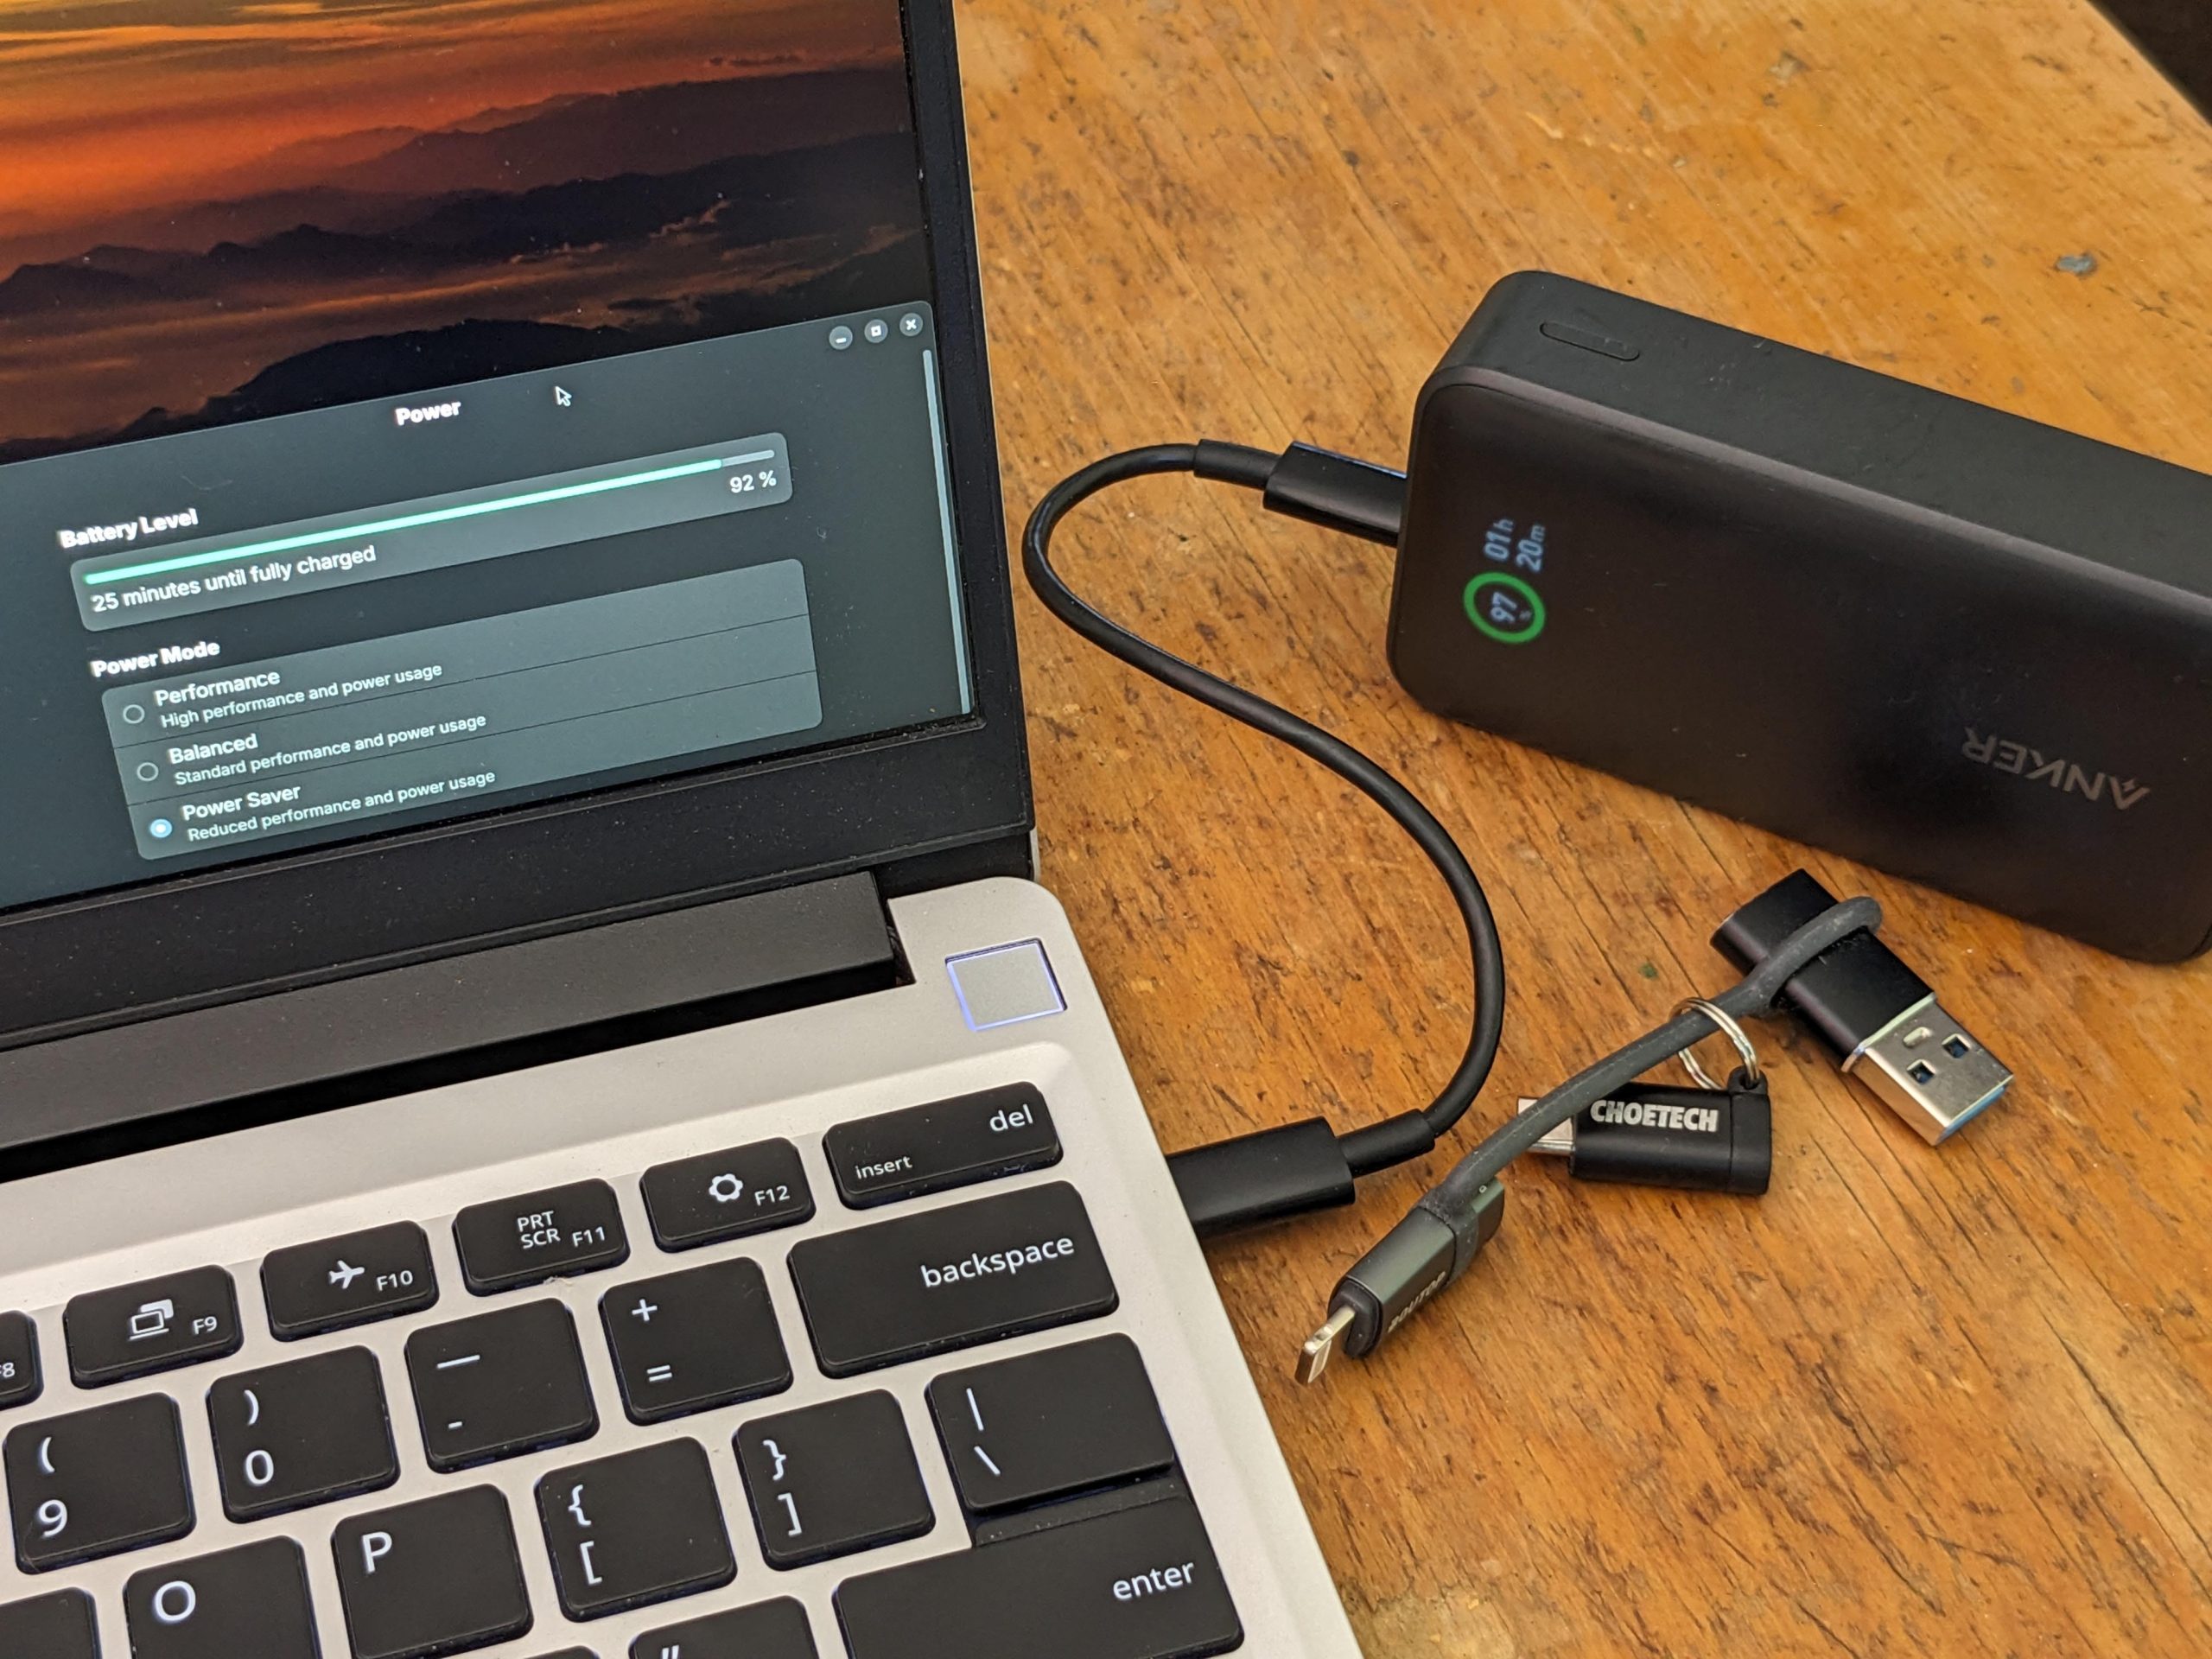
I have a Framework 13″ (Ryzen 5 7640U w/ 2.8K Matt screen) that has USB-C PD charging like most modern laptops. While it normally ships with a 60W USB-C charger, I’ve gotten away charging it with a teen tiny 45W charger – this is because Framework is totally awesome and went out of their way to support very low watt chargers. I love it!
To this end, I wanted an emergency teeny tiny battery that I could use on every device I own. Be it an old kindle with microUSB, my kids’ iPhone with lightening port or, yes, you guessed it, my whole laptop that, for what ever reason, I desperately need to charge or use for a bit more.
After doing some research, I found an open box deal for $20 on an Anker 30W battery. While I knew that Framework went out of it’s way to be compatible with less than perfect chargers, I was nonetheless quite pleased to see it all working. I kitted out my emergency charge kit with an 8″ USB-C <> USB-C cable, a USB-C <> lightening adapter, a USB-C<> microUSB adapter and a USB-C <> to USB-A adapter for good measure. I just keep it charged up in the bottom of my bag – so handy just in case!
Flameshot 14 was just released and should solve all issues and add a ton more features. I’ve been using a beta release for months and it’s been working great. As of Jun 22nd it has already hit many distros – so do your apt/yum/rpm update and get on it!
Read on below for the original post from Apr 2025
The tl;dr
Set a flatpak env variable and run a CLI call to grant permissions. Jump down to “the fix” at the bottom to see how or read on for a little backstory!
The quest
For a while now I’ve been really loving daily driving Bluefin on both my laptop and my desktop. However, one of my biggest complaints, coming from running Xorg, is that my very most favorite screenshot utility doesn’t work on the desktop: Flameshot. Easily installed via a flatpak, it either errors out prompting on permissions or looks like it’s gonna launch but doesn’t. Strangely, I found It Just Works™ on my laptop which led me to think it was multi-monitor issue as my desktop is three up affair ( | | — if you must know).
Every now and again I try the work-arounds and they never work. Then today I was doing some work which required arrows on screenshots, the absolute happiest of paths for Flameshot. I thought I’d fumble through with some of the work-arounds to see if any of them worked.
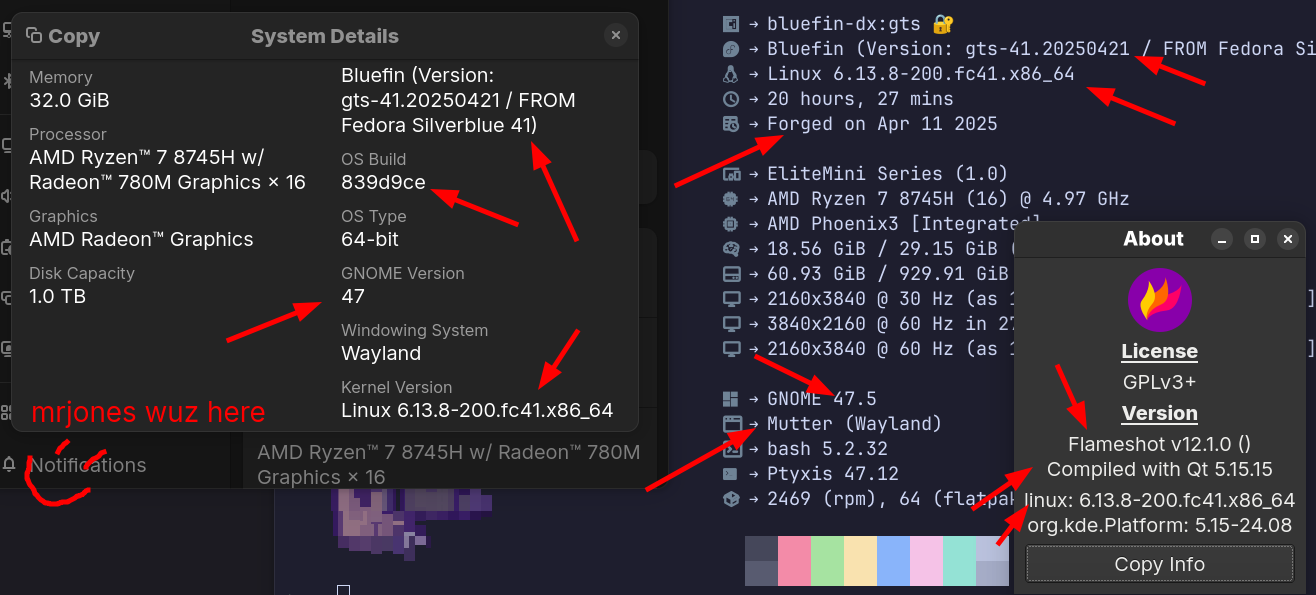
Surprise surprise, I made two changes and it works! I’ll keep this post updated, because some times things change and it breaks, but as of right now, it just works works. Here’s a screenshot with like a bazillion arrows (remember, it works!! happy path!!) with some relevant versions:
(for the SEO types, thats: Gnome 47, OS Build 839d9ce, Bluefin (Version: gts-41.20250421 / FROM Fedora Silverblue 41) and Bluefin (Version: gts-41.20250421 / FROM Fedora Silverblue 41), Flameshot v12.1.0 () Compiled with Qt 5.15.15)
For some time I’ve had all my home lab systems running on LXD. For me at least, LXD predated Docker and so I’ve stuck with it. The containers are a bit more pet like and less cattle like – but that’s OK. They’re there for me to learn with – plus I can totes do docker in LXD inception if I wanna! (I’ll figure my way over to Incus some other month)
So years and years ago I found out bout FreshRSS as a great way to self host an RSS reader. This meant I didn’t have to install any apps on my phone, my feeds could stay synced and since I already had a VPN setup, it was trivial to access while on the road. Lovin’ it! I’d set this up around late 2018.
Fast forward to yesterday, I flippantly upgraded FresshRSS to the latest, as I occasionally do, and the site started having a fatal error, as it often does after I upgrade ;) I pulled up the error logs on the FressRSS LXD container running Apache and MariaDB and immediately saw some sort of unexpected { character in function blah blah on line 1-oh-smang-thirty error. Huh, what’s that about?
Turns out in the latest dev release of FreshRSS, they’d formally removed support for PHP 7.x and required PHP >8.0. Specifically, this was because they’re using Union Types in their function declarations. This is cool stuff! you can see the int|string values in the sample function here:
// Declaring a function with Union Type
function getMixedValue(int|string $value): int|string {
   return $value;
}
This is no problem! I’ll just update PH….P…. oh yeah – I’m on hella old Ubuntu 18…so then I’ll just find some third party apt repo and add that and then…. Hrrmm…might be more trouble than it’s worth. That’s cool! I’ll just deploy a new Ubuntu container on 24.04. Oh, well, that’s gonna take a chunk of disk space – I’ve been using a bit of Alpine to build small Docker images at work, what about a pet Alpine in LXD? They have an image – why not!
Preparing the leave the old system
Before we sudo rm -rf / on the old box (er, container), let’s get our data outa there. We need to first make a dump of the database. We’re root so we can just zing right through any permissions with a one liner. Next up we can zip up our old files into one big ol’ honkin zip file. That looks like this:
mysqldump freshrss > ~/freshrss.sql
cd /var/www/localhost/htdocs/
zip -r ~/freshrss.zip .
Finally, we can generate an SSH key for this root user to easily copy to the new container – I knowingly didn’t add a password because I’m about to delete the container and we’re all friends here:
That’s it! You’re now sitting as root on the new instance. Let’s install the base packages including Apache, MariaDB, OpenSSH and PHP with all it’s libraries:
As final hurrah at the old server, now that our SSH key is on the new server, let’s copy over the zip archive and the SQL dump. Be sure to replace 192.168.68.217 with your real IP!
scp ~/freshrss.* 192.168.68.217:
Go SQL!
Now that we have our server with all the software installed and all the data copied over, we just need to pull together all the correct configs. First, let’s run setup for MariaDB and then harden it. Note that it’s called mysql… , but that’s just for backwards compatibility:
That last command will ask questions – default answers are all good! And the initial password is empty, so you can just hit return when prompted for the current password. Maybe check out passphraseme if you need a password generation tool? Let’s add the database, user and perms now. Be sure to not use password as your password though!
echo "CREATE USER 'freshrss'@'localhost' IDENTIFIED BY 'password';" | mysql
echo "GRANT ALL PRIVILEGES ON *.* TO 'freshrss'@'localhost' WITH GRANT OPTIO" | mysql
echo "GRANT ALL PRIVILEGES ON *.* TO 'freshrss'@'localhost' WITH GRANT OPTION;" | mysql
Now we can load up the SQL and move all the PHP files to their correct home. Again, we’re root so no SQL password, and again, this is actually MariaDB, not MySQL:
Now find the one line where DocumentRoot is set and change it to this value and add two more lines. One to allow encoded slashes and one to set the server name. Be sure to use the IP address or FQDN of the server – don’t use rss.plip.com!
DocumentRoot "/var/www/localhost/htdocs/p"
AllowEncodedSlashes On
ServerName rss.plip.com:80
Now that apache has been configured, let’s restart it so all the settings are loaded:
rc-service apache2 restart
Conclusion
The old FreshRSS install should now be running on your new Alpine based container – congrats! This has been a fun adventure to appreciate how Alpine works as compared to Ubuntu. This really came down to two main differences:
systemd vs OpenRC – Ubuntu has usedsystemd for sometime now and the primary interface to that is systemctl. Alpine on the other hand usesOpenRC which you interface with rc-update and rc-service. Alpine picked this up from when it split off from Gentoo.
apt vs apk – Package management is slightly different! I found this to be an inconsequential change.
There’s plenty of guides out there that do the same as this one. Heck, you’re likely better of just using a pre-built docker image (though the topresults were pinned to PHP7)! However, I wanted to document this for myself and hopefully I’ll save someone a bunch of little trips off to this wiki or that FAQ to understand how to migrate off of Ubuntu to Alpine.
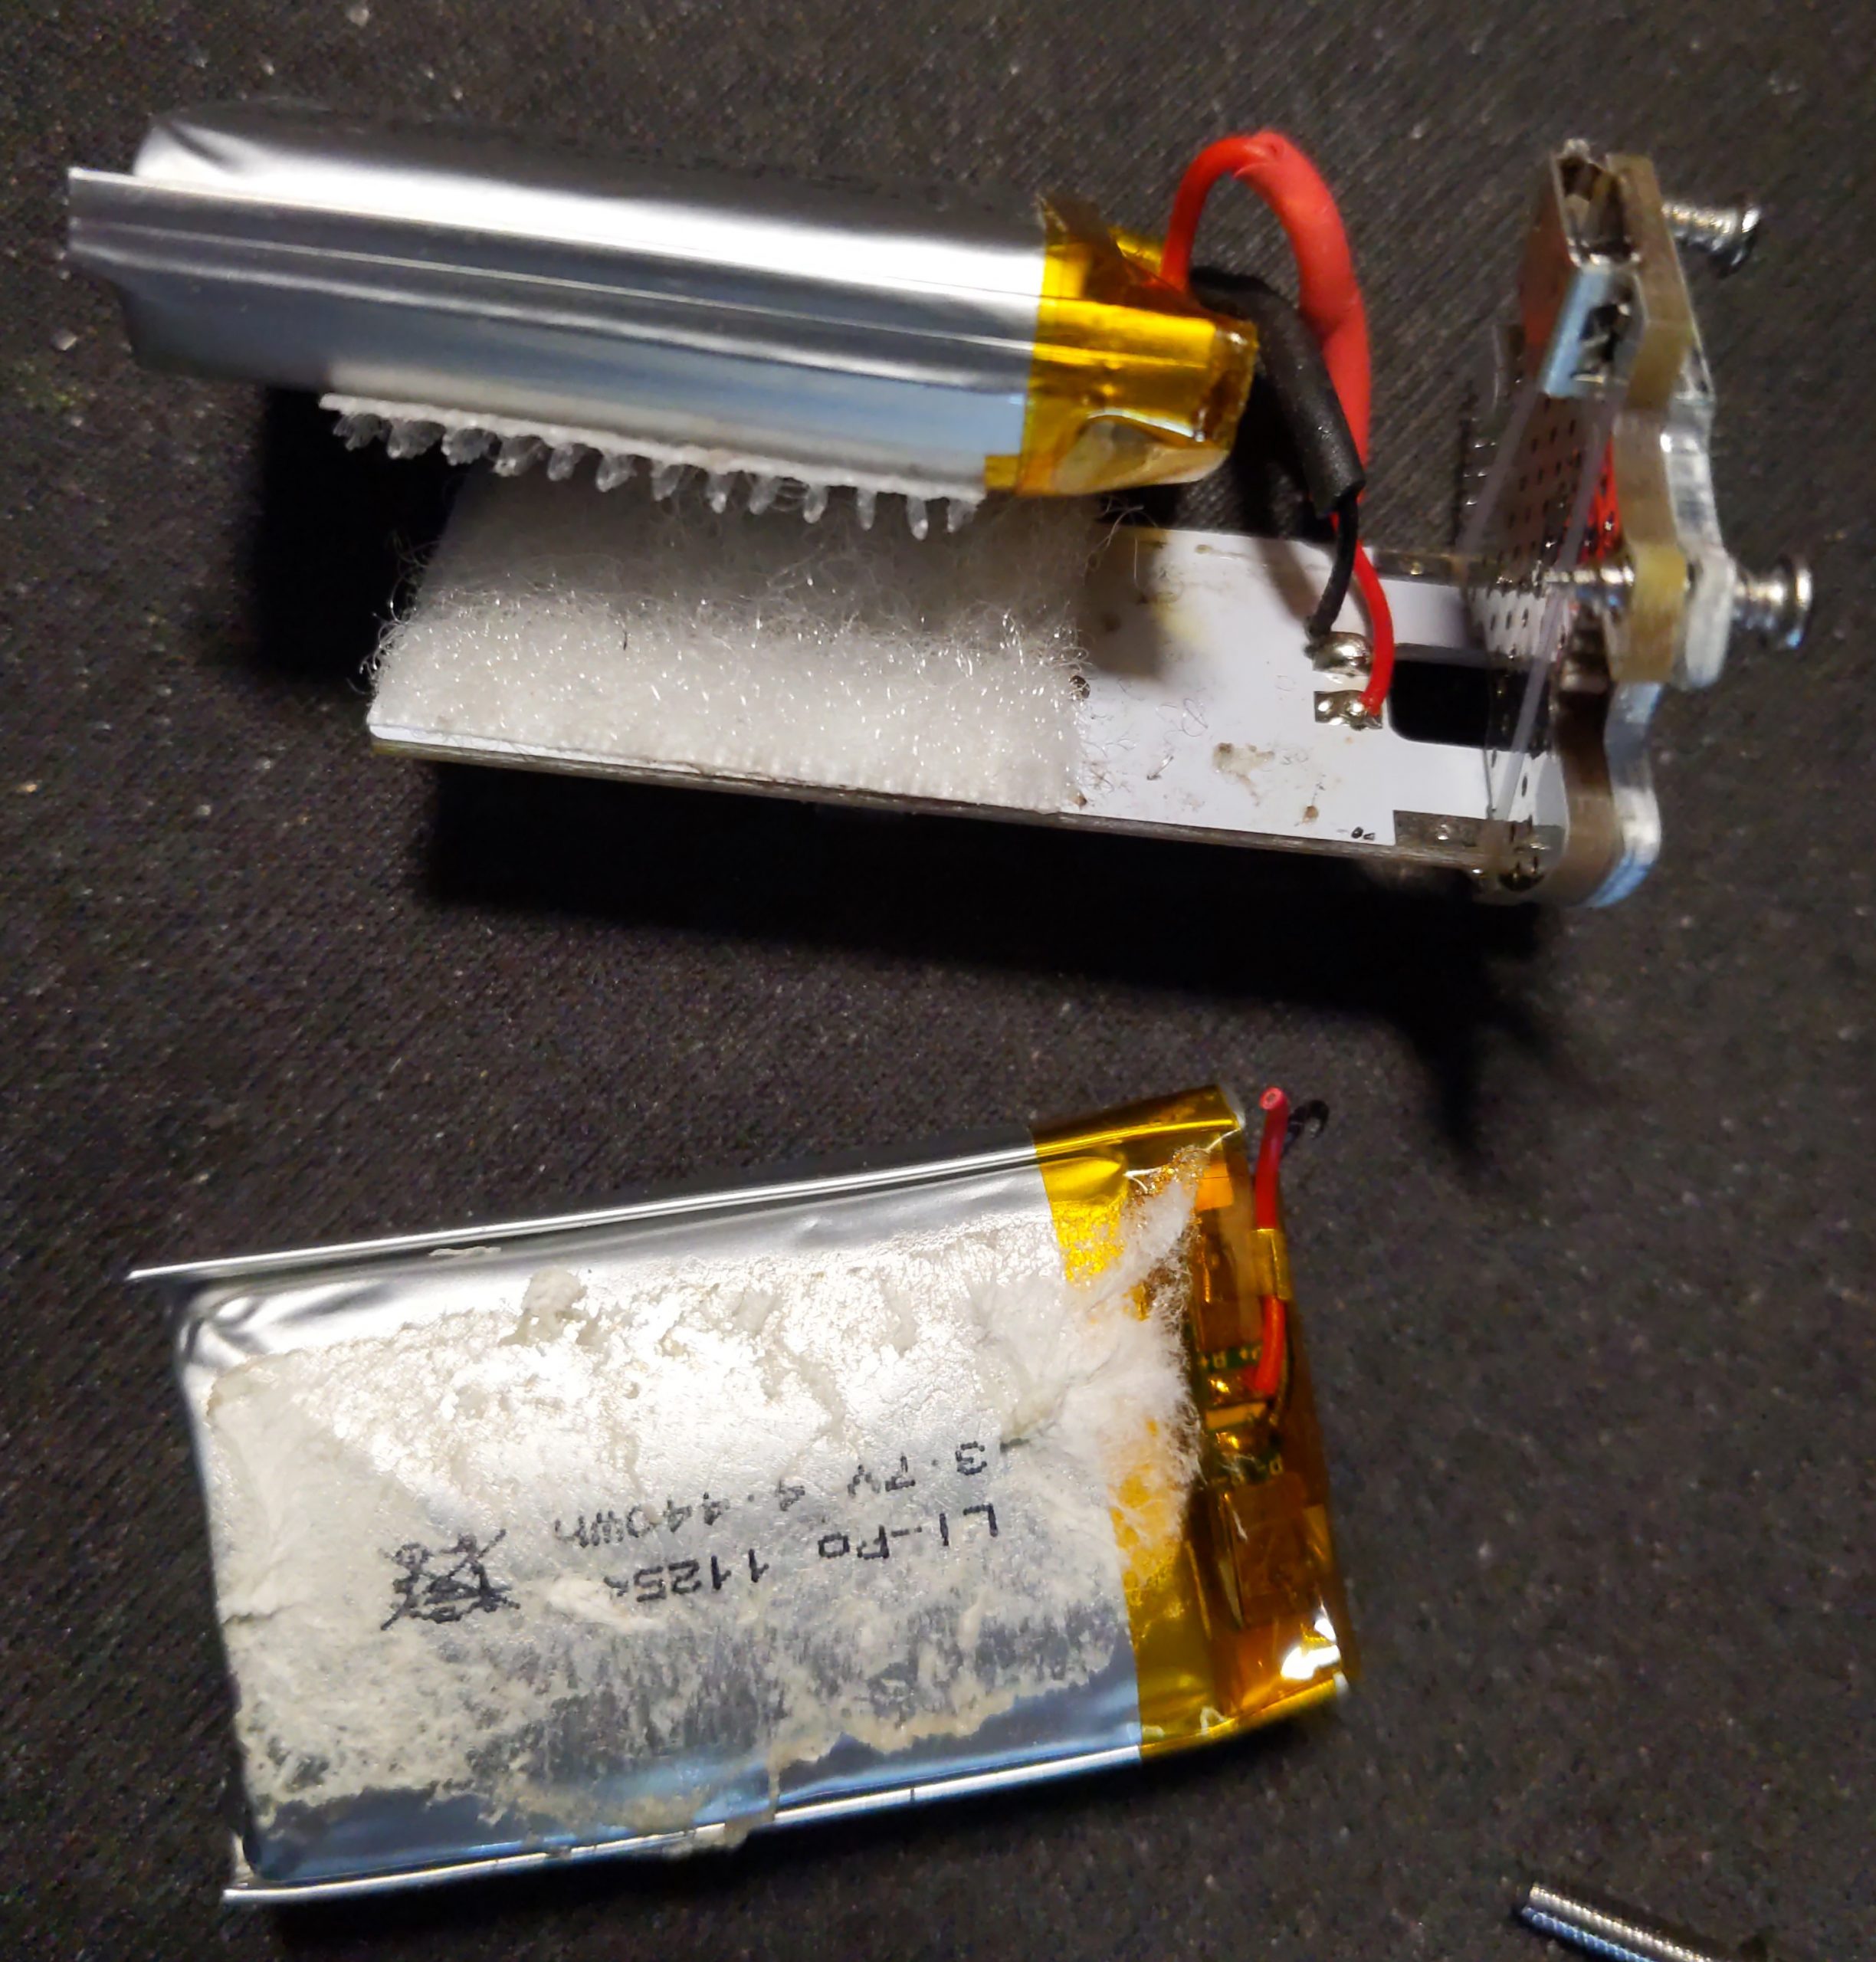
A while ago the battery on my NiteRider Swift 500 headlight stopped taking a charge. I looked at NiteRider’s FAQ page and saw no mention of the batteries being user serviceable. Further, when I searched online, I didn’t find any guides or replacement parts for the light. Time to grab a screwdriver and DIY!
I started by removing the strap mount – a single Phillips head on the bottom:
Then I removed the 4 allen screws around the base of the head:
The lens assembly should come off – be careful as the rubber battery cover will fall free now. Be sure to keep track of all the parts!
Remove the two Philips head screws at the top of the LED plate:
You should now be able to slide the LED plate out which is attached to the battery and the main circuit board. You’ll note the battery is both soldered on an aggressively affixed with double sided sticky tape. Peel the battery off, cut the two wires (one red, one black) half way between the battery and the circuit board. Rub the tape residue off enough so you can see the specs of the battery:
There’s no direct replacement part for this, but I found this “CaoDuRen Rechargeable 3.7V Li Lipo Lithium” on Amazon was close enough to work. Only $9 at the time – what a deal!
Cut the JST connector off of the new battery, cutting half way between the battery and connector. Solder the black to black and red to red wires, and seal up the solder connection. I used heat-shrink tubing and then affixed it with sticky Velcro:
Reassemble your light by following the steps above in reverse order. Careful when working with the light as it is quite bright and I had it accidentally turn on while assembling it – yikes!
Now enjoy your light and drop me a line if you have any other tips or succeed in replacing your battery!
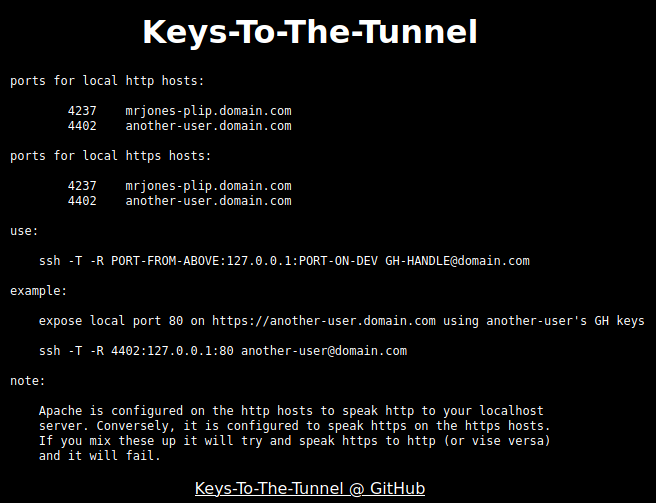
Hey hey! I’d been meaning to consolidate some of my VMs I’m paying for and semi-accidentally deleted the place where I was hosting my work’s instance of Keys-To-The-Tunnel (KTTT). With this VM deletion, I decided to leverage my recent dabblings with Caddy and do a big refactor of KTTT by replacing Apache with Caddy.
As a reminder, KTTT is an easy way for an organization which both develops web apps and uses GitHub to share their local dev app on the internet via a publicly accessible URL all protected with solid TLS and SSH encryption.
Let’s dive into what the update means and why I did it!
Parenthetical aside about TLS for local Android development
Originally I asked if potential KTTT users :
ever need to test an Android application against a web server such that you need a valid TLS certificate?
This is actually a bad idea if all you need is a valid TLS cert for Android testing. The reason is that you’ll literally be holding your phone in your hand which is less than a foot from the computer hosting your app you want to test against. By introducing KTTT into the mix, you send your traffic thousands of miles/kilometers (you pick which) and back just to get a TLS cert. Crazy times!
A much better approach is to use something like local-ip.co . If you want an easy way to keep your traffic entirely local, you can use nginx-local-ip with a one line docker compose call to set up everything you need to locally run a local-ip.co TLS. It’s a really sweet set up! (I’m biased because I help author some of it ;)
KTTT is still a great idea if you need to share your local dev environment though!
With that out of the way, back to KTTT updates…
What’s new with KTTT
For an end user of KTTT who just wants to share their app, it’s now WAY easier to figure out which SSH command to run and which URL to share. This is thanks to the handy web app which walks you through three easy questions:
For the administrators of KTTT, you’ll note that KTTT now uses Caddy instead of Apache. While there’s nothing wrong with Apache, Caddy is a simpler take on the needs of an app like KTTT that requires a bunch of small reverse proxies. Caddy is 7 years old and came to being in the world of Docker, containers and micro-services. Where as Apache is 27 years old and came being near the birth of world wide web.
Ironically, a key feature of Caddy, the ability to automatically provision and renew TLS certs, is NOT being used. Instead, the opportunity to use a wildcard TLS cert came up via acme-dns.io and I took it.
That all said, it’s a joy to use Caddy because I can create a simple JSON file with four lines to define a reverse proxy:
The web app above gives a pretty good idea of the improvements, but since I added a demo video of the whole KTTT experience on GitHub, may as well post it here in case you’re curious (44 second video):
Other odds and ends in 1.1.0
There’s also a bunch of other fixes and improvments I made while in there. Here’s the notes from the 1.1.0 release:
I’d been meaning to learn how to write an app using something more than CSV files, but less than MariaDB, to store files – I’m thinking SQLite of course! Then along came the desire to have a simple way to track when a computer was on a network as a proxy for kids’ daily screen time. After all, the network is the computer, right?
While there’s so very many ways to solve detecting if a computer is online (more on this later), I thought it’d be fun to write a simple app that could correlate multiple IPs to a single person, and then give a histogram of minutes per day per person. Given this is just a proxy for screen time, it’s fine if it doesn’t have alerting, password protection or even a way to prevent going over the allotted time per day. The goal will be for any interested parties to see how long a device has been on for the current day. It’s then up to the family to have a discussion about what it means to go over your daily allotment.
Ok, let’s do this! We have a requirement to track computers being online and to write and read the results to a SQLite DB. I’ve been groovin’ on learning Python, so let’s double down and use that. I did some Wikipedia exploring and read about Papa Legba, and thought it made a mighty fine sounding name. Finally, after some nudging from a friend, we’ll package it up in Docker so it’s easy to try out and host in an isolated container.
Ping FTW
The first step to using Legba, is to define a list of users and which IPs they’ll be on. Very likely the best way to do this is to either use static IPs on your LAN clients, or have your DHCP server set the same IPs per MAC every time.
Then you’ll create a conf.py file copied from the conf.example.py file and fill it out. Here we see Jon and Habib have one IP each, where as Mohamed has 2:
The code to track if a device is achieved via the subprocess module via a ping() function with just two lines that send a single ICMP packet:
# thanks https://stackoverflow.com/a/10402323
def ping(host):
    """ Ping a host on the network. Returns boolean """
    command = ["ping", "-c", "1", "-w1", host]
    return subprocess.run(args=command, stdout=subprocess.DEVNULL, stderr=subprocess.DEVNULL).returncode == 0
Back in the main() function, we then read in config, loop over each person and try and ping() each of their IPs. If we see them online, we write to the DB via record(). It ended up, just as I’d hoped, that Python’s SQLite libraries are robust and it’s just 6 lines to insert a row:
Just before the end of the loop we call probably the most complex function of the lot output_stats_html(). This function is responsible for reading the day’s active users, getting each users activity by hour, the total for the day and finally output static HTML as well as a static JSON file that will get called via AJAX so the stats will auto-refresh.
At the end of the loop we sleep for 60 seconds. In theory if you had hundreds (thousands?!) of IPs to track and they were on connections with >500ms latency, it would take way longer than 60 seconds. Legba will not scale to this level. It’s currently been comfortably tested with 5-10 devices on a LAN where each device has ~20ms of latency.
A histogram is worth a 1000 words
After you’ve done a bit of a git clone with a lil pip3 install and fleshed out your own config.py and done a little systemd love, you’ll have some sweet sweet histograms! (Some keen eyed readers may note this histogram looks familiar ;)
It’s interesting to note that mobile devices, as seen withe “Adnon Cell”, are effectively on all the time. In this sense, Legba is not much use to track a cell phone. Meanwhile, Bobby Table’s desktop, Adnon’s Laptop and Chang’s Nintendo Switch all work as expected (NB – I didn’t actually test with a Switch).
Existing Solutions
I’ve been running this for solution for just about 4 months now. It’s been a great way for our family to have an open discussion about what it means to spend too much time on the computer and it’s been rock solid. Checking ls and select count(*) from status; I see my DB is 23MB and has 487,069 rows.
Given the simplicity of this app, could this DB and rows be easily stored and retrieved elsewhere? When I wrote the app, I didn’t care – I just wanted to write it for the fun of writing it! However, I was listening to episode 171 of Late Night Linux and they mentioned how utilitarian Telegraf is. It struck me that, indeed, if you had a Telegraf, InfluxDB and Grafana (aka “the TIG stack”) already set up, it would be pretty trivial to capture these same stats. I would do this by setting up a centralized instance of Telegraf and either use the built in Ping plugin, or possibly the more extensible [[inputs.exec]] input type. With the latter, you could even re-use parts of Legba to pretty trivially input the data to InfluxDB. Then, it would be equally trivial, to slice up the ping counts per hour, per user and have a slick dashboard. Just food for thought!
Otherwise, I hope some else than me gives Legba a try!
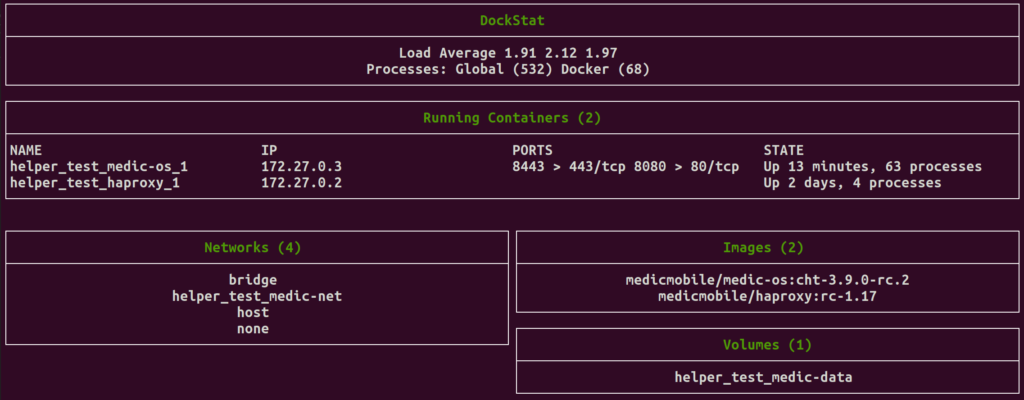
At work I’ve been doing a lot of Docker based projects. I ended up writing a neat little Bash utility which I then recently extended into what I’m calling DockStat. It shows running containers and their related resources. You could use it if you’re repeatedly upping, downing and destroying docker containers over and over like I was. Or maybe you just want a nice little dashboard to see what’s running on your server?
DockStat at work
However, if you have more than say a dozen active containers, this script might not scale nicely (oh, perhaps a monitor in portrait mode might fix this? ;)
Being the good little open source nerd that I am, this is of course available for download with a permissive license in the hopes that some one will find it useful or possibly even offer a PR with some improvements to my nascent Bash coding skills.
Background
With countless primers on how to use Docker out there, I won’t get into what the commands all mean, but the impetus for this script was repeatedly running docker ps to show a list of the active containers. A bit later I remembered you could run endless Bash loops with a one-liner which made the process a bit nicer as it auto-refreshed:
while true; do clear;date;docker ps;sleep 5; done
A bit after that I stumbled upon the glorious watch command! Wow – just when you think that that you know and OS, they come and show you that there’s this awesome command they’ve been hiding from you all these years. Thanks Linux!
watch greatly improved on my Bash one-liner as it was an even short one-liner, could trivially be configured to refresh at what ever frequency you wanted and show a header or not. The icing on the cake was that prevents the flash of a redraw upon refresh:
watch -t -n 1 docker ps
About now I got more cozy with the --format feature built into most Docker command line calls. This was handy because I could reduce the number of fields shown in docker ps that I wasn’t interested in. Here’s maybe the simplest of them which shows JUST the container name and if how long the it has been running:
docker ps --format='{{.Names}} {{.Status}}'
Research continued on how to architect the helper script. I had need to show different data than docker ps had to offer. I branched out into docker inspect as well as finding other Dockeristas one-liners that I shamelessly co-opted (I’d be honored if anyone did the same of my work!!). This allowed me to joined ps and inspect like as seen with this fave that shows all the running containers’ and their internal IPs:
I was ready to assemble all the docker Data dukets I’d gathered into a nice CLI dashboard so our app developers could see the status of our containers booting. Finding a solution for this enabled both the the helper script to spring forth and simultaneously created the nascent DockStat. This was a Bash utility that was both easy to use, automates flash-less refreshes and introduced basic terminal layout functionality with a near zero learning curve (assuming you know Bash): Bash Simple Curses
Thanks
Thanks to James and Russ for reviewing my code and an early draft of this post. I’ve been trying to improve both my posts and code and this won’t happen without folks kind donation of their time and input!


