6 minutes, 4 seconds
Like all of you parents lucky enough to still have a job during the COVID19 layoffs, I’ve been struggling to balance time at work, personal time, family time and being the family’s IT person. With school closed, and now all summer camps closed, our use of kids screen time (aka internet time) has gone up from 0.5hrs/day to 3hrs+/day. How do we ensure we have safe computing environment for them?
DoT by Design
Originally, we had a MacOS workstation for the kids with parental controls enabled. This allowed us to do things like set up a 30 min per day limit, create separate accounts for each kid, limit which apps they could use and, most importantly, limit which URLs they could use (deny all, allow some). When coupled with my love of LXD/Pi-Hole/Quad9, that looked like this:

In this scenario the kid’s single shared workstation would get an IP lease from the DHCP server running on the pfSense router. This lease would specify the house wide Pi-Hole which sent all it’s DNS clear text queries to Stubby which in turn sent them encrypted to Quad9 via DNS over TLS (DoT). This is really nice as not only do we do get LAN wide ad blocking, but we get LAN wide encrypted DNS too. Score!
The kids workstation gets no special treatment on the network and is a peer of every other DNS lease on the LAN. However, with them needing to do school work and have fun and learn over the summer, they’ve since each gotten their own workstations. Now we have three workstations! This is starting to be a hassle to maintain the lock down on which sites they can browse. As a result, we just told them “be good” and let them use their new workstations with out any filters. This is sub-optimal!
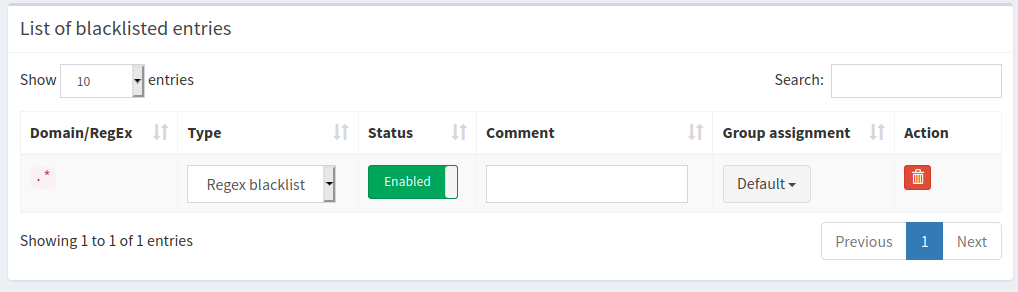
.* Blacklist
How can we improve this situation to make it more tenable and more secure? By adding more instances of Pi-Hole, of course! It’s trivial to add a new instance of Pi-Hole with LXD. Just add a new container lxc launch ubuntu: pi-hole2 and then install Pi-Hole on the new container with curl -sSL https://install.pi-hole.net | bash . It’s two one liners that take all of 5 minutes.
For those of you like me that want an easy way to export their existing whitelist from MacOS’s parental controls, check out the “Directory Service command line utility” aka dscl. With this command you can create a file with all the URLs you’ve whitelisted. You can then easily import them into your new Pi-Hole instance (be sure to swap out USERNAME for your user):
dscl . -mcxexport /Users/USERNAME com.apple.familycontrols.contentfilter|grep http|cut -d'>' -f2|cut -d'<' -f 1|sort|uniq
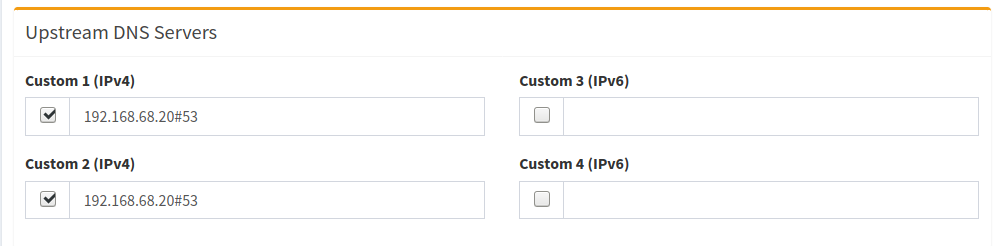
Back to the new Pi-Hole instance, if we set the upstream DNS server to be the initial Pi-Hole, this means the kids DNS gets all the benefits of the existing encrypted infrastructure, but can add their own layer of blocking. Here I configure their Pi-Hole to just use the existing Pi-Hole as the resolver:
Specifically, if you add .* as a blacklist, EVERY site on the internet will fail to resolve. Then you can incrementally add sites you want resolve to your whitelist:
Once we hard code each of the three workstations to use the new Kids DNS, we’re good to go! And, this indeed works, but the savvy technologist will see the time suck of a flaw in my plan: If you whitelist example.com, there’s 5 or more sites you need to whitelist as well in order for example.com to work. This is because 99% of all sites use 3rd party javascript via content delivery networks (CDNs), have integrations with social media and of course often use the ever present Google Analytics. It gets even more tricky because if you want to keep your kid from searching on Google, you can’t think, “Oh, I’ll just whitelist *.google.com and then all it’ll save a bunch of time!”. Along with that will come Gmail and who knows what ever else. I knew this issue would be there going in, so I wasn’t afraid to take the time to get it to work. But caveat emptor!
Teaching Kids to be Smart
Speaking of caveats of a plan – all parents should know that this plan is VERY easy to bypass once your kids starts to figure out how the internet and their specific devices work. I’ve literally told my kids what I’m doing (stopping just about every site from working) why I’m doing it (the internet can be a horrible place) and that they can likely figure a way around it (see Troy Hunt’s tweet – as well as his larger write up on parenting online).
Like Troy Hunt, I’ll be super proud when they figure a way around it – and that day will come! But I do want to prevent them from randomly clicking a link and ending up somewhere we don’t want them to be. They can then ask us parents about why they can’t access a site or when it might allowed.
Being honest with your kids about what you’re doing is the way for them to be aware that this is for their benefit. The end goal is not to lock the entire internet away forever, it’s actually the opposite. The end goal is to prepare them to be trusted with unfettered access to the internet. This will happen soon enough whether we parents want it or not!
Banning 8.8.8.8 et al.
While I was in there tuning up the DNS, I remembered that some clients on my network (I’m looking at you Roku!) weren’t listening to the DHCP rules about using my preferred, encrypted DNS and going direct to Google’s DNS (8.8.8.8) or others I didn’t like. After a little research I found I could redirect all outbound TCP and UDP DNS traffic so that all devices use my Pi-Hole/Stubby/Quad9 DNS* whether they thought they were or not. For others running pfSense and want to do this, see the steps to “Blocking DNS Queries to External Resolvers” and then “Redirecting all DNS Requests to pfSense” (both thanks to this Reddit thread).
* We shall not speak of how devices will soon speak DNS over HTTPs (DoH), thus ruining this idea.
What about product X?
Some of you may be thinking, “this seems like a lot of work, why don’t you just implement an existing off the shelf solution?” Good question! For one, I like to DIY so I control my data and what’s done with it instead of letting a 3rd party control it. As well, while there’s home based solutions, I prefer open source solutions. To put my money where my mouth is, I’ve just donated for the 2nd (3rd?) time to Pi-Hole. I encourage you to do the same!
To be clear though, this set up is a pretty crude tool to achieve the end result. It looks like there’s some quite polished solutions out there if you’re OK with closed source, cloud hosted solutions. As well, there’s of course other variations on the “Use Pi-Hole For Parental Controls“.
Wrapping Up
Now that we have all in this in place, we can trivially support N clients which we want to force to use the kids more lock down DNS set up. This looks like exactly like it did before, but we have an extra container in the LXD server (and, some what orthogonally, a fancier pfSense DNS blocking setup):

I suspect this set up won’t last for more than a year or two. As more and more sites get added to the white list, it will be harder and harder to maintain. Maybe after that I’ll give each kid their own Pi-Hole instance to run on an actual Raspberry Pi and let them do with it as they please ;)
(Of course just after I deployed this, Pi-Hole 5.0 came out which offer the concept of groups, so you can likely do this idea above in a single instance instead of multiple. A bummer for me now, but a win for all other Pi-Hole users, including my future use!)