Monthly Archives: January 2015

All HTTPS all the time, With HSTS to boot

1 minute, 54 seconds

I’ve been brushing up on my web security best practices recently.  OWASP is a great resource for this!  One of their recommended best practices is to use HTTP Strict Transport Security (HSTS).  This involves redirecting traffic from unencrypted HTTP to HTTPS.  However to ensure that no future Man in the Middle attacks happen with the redirect, it’s best to tell the browser to always go directly to HTTPS regardless of the protocol.  This, in a nutshell is the HSTS solution.

I’ve updated plip.com and blog.plip.com to be served over exclusively over HTTPS.  This is thanks to a *.plip.com wildcard certificate from Global Sign. After setting up Apache to use the certs on the SSL vhosts, I then needed to redirect all traffic away from HTTP.  For plip.com, this was a simple Apache rule in the HTTP vhost:

# send everything to HTTPS
RewriteCond %{HTTPS} off
RewriteRule (.*) https://%{HTTP_HOST}%{REQUEST_URI}

And then for the blog.plip.com, iThemes had this codex entry about a simple plugin to rewrite HTTP to HTTPS, following the second option on their page.  They do caution that this plugin might have performance drawbacks as you’re parsing every post on the fly.  You can fix this if you’re running a caching system, like W3 Total Cache, which I am! W3TC recommends you fix slow HTTPS calls by enabling caching of HTTPS: Go to Performance -> Page Cache and check “Cache SSL (https) requests.” Easy peasy!

Now to add the HSTS to the HTTP header.  For plip.com this is easy as I have a single PHP header file for the entire site. I just added this line:

header('Strict-Transport-Security: max-age=31536000');

For the blog, I extended the simple iThemes plugin by adding these lines:

add_action( 'send_headers', 'add_header_hsts');
function add_header_hsts(){
        header('Strict-Transport-Security: max-age=31536000');
}

Special thanks to the WordPress Codex on how to set headers as well as a random post over at Hakre on WordPress on how to format the HTTP header in PHP for HSTS.

Plip.com has absolutely zero affect on the big players, and the EFF would never care about giving me a report, but I’m scoring 4 out of 5 on EFFs encrypt the web report:

  1. Plip doesn’t have a data center, but all connections for administration are encrypted.
  2. Plip now, of course, supports HTTPS
  3. Plip now supports HSTS
  4. Plip does not support Forward Secrecy
  5. As Plip uses Google Apps, it supports STARTTLS

Looking at what it takes to set up my ciphers, I’m still gonna shoot for getting a perfect 5 of 5!
On The Register’s security posts

3 minutes, 12 seconds

Intro: 2 posts, 1 bored security tinkerer

I was stuck on a cross-country plane trip recently, and I started reading up on some security posts.  I found two interesting ones, both of which happened to be written by Darren Pauli:

As a best practice, from way back in my journalism undergrad days, I try to always go to the source of news articles I read.  So, for both of these posts I dug in and tried to see the facts and chronology as the articles reported them vs what the actual sources said. Let’s dig in and see what we find!

Article 1: How unresponsive and culpable was CyanogenMod?

The first article  was published by The Register on 13 October 2014 and claimed that 10 million phones were vulnerable to a Man in the Middle (MitM) attack and it was a zero day exploit.

On October 14th CyanogenMod (CM) responded, ‘In Response to The Register “MITM” Article.

Then McAfee jumped on the bandwagon of an exploit possibly affecting a lot of Android users. On October 17th the McAfee blog published a piece on this vulnerability as well saying, “it appears easily fixable once it’s actually acknowledged and addressed by the CyanogenMod team.”

The issues I see with the scenario painted in these articles are threefold:

  1. The initial piece by Pauli states that the source of the attack is open source code in a 2 year old vulnerability. How can this be both a zero day exploit AND a 2 year old vulnerability?  Unsurprisingly, CM’s response cites this point as well.
  2. A whole 3 days had passed when McAfee posted their blog piece stating that CM hadn’t responded when, in fact, they had.  CM’s response was published 24 hours after the original Register article.
  3. The issue purportedly affected “10 million users” already sounds good, so there was no need to erroneously report that it affected “12 million” as the McAfee piece did.

Article 2: Was TOR really vulnerable?

In the second post, Pauli’s title starts off with, “STAY AWAY” and the subtitle “USB plugged into Atlas, Global servers.” He goes on to pull a quote from the tor-talk mailing list, citing Thomas White saying, “the chassis of the servers was opened and an unknown USB device was plugged in.”

More so than the first article, there’s a number of issues with this piece. Some are minor, but some are egregious:

  1. The only link to the thread about the incident on the tor-talk link is wrong.  He cited a thread about hidden services instead of the one on possibly illicitly inserted USB devices.
  2. The subtitle “USB plugged into Atlas, Global servers” references White’s instances of Atlas and Globe as if they were the one and only ones, when in fact they’re not. The Tor Project instead links directly to atlas.torproject.org, from their homepage no less.
  3. By the time the story was published, the issue had been fixed and Tor users at large didn’t even notice:
    1. Dec 21 20:17 UTC  – Initial post to the tor-talk list is made by White
    2. Dec 21 20:55 UTC  – White posts the fingerprint of all the servers he felt could have been compromised.
    3. Dec 21 21:05 UTC – Jacob Appelbaum rejects the possibly compromised nodes so that general public Tor users won’t unknowingly use them.
    4. Dec 21 23:54 UTC – White gives an extensive update.
    5. Dec 22 05:58 UTC – Pauli writes his piece for The Register.
  4. The title of the article, “STAY AWAY” goes against a explicit request from White in his 23:54 update, “Tor isn’t broken. Stop panicking.” White’s request was penned before Pauli even published his article.

Clicks clicks clicks

I feel like The Register’s articles, and the related McAfee piece, though having quite a bit of truth to them, take advantage of the facts.  The Tor piece borders on fearmongering.  Put it all together and I think that tech writers and bloggers can easily shoot out a piece that gets the clicks.  To make matters worse, both Register pieces haven’t been updated to reflect not-so-recent updates:  issues cited aren’t of concern by the developers and maintainers of CyanogenMod and Tor respectively.

Given I’m new to critiquing news pieces, I reached out to Pauli for comment. He didn’t get back to me. If he does, and it turns out I’ve gotten any of the facts wrong, I’ll be sure to post an update!

Tip: Better Amazon URLs

0 minutes, 52 seconds

Have you ever had a friend send you an Amazon link that was all kinds of long and ugly? Maybe it looked like this:

http://www.amazon.com/Princess-Tiana-Balloon-Bouquet-Balloons/dp/B00BIIAUY4/ref=sr_1_1/187-3169712-6163024?s=toys-and-games&ie=UTF8&qid=1421967348&sr=1-1

Thought you can clearly see it’s for some sort of balloons by the “Princess-Tiana-Balloon-Bouquet-Balloons” part, there’s a bunch of referrer tracking junk in there after that.  It’s very ugly.  As well, maybe you have 3 or 4 balloons you’re thinking of getting and want to send them to a friend with the price and if it’s Amazon Prime or not.  Enter the tip!

You only need 3 parts to the URL for it to work:

  1. Domain: http://amazon.com
  2. Vanity Name: Princess-Tiana-Balloon-Bouquet-Balloons
  3. Product ID: /dp/B00BIIAUY4

The three takeaways are that you A) don’t need all the junk at the end, B) the domain can drop the “www” and, most importantly, C) can put what ever you want in the vanity section. In our case, we could make that ugly ol’ URL all purty and helpful and it still works just fine:

http://amazon.com/11buck.no-prime.tianna.balloon/dp/B00BIIAUY4

On ClouldFlare’s use of reCAPTCHA

1 minute, 13 seconds

I’ve been using Tor quite a bit of late.  It’s awesome!!  I encourage you to check it out today. One of the drawbacks to using Tor is that some content deliver networks (CDNs) block traffic from the Tor network by default. For example, the way CloudFlare blocks Tor is to present a captcha for Tor visitors. The Tor blog had an interesting write up of this back in August of 2014.

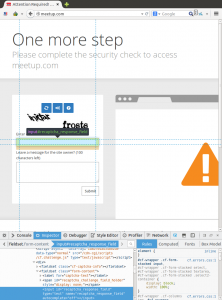
Inspecting the HTML of a CloudFlare reCAPTCHA on meetup.com

Inspecting the HTML of a CloudFlare reCAPTCHA on meetup.com

Being a web developer, I’ve implemented many captchas and, specifically, reCAPTCHA which CloudFlare uses.  Google has recently come out with v2.0 of reCAPTCHA which looks freakin awesome. That said, I think the “no captcha” term in that blog post isn’t quite accurate as you do have to click to prove you’re human in their v2.0 GUI.

Today’s post, which falls clearly into the “rambling” category, is about CloudFlare’s implementation of reCAPTCHA.  They’re using an early version, v1.0, on their site.  If you look at the customizing reCAPTCHA guide for v1.0 it clearly spells out the changes you can make on how it looks:

You must state that you are using reCAPTCHA near the CAPTCHA widget.

Though CloudFlare has the question mark icon which links to reCAPTCHA, I don’t think it follows the proper branding guides.

To wrap up this ramble, I posit:

  • CloudFlare should heed Tor’s advice on handling Tor traffic
  • CloudFlare should properly attribute reCAPTCHA

PS – the astute, Tor using reader may note that I’m using an outdated version of the Tor Browser in the above screenshot.  This has since been rectified ;)

Root on Verizon Galaxy S5 on NK2 Firmware

4 minutes, 19 seconds

Galaxy-S5After my S3 took a quick, but not quick enough, drink in the kitchen sink, I upgraded to an S5. It’s a really great phone. However, I had been running Cyanogenmod 11 on my S3 and I missed all the perks of root access. I’ve rooted my S5, and it’s awesome. Here’s a write-up for those who want to know how to do it. In my guide below, I take a bit more time than some of the threads in XDA to describe each step, which will hopefully make it a bit more beginner friendly.

Rooting is always a bit of a risk and ***YOU SHOULD NOT DO IT UNLESS YOU ACCEPT THE RISK OF TURNING YOUR PHONE INTO A PAPERWEIGHT***. Also, though, you already have a good backup system, (right!?), ***BE SURE YOU HAVE A BACKUP OF YOUR DATA ON YOUR PHONE***. With those warnings out of the way, root was a snap following bdorr1105‘s excellent write-up on xda developers. On top of it all, I had zero data loss as the root process doesn’t require you to reset android, which was super handy.

Preparation:

  • Have a windows machine and install Odin on it.
  • Double check you’re on NK2 baseband: Settings -> About Phone -> Baseband version -> last 3 characters are “NK2”.
  • Install latest Samsung USB drivers on your windows machine
  • Download both G900V_NCG_Stock_Kernel.tar.md5 and NK2_Firmware_Only.zip to your windows machine. Extract the NK2 zip file so it’s an md5 file (extracts to NK2_Firmware.tar.md5).
  • Have a micro USB cable
  • Allow unknown sources on your phone: Settings -> Security -> Unknown sources – checked
  • Read through all these steps and prep items. Ask questions *BEFORE* you start if you’re confused.
  • If you’ve never used Odin, maybe check out this youtube video to see how it works. There’s a 1080p option, and you can really see exactly which buttons to click and what Odin looks like in action. Note: the steps in this video differ from mine and you shouldn’t follow the video’s steps; follow mine instead. The video is for NI2 not NK2.
  • Be patient. Don’t get frustrated!

At a high level, we’re going to be doing 4 things which I’ll label below broken into 12 steps:

  1. Prep root kit: Installing a the towelroot root kit. Steps 1 and 2 below.
  2. Revert: Reverting back to the old NCG kernel/baseband which is vulnerable to a root kit. Steps 3 through 7 below.
  3. Root: Rooting the phone. Step 8 – just one easy step!
  4. Update: Updating back to the current NK2 kernel/baseband. Steps 9 through 12 below.
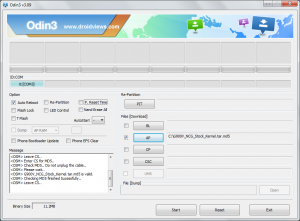
Odin v3.09 configured to install Ni2 firmware.

Odin ready to install NI2. Click to see larger version.

Now, the steps, again from the great guide that bdorr1105 wrote:

  1. Prep root kit A: Install Towel root to your phone. To download the APK, open Chrome and go to towelroot.com. Hold down on the big red lambda icon and choose “Save Link.” When you click the link in Chrome it creates an infinite redirect. If you click it in Firefox, it loads the text of the APK in the browser instead of saving the file :(.
  2. Prep root kit B: After the download, click the APK and install it. Also, add a shortcut of the towelroot APK to your phone’s home screen so that it’s easy to launch (more on this later).
  3. Revert A: Put your phone in Odin mode: hold down power button and then choose “Restart.” When the phone turns off, hold down power button, home button(button on front) and down volume at the same time. When prompted, choose to continue by pressing up volume.
  4. Revert B: Connect your phone to your laptop with the micro USB cable and launch Odin. If this is the first time you’ve connected your phone in Odin mode it might take a few minutes to find all the drivers. Possibly even longer. Be patient!
  5. Revert C: Once your phone shows up in Odin in the upper left in the ID:COM section (see screenshot), click the “AP” button and navigate to where you download the “G900V_NCG_Stock_Kernel.tar.md5” file. Click “Start.” Your phone will show a progress bar on the screen, and then it will reboot. Once Odin app says, “PASS” in green, unplug your phone.
  6. Revert D: Your phone will reboot and update the apps. This will take a few minutes.
  7. Revert E: Once it’s done updating, your phone will be slow. A ton of apps will force close. This is expected. Click “OK” or “Close” to any dialogues that pop up.
  8. Root: Click on the towelroot icon we made on the desktop. Click “make it ra1n” and wait. Towelroot will confirm you have root.
  9. Update A: Restart your phone and hold down the down + power + home buttons. Press up to get into Odin mode again
  10. Update B: Plug your phone in to the USB cable again. In the Odin app on your computer, press “AP” button and select “NK2_Firmware.tar.md5”. Click “Start.” Your phone will show a progress bar on the screen, and then it will reboot. Once Odin app says, “PASS” in green unplug your phone.
  11. Update C: Your phone will reboot and update the apps for a second time. This will take a few minutes, same as before.
  12. Update D: Go to the Play Store on your phone and install “SuperSU.” Open and choose to install SU. When prompted, choose “Normal” mode instead of “TWRP.” When prompted, disable Knox and reboot.

You’re done, congrats! You can install “Root Checker Basic” if you want to have warm fuzzies of seeing you have root. To clean up, go back into settings and uncheck “allow unknown sources” as well as uninstall towelroot. Google will flag this as an unsafe app and ask you to uninstall it anyway.

Shibby Tomato firmware on Asus RT-N66U router via OS X plus tcpdump

2 minutes, 6 seconds

asus.routerI’ve been trying to get close to what I call “end to end open source” (you know, as opposed to encryption) which means that everything from my desktop OS to my router to my firewall should be running non-proprietary software. Though I’ll probably keep  OS X on my MacBook Air,  I already have the notes for another post on running Ubuntu on my 27″ iMac.

The first stop on my EtEOS quest was my router.  I’ve happily been running a Netgear AC1750 for some time. It runs the stock firmware. I did try the Asus RT-N66U a bit ago, but had WiFi connectivity problems that I couldn’t resolve.

A while ago I ran DD-WRT and was happy with it, so I went looking for what was the new open source hotness to run on your router. After some DuckDuckGoing, I found Tomato by Shibby. This looked great! Prior open source firmware for the Asus didn’t have full (or any?) support for the 5 GHz radio, but this guy looked to be the whole enchilada. A post over on Nelson’s Log gave me some tips about getting it to work. Take note of his warning that 5 GHz doesn’t work until a second reboot.

However, the install instructions required installing Asus Software on a Windows box. That’s silly. Chris Hardie had a post about how to do this with a Mac (or a Linux box). It worked great.

After getting the router flashed with Shibby and doing a second reboot to get 5 GHz working, I set about kicking the tires on my new rig. After enabling it, SSH didn’t seem to work, and that’s because you need to log in with user of “root” instead of “admin.” Thanks to a post on tomatousb.org forums for that tidbit. Now that I had shell on my router, which tires should i kick? How about tcpdump? I’ve always wanted to be able to see what the apps on my phone were up to. This isn’t easy unless you capture the packets on the phone, which requires root. The other way is to capture the packets on the last hop out of your network, aka your newly rooted, shibby shimmyin’ RT-N66U.

Though it’s a bit dated, Martin Denizet’s post was great for a getting a local binary of tcpdump on my router. It was a bit shady loading an arbitrary binary onto my router, I’ll admit. Then I did some light reading on how to capture full packets compliments of a post by Noah Davis. After running tcpdump targeting the IP of my phone, I scp-ed the resulting file to my desktop and opened it up in Wireshark. Awesome! There’s all my little apps phoning home (oh, pun not intended, really) and POSTing and GETing all in the clear for me to research.

Importing and Trouble Shooting WordPress Imports

4 minutes, 3 seconds

I’ve recently achieved the life long dream of having one single WordPress instance for all my blogs and blogs I host. No more days of upgrading 15 different instances, but the forgetting that one rarely used instance and having that one instance get hacked. No more uploading the best new plugin to every which directory on the server. One install to rule them all!

However, as part of this, it meant exporting and importing a lot of content. I got pretty good at this as well as figuring out a lot of tricks along the way. Here’s some of my knowledge I gleaned that might help you if you’re faced with the same task!

Backups – Before starting down the path of any major code or data transfer, you should be sure you have backups of all your data. But, this isn’t a big deal for you, right? Right! That’s because you already back up all your blogs both on site and off. If you need help, check out WordPress Backups in the codex. Don’t forget, your backups are only as good as your restores. Be sure you test your backups to make sure they’re good!

Easy testing – Let’s say you have your WordPress network install for your fancy pants website at: http://wp.fancypants.com.  This means that, by default, to create a new site called “eatatjoes” you’ll need to:

  • Create the new “Eat At Joes” WordPress instance in the network admin site
  • Add a new ServerAlias in your apache vhost:
    ServerAlias eatatjoes.wp.fancypants.com
  • Add a new DNS entry:
    eatatjoes.wp.fancypants.com. 60 IN CNAME wp.fancypants.com.
  • And finally, don’t forget to restart apache:
    apachectl graceful

That’s a whole lot of work just for an instance that you’ll likely move to eatatjoes.com and do all the steps above again.  Instead, what I did was:

  • Create a wildcard DNS entry for *.wp.fancypants.com.  For me this was easy to do in Namecheap, my registrar and DNS host.
  • Create a wildcard server alias in your apache vhost:
    ServerAlias *.wp.fancypants.com
  • And finally, again, don’t forget to restart apache:
    apachectl graceful

Now, any time you create a instance, say irockaroundtheclock, in the network admin <BAM!> it will just work at irockaroundtheclock.wp.fancypants.com.  No editing of apache files, no updating DNS and no forgetting to bounce apache.  When testing instances and needing to delete failed import attempts to start from scratch with a different sub-domain, this made things very easy. This does assume you’re using name based hosting.

Good Prep – I’ve found that this is the checklist for successfully importing of a blog:

  • Using your new easy-to-test-a-new-instance set up from above, be sure you know how to create a new instance in the network admin interface.  You don’t want to cut your teeth learning how to create a site for the first time and then realize you’ve lost hours of work because you made a first timers mistake. Create and delete ’til you get it right!
  • Inventory all your plugins and themes on your old sites and add them to you new network site. Watch out for incompatible plugins from old sites which might throw a wrench in the works.
  • The first plugin you install in each new instance will need to be WP’s own Importer. While we’re on the topic, read up on the codex entry.
  • Create all your users before hand.  This way when you’re creating a new site or importing it’s easy to assign the existing user to be the owner. I choose to uncheck the “Send this password to new user via email” and disseminate passwords via one time secret instead.
  • You may also opt to communicate to your users that you’ll be doing some testing.  If you fat finger an import, it can email each of the authors that you just created an account for in the new instance.  See prior step as well!

Loss-less Data Imports – Having written a WordPress plugin or two, I know that plugins store their data in either the posts database table, along with your existing posts, or their own table created when the plugin was installed. If your importing data for a plugin that follows the “use the posts table” model, then you need to activate and configure this plugin before you import.  If you don’t, you’ll either lose the data for the plugin or it might be missing pieces or be corrupted. The bummer is if your plugin has its own tables outside of the posts table, it will then need to have its own export/import features.

Import Problems – If you’re having problems running the importer because it won’t finish because of errors, try turning on the debug output.  In the WordPress Importer plugin directory (WPHOME/wp-content/plugins/wordpress-importer) find the wordpress-importer.php file.  Edit this line:

/** Display verbose errors */
define( 'IMPORT_DEBUG', false);

To be true:

/** Display verbose errors */
define( 'IMPORT_DEBUG', true);

In my case the plugin complained that images imported didn’t match the size of the original:

Remote file is incorrect size

Imports failed :( When I ran strings on the imported image I saw this at the very end:

<!-- WP Super Cache is installed but broken. The constant WPCACHEHOME must be set in the file wp-config.php and point at the WP Super Cache plugin directory. -->

Going to the original, old site and disabling the Super Cache plugin fixed my import problems.  Yippee!