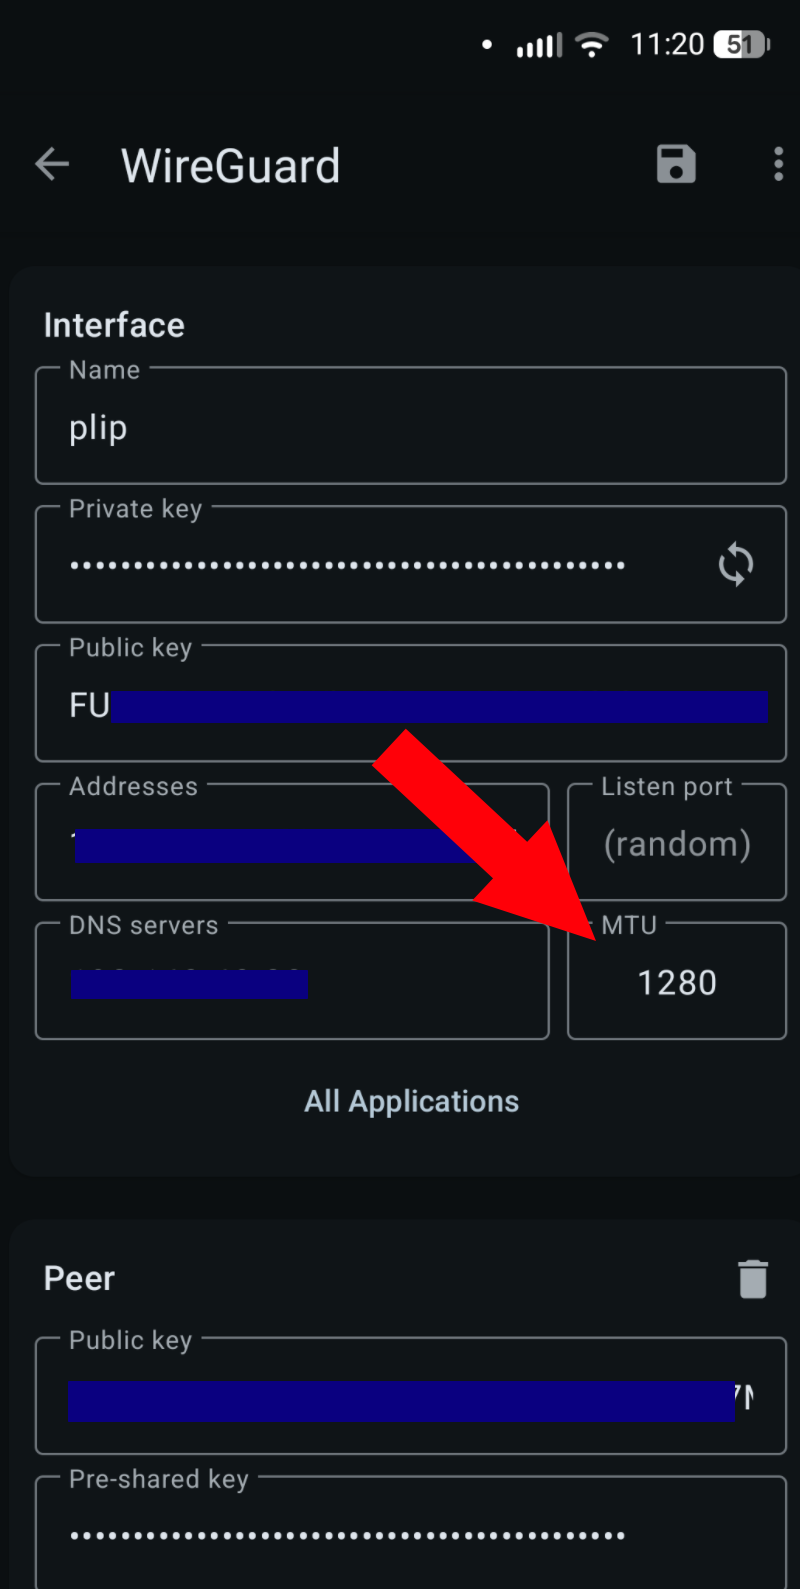
Change your MTU from 1420 to 1280 if your Android device is having issues connecting to your Wireguard VPN over cellular data. This MTU value should work on both WiFi and cellular data.
Slowly discovering the solution
For some time now I’ve been baffled why my Wireguard VPN doesn’t work on my phone. I was a looser and not actively troubleshooting it, so instead I spent months slowly unraveling what is going on with these discoveries:
I found my phone VPN didn’t work – odd – that’s frustrating
A few weeks later, I realized that my laptop worked fine. OK, so it’s endemic to the phone – noted
A few weeks after that I had a big breakthrough – my VPN on my phone worked on WiFi but did not work on cellular data. So odd!
Finally, one morning over a tasty coffee, I started DDGing for something like wireguard not working on mobile data, works on wifi
I found a Reddit post (not this one, but like this one) that said changing the MTU can fix this issue
A friend of mine created some fun stickers for use at the most recent DEF CON. They were sly commentary about how corporate a lot of the stickers are and how maybe we should get back to our DIY roots. But…what’s this? There’s a .xyz in there…is that a TLD…is there domain I could go to?! IS THIS STICKER AN AD ITSELF?!?!?!?!1!
It’s all of those things and none of those things – that’s why I love it so much. Best of all, when you go to website, you get just what you deserve ;)
The website was initially setup on a free hosting provider, but they didn’t provide any logs – something my friend was curious about to see how much traffic the non-ad ad was generating. I have a VERY cheap VPS server that already had Ubuntu server and Caddy on it, and I figured I could help by hosting a wee single file static web site and be able to easily offer the logs. Let’s see what we can do!
Step 1: One HTML file + Four Caddy config lines = Web server
I frickin’ love Caddy! I made a single index.html file and then added these 4 lines of config:
After I restarted Caddy (systemctl restart caddy) – I was all set! As DNS had already been changed to point to the IP of my lil’ server, Caddy auto-provisioned a free Let’s Encrypt cert, redirected all traffic from port 80 -> 443 and the site worked perfectly!
By default Caddy has logs turned off – let’s fix that!
Step 2: Turn up the (log) volume
Unsurprisingly, Caddy makes enabling logs very straight forward. Just add these three lines
I reloaded the config in Caddy (systemctl reload caddy) and checked for log activity in /var/log/caddy/. It was there! Oh…it was there in full repetitive, verbose JSON…OK, cool, I guess that’s a sane default in our new cloud init all JSON/YAML all the time world. However, how about common log format though?
This was the first time Caddy surprised me! While it was easy enough to do (huge props to “keen” on Stack Overflow), it was a bit more convoluted and verbose than I expected. You have to change the log deceleration to be log access-formatted and then specify both a format and a transform. The final full server config looks like this:
Now let’s figure how to to add secure access to download those logs.
Step 3: Rsync via Authorized Keys FTW!
A straight forward way to give access to the logs would be to create a new user (adduser username) and then update the user to be able to read the files created by the Caddy process by adding them to the right group (usermod -a -G caddy username). This indeed worked well enough, but it also gave the user a full shell account on the web server. While they’re a friend and I trust them, I also wanted see if there was a more secure way of granting access.
From prior projects, I knew you could force an SSH session to immediately execute a command upon login, and only that command, by prepending this to the entry in the authorized_keyfile:
If I had SOME_COMMAND be /usr/bin/rsync then this would be great! The user could easily sync the updates to their access log file at /var/log/caddy/the-domain-goes-here.xyz-access.log. but then I realized they could also rsync off ANY file that they had read access too. That’s not ideal.
The final piece to this Simple Single Page Site with Secure Log Access is rrsync. This is a python script developed specifically for the use case of allowing users to rsync only specific files via the Authorized Keys trick. The full array of security flags now looks like this:
As there’s no other logs in /var/log/caddy – this works great! The user just needs to call:
rsync -axv username@the-domain-goes-here.xyz: .
Because of the magic of rrsync (two rs) on the server forcing them into a specific remote directory, the rsync (one r) on client is none the wiser and happily syncs away.
Happy web serving and secure log access syncing and Happy Halloween!
Like all of you parents lucky enough to still have a job during the COVID19 layoffs, I’ve been struggling to balance time at work, personal time, family time and being the family’s IT person. With school closed, and now all summer camps closed, our use of kids screen time (aka internet time) has gone up from 0.5hrs/day to 3hrs+/day. How do we ensure we have safe computing environment for them?
DoT by Design
Originally, we had a MacOS workstation for the kids with parental controls enabled. This allowed us to do things like set up a 30 min per day limit, create separate accounts for each kid, limit which apps they could use and, most importantly, limit which URLs they could use (deny all, allow some). When coupled with my love of LXD/Pi-Hole/Quad9, that looked like this:
In this scenario the kid’s single shared workstation would get an IP lease from the DHCP server running on the pfSense router. This lease would specify the house wide Pi-Hole which sent all it’s DNS clear text queries to Stubby which in turn sent them encrypted to Quad9 via DNS over TLS (DoT). This is really nice as not only do we do get LAN wide ad blocking, but we get LAN wide encrypted DNS too. Score!
The kids workstation gets no special treatment on the network and is a peer of every other DNS lease on the LAN. However, with them needing to do school work and have fun and learn over the summer, they’ve since each gotten their own workstations. Now we have three workstations! This is starting to be a hassle to maintain the lock down on which sites they can browse. As a result, we just told them “be good” and let them use their new workstations with out any filters. This is sub-optimal!
.* Blacklist
How can we improve this situation to make it more tenable and more secure? By adding more instances of Pi-Hole, of course! It’s trivial to add a new instance of Pi-Hole with LXD. Just add a new container lxc launch ubuntu: pi-hole2 and then install Pi-Hole on the new container with curl -sSL https://install.pi-hole.net | bash . It’s two one liners that take all of 5 minutes.
For those of you like me that want an easy way to export their existing whitelist from MacOS’s parental controls, check out the “Directory Service command line utility” aka dscl. With this command you can create a file with all the URLs you’ve whitelisted. You can then easily import them into your new Pi-Hole instance (be sure to swap out USERNAME for your user):
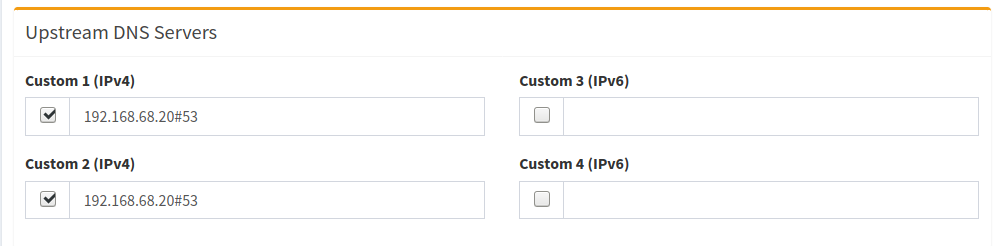
Back to the new Pi-Hole instance, if we set the upstream DNS server to be the initial Pi-Hole, this means the kids DNS gets all the benefits of the existing encrypted infrastructure, but can add their own layer of blocking. Here I configure their Pi-Hole to just use the existing Pi-Hole as the resolver:
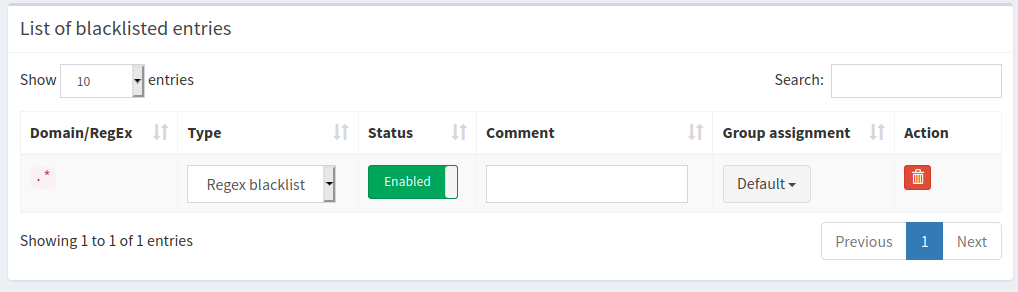
Specifically, if you add .* as a blacklist, EVERY site on the internet will fail to resolve. Then you can incrementally add sites you want resolve to your whitelist:
Once we hard code each of the three workstations to use the new Kids DNS, we’re good to go! And, this indeed works, but the savvy technologist will see the time suck of a flaw in my plan: If you whitelist example.com, there’s 5 or more sites you need to whitelist as well in order for example.com to work. This is because 99% of all sites use 3rd party javascript via content delivery networks (CDNs), have integrations with social media and of course often use the ever present Google Analytics. It gets even more tricky because if you want to keep your kid from searching on Google, you can’t think, “Oh, I’ll just whitelist *.google.com and then all it’ll save a bunch of time!”. Along with that will come Gmail and who knows what ever else. I knew this issue would be there going in, so I wasn’t afraid to take the time to get it to work. But caveat emptor!
Teaching Kids to be Smart
Speaking of caveats of a plan – all parents should know that this plan is VERY easy to bypass once your kids starts to figure out how the internet and their specific devices work. I’ve literally told my kids what I’m doing (stopping just about every site from working) why I’m doing it (the internet can be a horrible place) and that they can likely figure a way around it (see Troy Hunt’s tweet – as well as his larger write up on parenting online).
Like Troy Hunt, I’ll be super proud when they figure a way around it – and that day will come! But I do want to prevent them from randomly clicking a link and ending up somewhere we don’t want them to be. They can then ask us parents about why they can’t access a site or when it might allowed.
Being honest with your kids about what you’re doing is the way for them to be aware that this is for their benefit. The end goal is not to lock the entire internet away forever, it’s actually the opposite. The end goal is to prepare them to be trusted with unfettered access to the internet. This will happen soon enough whether we parents want it or not!
Banning 8.8.8.8 et al.
While I was in there tuning up the DNS, I remembered that some clients on my network (I’m looking at you Roku!) weren’t listening to the DHCP rules about using my preferred, encrypted DNS and going direct to Google’s DNS (8.8.8.8) or others I didn’t like. After a little research I found I could redirect all outbound TCP and UDP DNS traffic so that all devices use my Pi-Hole/Stubby/Quad9 DNS* whether they thought they were or not. For others running pfSense and want to do this, see the steps to “Blocking DNS Queries to External Resolvers” and then “Redirecting all DNS Requests to pfSense” (both thanks to this Reddit thread).
Some of you may be thinking, “this seems like a lot of work, why don’t you just implement an existing off the shelf solution?” Good question! For one, I like to DIY so I control my data and what’s done with it instead of letting a 3rd party control it. As well, while there’s home based solutions, I prefer open source solutions. To put my money where my mouth is, I’ve just donated for the 2nd (3rd?) time to Pi-Hole. I encourage you to do the same!
To be clear though, this set up is a pretty crude tool to achieve the end result. It looks like there’s some quite polished solutions out there if you’re OK with closed source, cloud hosted solutions. As well, there’s of course other variations on the “Use Pi-Hole For Parental Controls“.
Wrapping Up
Now that we have all in this in place, we can trivially support N clients which we want to force to use the kids more lock down DNS set up. This looks like exactly like it did before, but we have an extra container in the LXD server (and, some what orthogonally, a fancier pfSense DNS blocking setup):
I suspect this set up won’t last for more than a year or two. As more and more sites get added to the white list, it will be harder and harder to maintain. Maybe after that I’ll give each kid their own Pi-Hole instance to run on an actual Raspberry Pi and let them do with it as they please ;)
(Of course just after I deployed this, Pi-Hole 5.0 came out which offer the concept of groups, so you can likely do this idea above in a single instance instead of multiple. A bummer for me now, but a win for all other Pi-Hole users, including my future use!)
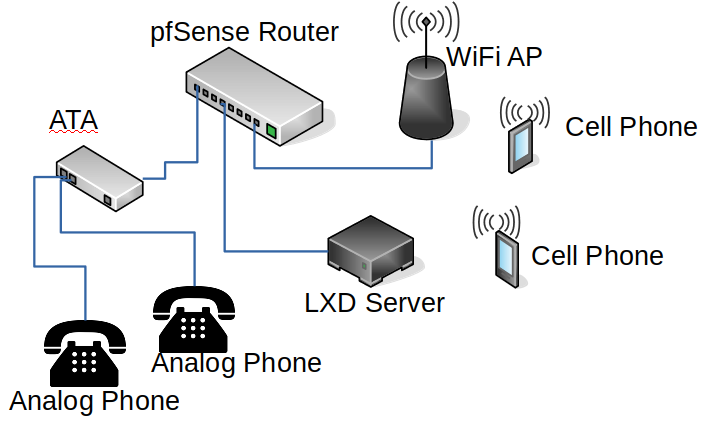
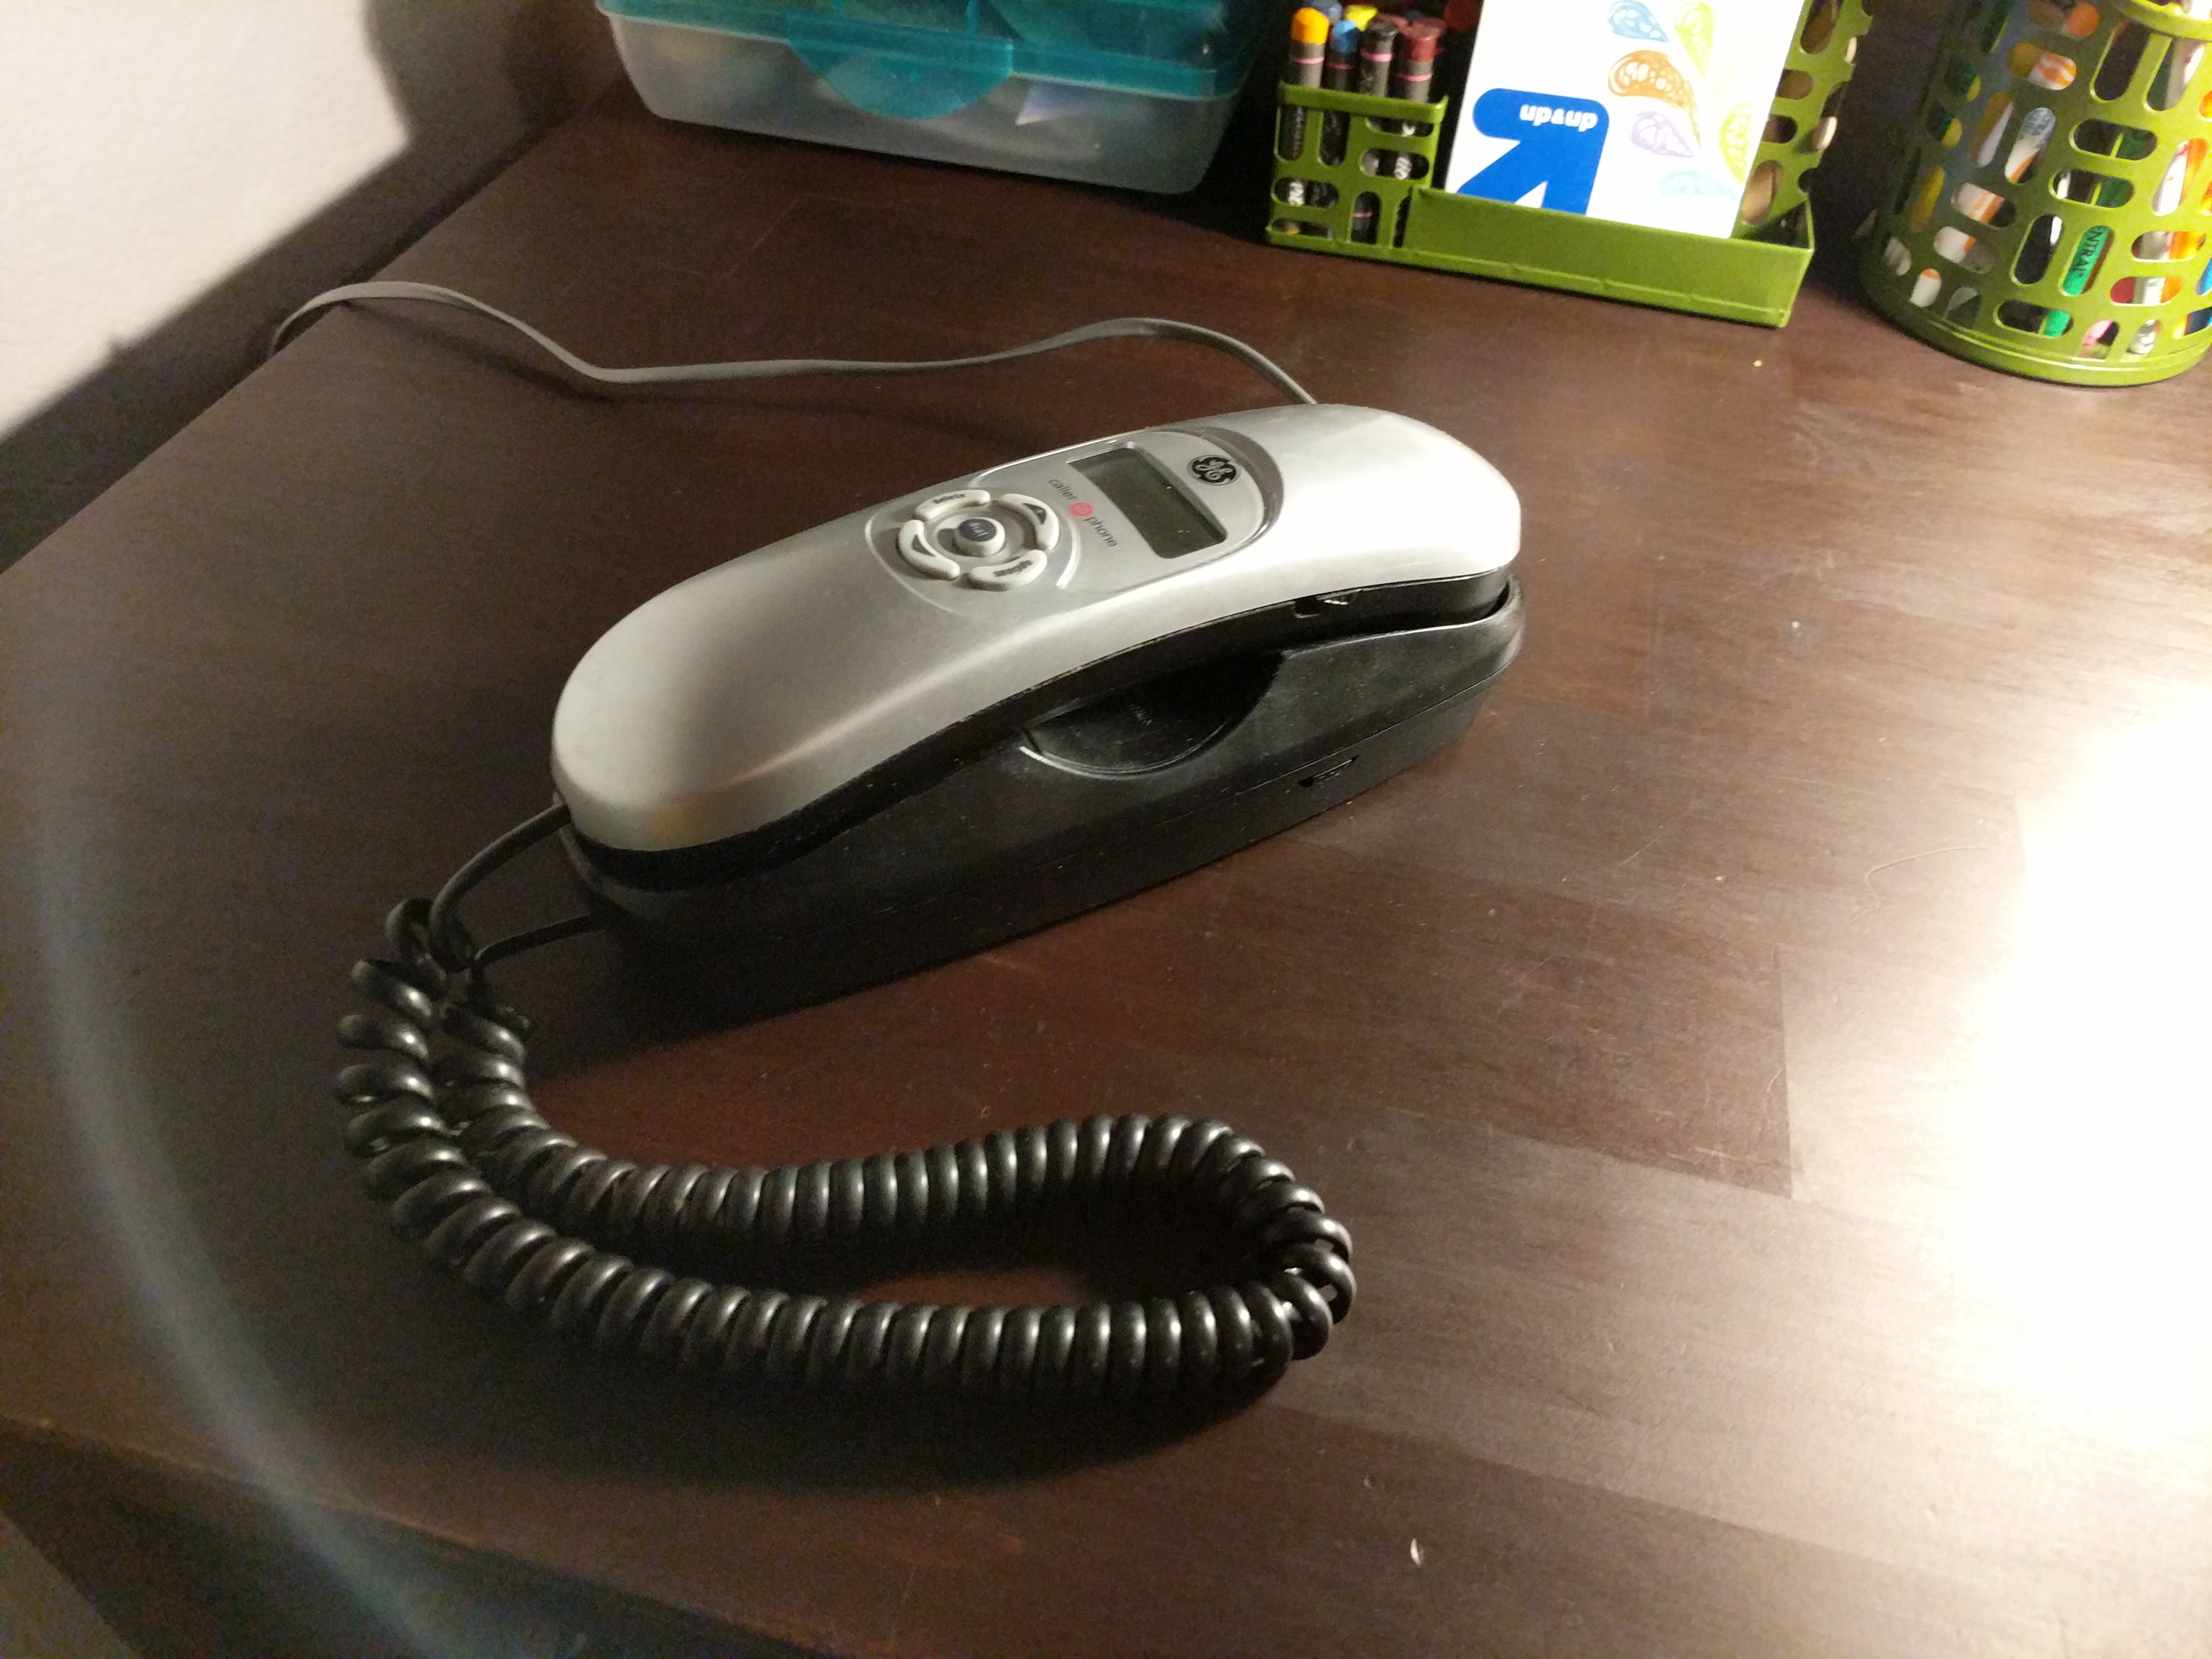
You may remember that a while ago, I set up a fun little PBX for my kids. It was awesome! That setup allowed my partner and I to use our cell phones as SIP clients to the Asterisk instance running on the LXD server and my kids each had an analog phone going through the ATA:
Since then, I decided it would actually be pretty cool to have a phone in our kitchen so we could call upstairs to the kids. If I was gonna wire up 1 phone, I may as well wire up 3 phones and I may as well make them all awesome. Yes, you know it, I’m talking about deploying 3 of the venerable Cisco 7960s:
These phones, according to my research, will be 20 years old in August of next year. That’s 10 years older than my oldest kid. That’s….really old! Especially in internet time! Yet, these phones are indeed venerable. They simply work and won’t quit. Even when they do quit, all you need is a little cardboard and they’ll keep on goin’. I had a few laying around and they’re often posted for sale for $5-15 online. I won’t get into it in this post, but it is some what of an art to get them on the right SIP (not SCCP!) firmware. This guide has some good info as does Loligo’s. tl;dr – set up an TFTP server, set your DHCP with the TFTP option, tie your phones MAC to the right conf file, and away you go. Feel free to email me if you get stuck!
But, we’re getting ahead of ourselves. Before we could plug the phones in though, we had to string some Ethernet. This means that my kids learned the important life skill every 7 year old needs to know, how to crimp RJ45 cable ends:
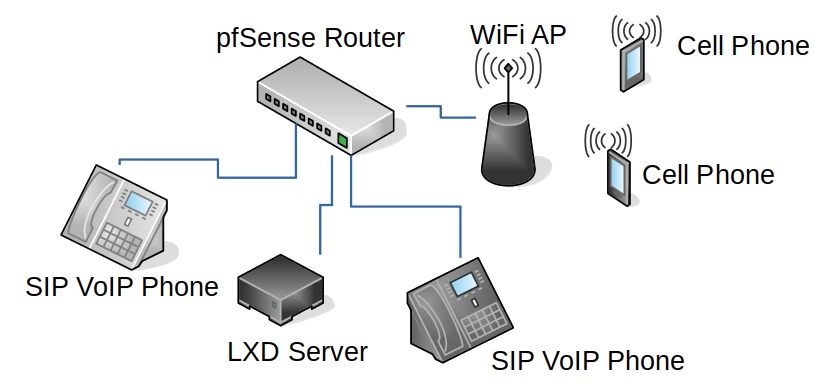
After all 3 phones were physically connected to the network (and running SIP firmware per above), they could connect to the Asterisk instance on the LXD box. Now our set up looks like this (only two SIP phones are shown, we have 3 (actually I put one on my office desk recently, so now we have 4 :))
At this point, I nuked the vanilla Asterisk instance and installed the latest version of FreePBX. Now the kids no longer get to learn about busy signals, instead they get to learn about conference calls, hold music (but not THAT hold music sadly), voice mails and a house wide paging system. It is SO much fun! And, honestly, it’s super practical too.
I was talking to my sister recently and she’d heard the kids talk about their phones and how much they loved them. I asked if she wanted one at her house. Given our kids don’t have email or a cell phone, this would give my sister a direct way to contact her niece and nephew with no middle parent man. Let’s do it! But…how?
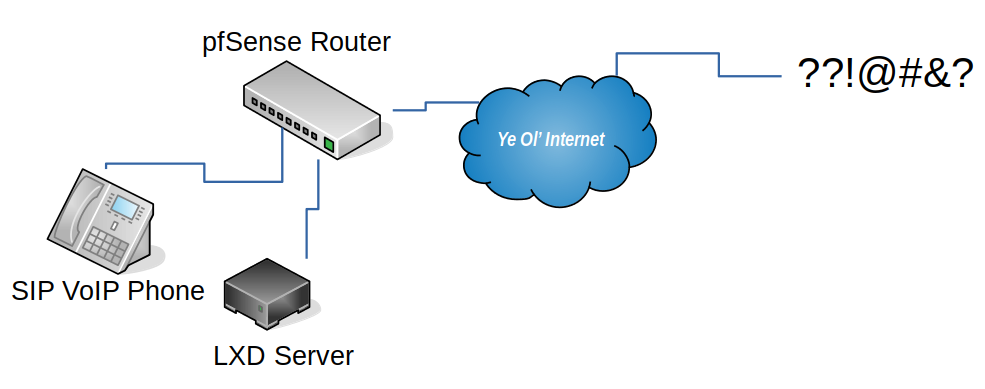
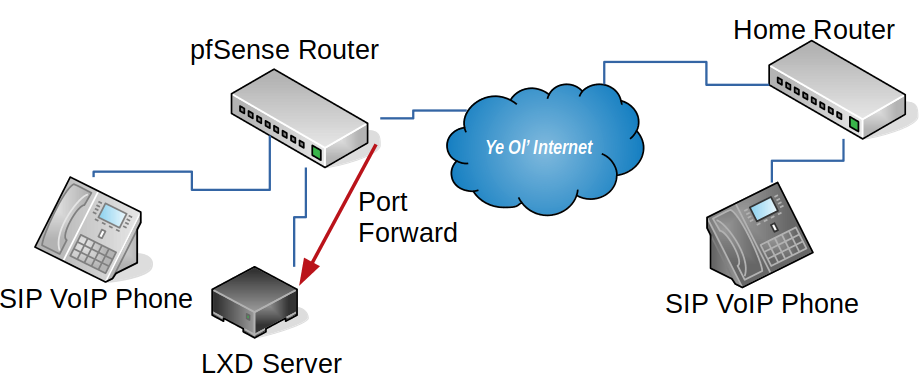
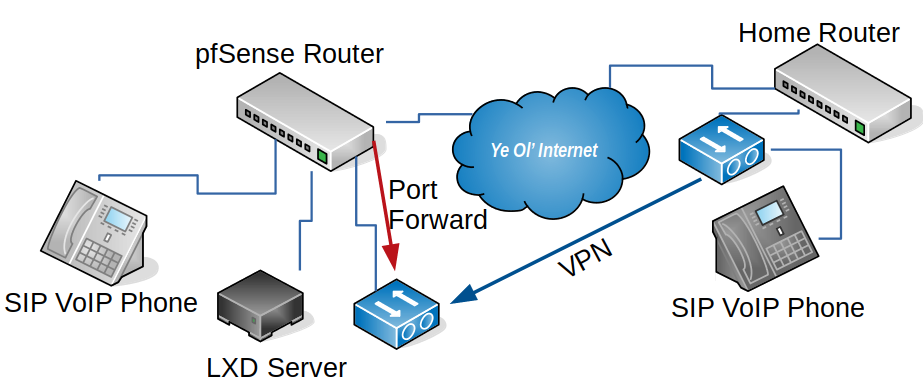
Let’s assume we just go for it. We’ll just program another phone we picked up off craig’s list to talk to the public IP of my house (no static IP, but that’s what Dynamic DNS is for), and we’ll punch a whole in the NAT Firewall Router thingy (a fanless doodad running pfSense). Asterisk uses SIP as we know, which is on port UDP 5060, so it’s pretty easy. We do a port forward like this – see red arrow:
This is a bad idea. On so many levels. First off, these hella old phones use only unencrypted tech. I mean, why use SSH when you have telnet? Why use TLS when you have good ol’ HTTP? SIP itself is unencrypted which means that any one of the many hops the traffic goes through will be able to trivially sniff the UDP packets used to authenticate against the Asterisk instance. Not only could they get on to my LAN, they could listen to all the calls. Nitpickers may note that Wikipedia speaks of SIP encryption – but that’s impossible on these old phones.
These types hacks are no theoretical either. Security researcher Ang Cui has made quite a name for him with all the vulns he’s found in these phones. In a Defcon 21 talk called “Stepping P3wns: Adventures in full spectrum embedded exploitation (and defense!)” he demonstrated how sending a resume (PDF) which would get printed on a (vulnerable) HP printer would allow a reverse tunnel to open up which could then be used hack the phone on the desk and silently enable the mic so he could listen to you discuss his “resume”. Awesome!! And scary ;) The same nitpicker as above will not this was the 7961, not the 7960 – still my OLDER phone is very likely less secure than the NEWER one.
Maybe I should encrypt the traffic? Like, what if we put a VPN server behind the firewall, do a port forward to it, and a VPN client at the remote “office”? That way the SIP traffic is never seen on the internet! Yeah!! Very similar to the diagram above, but with two more devices:
Now instead of unencrypted packets being forwarded to the Asterisk server, we only have encrypted packets being forwarded to the VPN server (again, see red arrow below). Further the remote phone uses the VPN (blue arrow) and thinks it’s on my home network – un-routable IP and all!
But where as we spent $15 before, we’ve reused existing phones with the new setup and VPNs sound hard and possibly expensive to deploy. Maybe it can’t be done the cheap-cheap? Dun dun dun!! Enter Wireguard! This insanely simple, radically secure and Sys Admin friendly VPN is great. I’ve deployed a bunch of instances now and can’t get enough of it. But what about the price of the hardware? Here’s where the final piece of this Asterisk, LXD, Wireguard VPN and Remote “Office” puzzle is put in place:
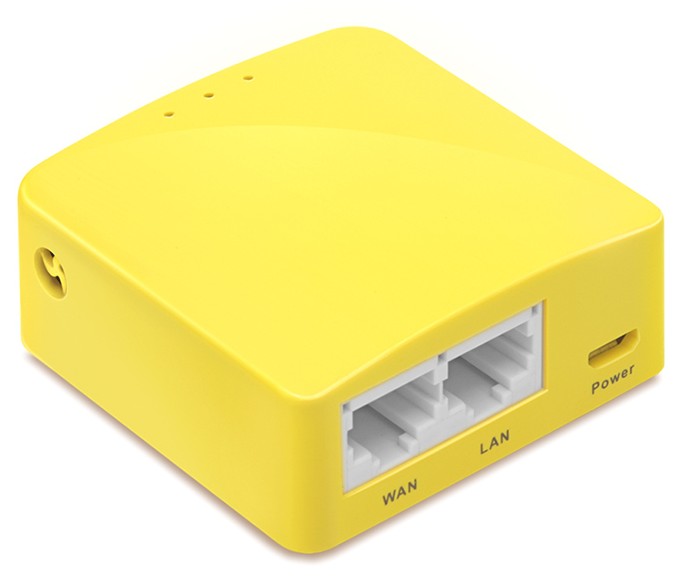
For just over $20 shipped you too can have an awesome VPN server aka the GL-MT300N-V2 made by GL Technologies (aka GL.iNet). They also work as clients too! While we’ve had to reboot the remote VPN and Phone once or twice, we’ve had months of up time using this set up. The router supports a slick GUI (what I ended up using) but if you’re retro, you can do it all manually too.
An added bonus to this whole set up is by adding a Wireguard client on my phone, I can now VPN in and use the SIP client where ever I am to call or be called.
Postscript: A few weeks ago we decided we’d experiment with letting the kids be at home alone for short periods. Per above, they have no cell phones and we have no land line. But with a perfectly good PBX in place already, I spent $4 getting a LocalPhone SIP trunk. We now pay $0.005 per outgoing call. Yes, you read that right, half a cent per call. Read more over at Ward Mundy’s site!
I’ve yet to find the magic sauce to compile Stubby on the Orange Pi Zero board though. It’s so cheap ($20 shipped), has a built in Ethernet, and is just so dang cute! So, I was looking around at stubby posts and Linux posts and Ubuntu posts and found this great write up on Ubuntu 18.04 and stubby and it said,
This was awesome! This means my previous trickery of having to compile stubby from source on Ubuntu wasn’t needed! However, the revelations about easy DNS set up and encryption were only just getting started.
The next one I found was that the 4.0 release of Pi-Hole from early August, had a new feature: custom ports can be used for upstream servers. Wham! This double awesome! Now, in the GUI of Pi-Hole, you could safely add a the IP of stubby and specify a random port to use! But we’re done yet, no sir, two more revelations to go. Hold on.
The penultimate revelation was BOTH the Orange Pi Zero AND the Raspberry Pi 3 b had a release of Ubuntu 18.04 for them. This means that you not only don’t have to compile stubby for your x86 LXD environment, but you don’t have to do it for ARM SoC setups either! Yay!
The final revelation dates back to a long, LONG time ago, and I’m just late to the party. I’m talking proto-internet long time ago. The legend Jon Postel decided that not only would IPv4 have a reserved IP address of 127.0.0.1 for localhost, but in RFC 790 in 1981, he said it would actually be a /8, so you get just over 16 million localhost IPs just for your bad ass self. This means you don’t actually need the new port specifying feature of Pi-Hole – you can just set up Stubby on port 53 on 127.1.1.1 and Pi-Hole on port 53 on 127.0.0.1. Ugh – this makes it so much easier – if I only was more a network guy!
Now that my rambling background on my recent revelations is done, let’s get to the technical write up. Though, honestly, this part will be pretty short and sweet.
Installation Guide
This guide assumes you’ve downloaded and installed Ubuntu 18.04 for either your Orange Pi Zero or Raspberry Pi 3 B. Note that both the official download page of both Orange Pi and Raspberry Pi Foundation, do not list 18.04 options. It also assumes you’re running everything as root. The instructions are identical for both boards:
Ensure you’re up to date: apt-get update&&apt-get upgrade
Install Stubby: apt-get install stubby
Edit /etc/stubby/stubby.yml so that it’s listening on 127.1.1.1: listen_addresses: - 127.1.1.1
Restart Stubby: systemctl restart stubby
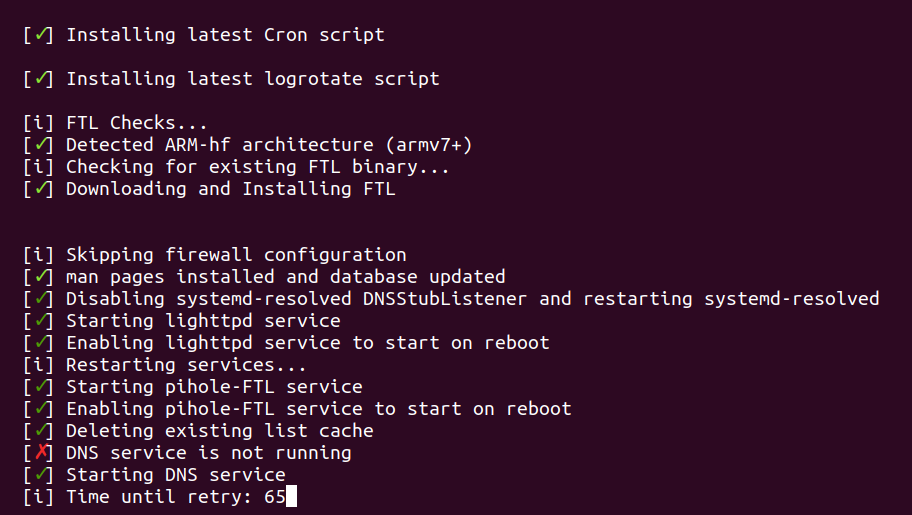
Install Pi-Hole. Use what ever upstream DNS server you want when prompted, we’re going to override it with Stubby: curl -sSL https://install.pi-hole.net | bash IMPORTANT – See Troubleshooting below if you get stuck on “Time until retry:” or “DNS resolution is not available” when installing Pi-Hole
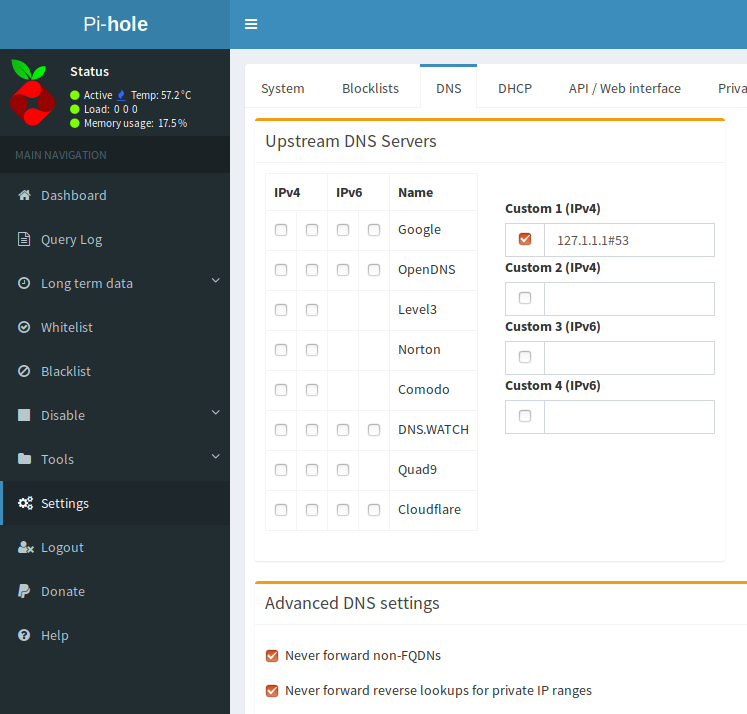
Pi-Hole DNS settings
Log into your new Pi-Hole at YOUR_PI_IP/admin and go to Settings -> DNS. Uncheck any DNS servers and enter a Custom 1 (IPv4) of 127.1.1.1:
If you want to use Quad9 (and I think you should ;), in step 3, while you’re in stubby.yml, comment out all the other servers in upstream_recursive_servers: and un-comment Quad9 so it looks like this::
Full disclosure, I work for PCH which sponsors Quad9.
Troubleshooting
A few things I found while researching this post that might help you:
The login on the Raspberry Pi is Ubuntu with password is Ubuntu. The login on the Orange Pi Zero is root and password is 1234. Check out my SSH Bootstrap trick as well.
The Orange Pi Zero didn’t get an IP via DHCP the first boot. A reboot solved that.
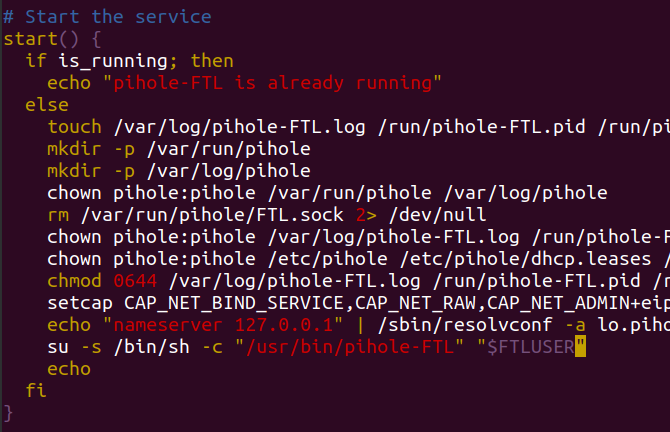
The Pi-Hole script gave me a headache when installing. Near the end of the install it said, “Starting DNS service” and then was waiting to retry. I found a post on the Pi-Hole boards that solved it perfectly. To work around this, edit /etc/init.d/pihole-FTL so that this line:
su -s /bin/sh -c "/usr/bin/pihole-FTL" "$FTLUSER"
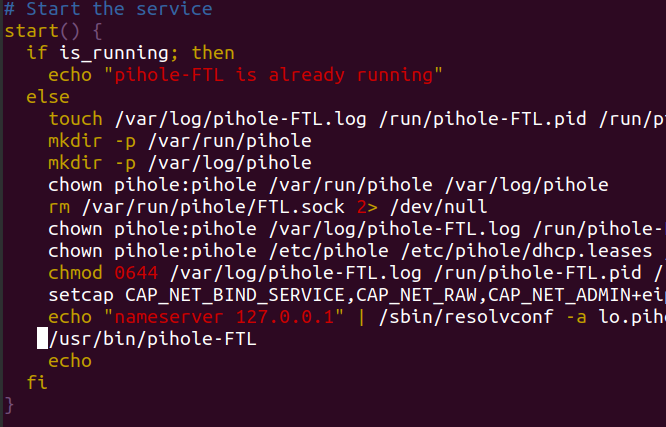
is replaced by this line:
/usr/bin/pihole-FTL
Before
After
After that, be sure to reload your init script with:
systemctl daemon-reload
Finally you should be able to complete your install just by restarting Pi-Hole:
systemctl restart pihole-FTL
Even though I followed step 4, during one my tests stubby was still blocking port 53 on 127.0.0.1. If that happens, restart stubby:
systemctl restart stubby
At any point you can test that stubby or pi-hole is working. These are good to intersperse with each install and configuration change:
I was playing around with Snaps and I wanted to try out Ubuntu Core as well. I still had some of those Orange Pi Zero boards laying around and when you go to the Core Download page – there’s an option for Orange Pi right there – sweet! I downloaded the .img file, wrote it to my microsd card with dd, slapped it in my Orange Pi Zero, found the new IP in my DHCP server and off I went to SSH in.
Then I saw this step on install docs:
you will be asked to enter your Ubuntu SSO credentials
Whhhaaat? Oh, I see, Core’s whole shtick is that it’s secure by default. They say, “Secure by default – Automatic updates ensure that critical security issues are addressed in the field, even if a device is unattended.”. Cool, I can get behind that. IoT needs some thought leaders in IoT security. However…I still just want to SSH in and poke around a bit – I don’t want to have to set up an account at Ubuntu.
Then I thought, “What if I just create a .ssh directory in /root/ and put my public key in the authorized keys file?” Assuming you’re on an Ubuntu system, logged in as mrjones and just stuck in your microSD card with the core image on it, that’d look like this:
cd /media/mrjones/writable/system-data/root/
mkdir .ssh
chmod 700 .ssh/
vim .ssh/authorized_keys
chmod 700 .ssh/authorized_keys
After unmounting the card, inserting it into and rebooting my Pi, I SSHed as root and it just worked – that’s awesome! Now you know how to do it as well! In fact, this likely will work with the Raspbian, Armbian and Ubuntu images for all kinds of Pi boards as well.
Stay tuned for my next post where I’ll massively simplify my stubby and pi-hole how to!
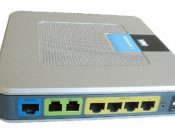
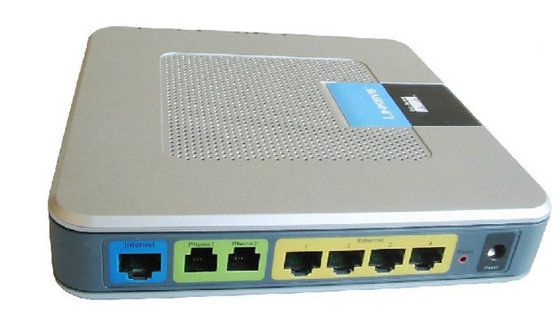
The other day the kids and I were at our local, awesome Goodwill store. I guess they’re all awesome, eh? I was looking over the pile of small electronics while the kids picked out a shirt (“any shirt you want!!”), and stumbled across a device with Ethernet jacks (RJ45) and phone jacks (RJ11). It’s a router with two ATA ports – cool! It was only $5 bucks!! A quick internet search suggests that it may be locked to a provider like Vonage, but that there’s lots of folks unlocking it. Given this was Goodwill, there were was a plethora of POTs devices handy – two more phones at just $5/ea – no problem!
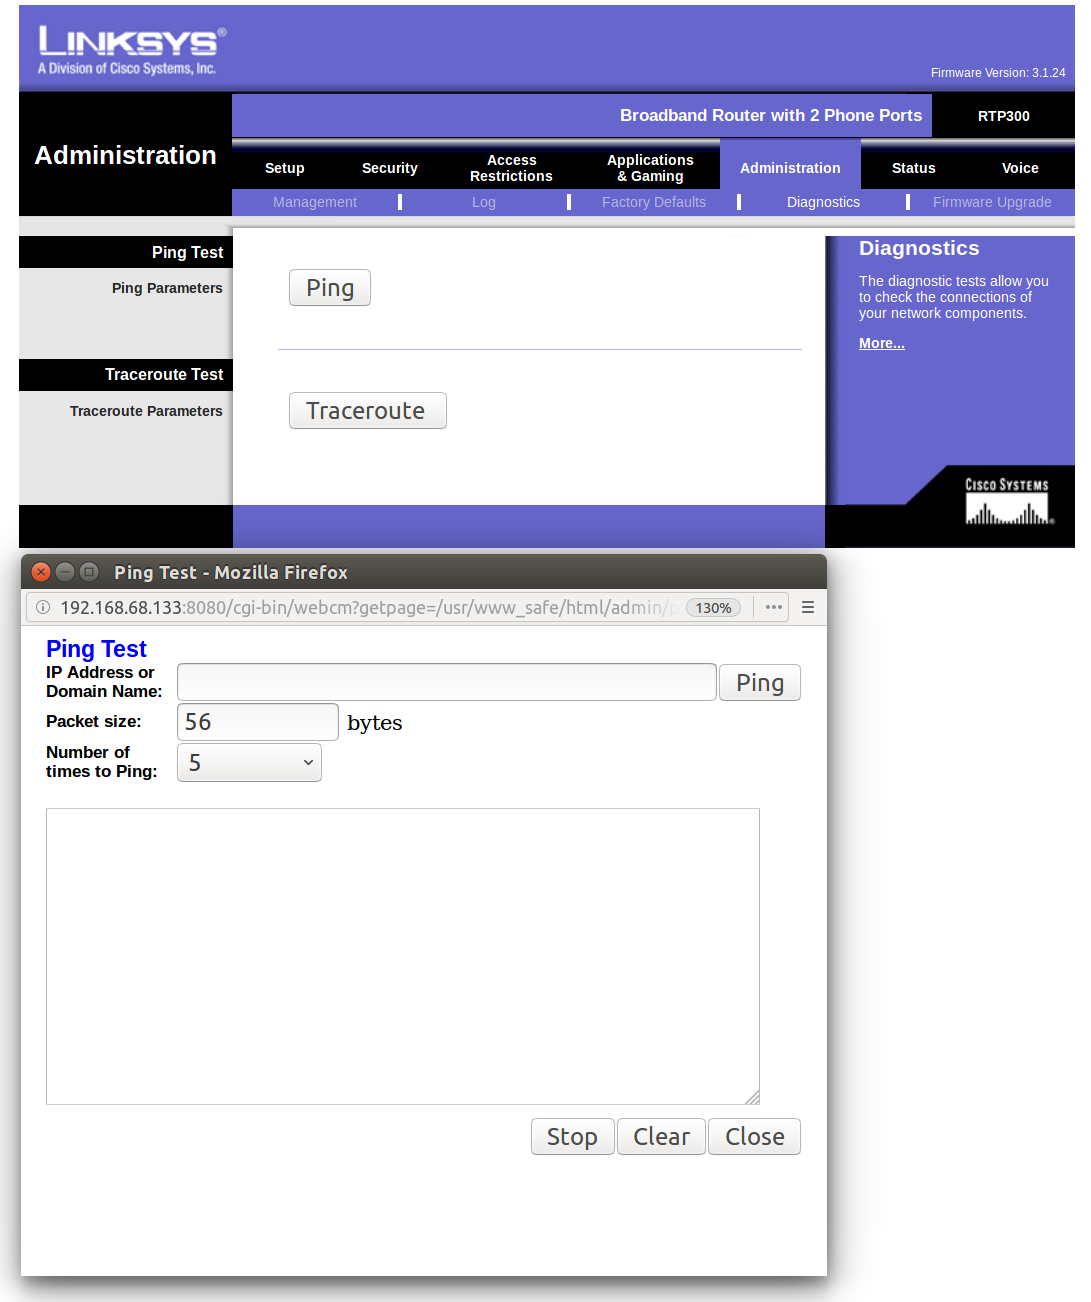
Now that I had the whole kit home, it was time to see what the ATA was up to. It’s a Linksys RTP300 – and the voice section was definitely locked down :( But that means it’s time to start hacking! I dug up the site I initially found before buying it – luckily all the downloads still work! The post is 8 years old, forever in ‘net time, so I was impressed.
I’m pretty pleased with myself because I fully understood everything and was able to improve the process because of this. Mainly:
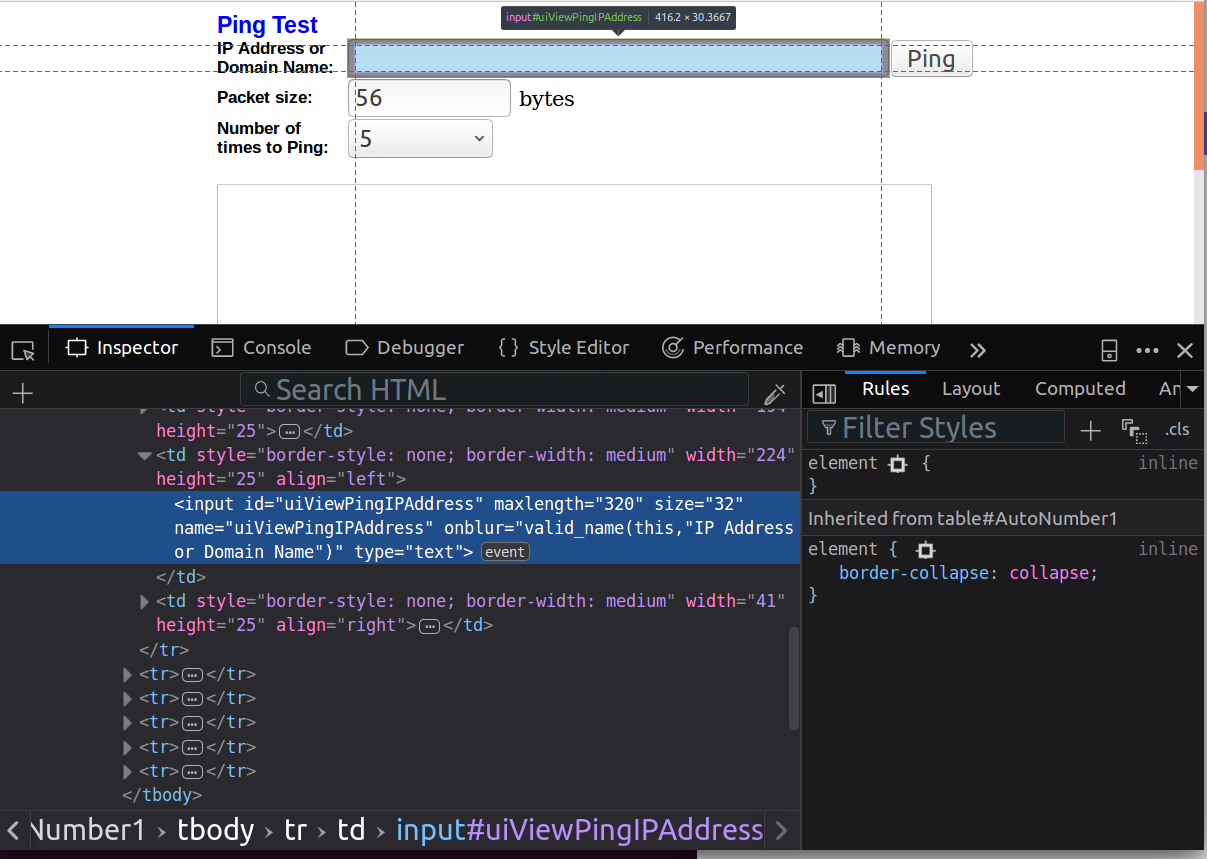
Using inspector tool to make the ping input field longer
Being a web developer I already had a web server running. This is much easier to use instead of setting up a new TFTP server as they suggested.
Being a web developer (still) I was kinda in awe that I’d already forgotten how amazeballs Firebug was, and how I take for granted that modern browsers have such good developer tools built in.
Knowing all the linux commands used (wget, chmod, cd & dd) I was able to explore the device a bit
I figured out that the guide wanted you to download into /var/tmp which didn’t exist on my device, but /var worked
They have you download some *.img, but running it through strings and checking the size, it appeared to match the 3.1.24 version. Completing the install confirmed this. However, md5sum outputs don’t match.
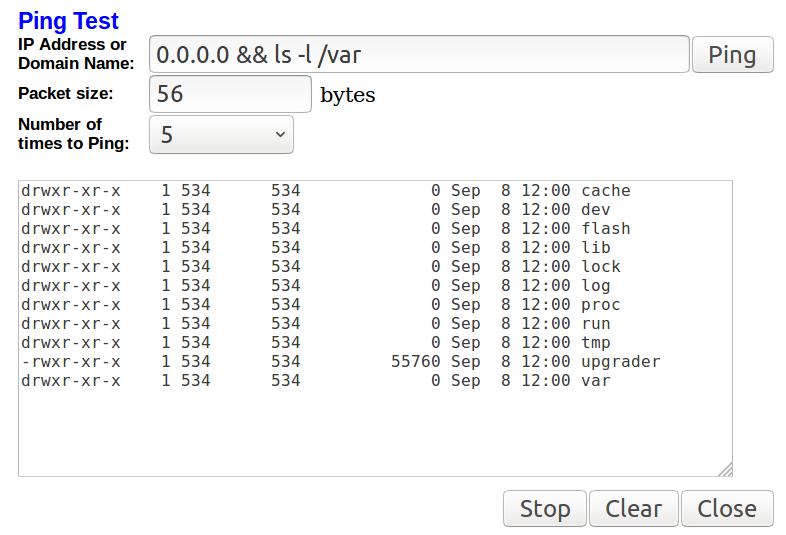
That, sir, is an odd response to a ping ;)
After all this I had a generic, if not quite dated, ATA that was ready to talk to a VoIP provider. Time to install Asterisk! This is where LXD comes in. I already had my home server running Stubby and Pi Hole – time to add another. After spinning up an Ubuntu 16.04 box, hitting a snag, then spinning up an 18.04 box, a quick apt-get install asterisk and I was ready to go!
I created 4 extensions, one for each of us, by following some simpleguides I’d found (edit /etc/asterisk/sip.conf, /etc/asterisk/extensions.conf and a reload). I plunked in the LXD Asterisk IP, extension and password and BAM! both lines registered easy peasy on the ATA.
With two hard phones set up (just plug ’em in to the ATA), I set up me and the wife using the built in client on our phones. Now we all had a phone and could call each other. See the gallery below for the visual story!
On a personal note, this was pleasing for a two reasons:
I saved 3 small electronic devices from the landfill. More and more I’m trying to be conscientious about buying less or buying used.
My kids got to look up at me and say, “it’s making a weird sound!?” I explained to them that it was a “busy signal”. See, cell phones, office phones and 99% of home phones don’t do this any more. They have either call waiting or voice mail, or both ; )
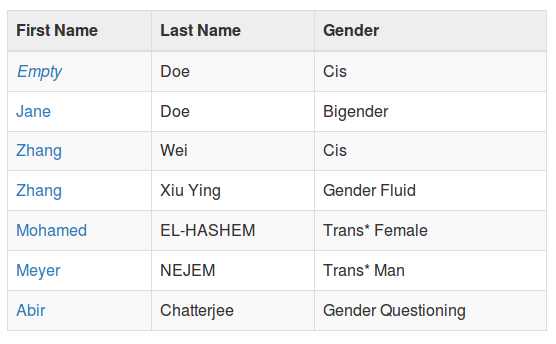
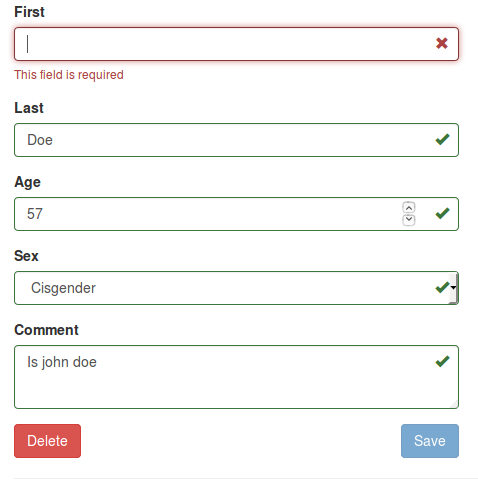
I have to admit, one of the utter joys of my job is that they encourage me to open source software I write at my day job. After looking high and low for a PHP framework or library to do a basic MySQL CRUD GUI, I gave up. While phpMyAdmin is the longstanding champion for full featured DB administration, it’s way to complicated for an end user looking to just add a row right quick. There seems to be an amazing project called CrudKit (great name!), but it has this one, massive blocking “feature”:
This is, literally, what I was trying to do. I spent a some time seeing how hard it would be to contribute to CrudKit to get the feature I wanted working. I ultimately decided that a bespoke solution would more quickly achieve my desired goals. That said, if you do want a stand alone app, do check out CrudKit.
While I suspect it could use some rewrites to not have silly-long arrays passed as arguments, I’m quite happy with my results: tableMaker. This guy takes this PHP:
Which will output this responsive, nice looking HTML:
Two big features of tableMaker are it’s simplicity and it’s security*. Yes table maker can do whiz bang client side sorting, but it also can output tidy, HTML compliant tables. Yes, we can make your browser download 100k+ of web fonts just to render an “X” when you have an error in your form, but it can also do with out all that noise – implementers choice! Security wise, tableMaker abstracts away all the complexity while ensuring there’s simply no way for you to expose yourself to a SQL injection attack. (* We need some nonces).
Along they way in making this, I see all the cool kids are using Composer. I’ve earmarked this guy for my next project!
I’m really happy to have been paid to write this library; I’d be even happier if some else on started using it! I’d about piss my pants with glee if some opened a PR ;)
Update 3/18/2017 – Issue #3 on tableManager has been closed – CSRF protection in place! Go Nonce, go!
After attending both Defcon and HOPE, I thought I should open my mind to other, more traditional security conferences. Since it was a short flight and of modest cost, I choose AppSec California, put on by OWASP. It was great!
tl;dr
Good:
11 of the 13 speakers/subjects I heard were great!
Santa Monica makes for a good venue: walkable, good coffee, good food and bike sharing program!
No big snafus by OWASP organizers: schedule, venue and food was well planned
Plenty of chance to meet and chat with folks
Two days was just long enough to pack in lots of good info, but not too long to be overwhelmed
Low cost registration
Just one here, but the Bad:
2 of the 13 talks were bad. One was a vendor pitch, the other was a possibly OK keynote, but speaker was a royal dick to the AV staff at the start of his talk
Santa Monica
This was my first time to Santa Monica (though maybe there was a trip when I was 18!?), and I liked it. Biggest hits are it was highly walkable and had a bike share program. This meant I could walk to close by dinner and then the next morning take a ride along the beach to the conference:
As well, if you want to get your snooty 3rd wave coffee on, then you can bop over to Demitasse on 3rd street. Tasty! Another nice feature of the town is that they have a nice collection of trails along the beach. The first night I was there I took a lovely 6 mile run on them well into the Pacific Palisades right from my hotel doorstep. Sunsets of the ocean are nice too (and I know I’m playing into OWASP’s desired PR For the location of the conference ;)
Conference highlights
Overall this was a great conference! I ended seeing 3 talks which heavily focused on Content Security Policy (CSP), which I’d only lightly heard about before. When done right, and thoroughly, it removes the JavaScript attack vector including, but not limited to, click jacking and XSS. Ilya Nesterov’s talk, “CSP: The Good, the Bad and the Ugly” really did a great job in describing how to implement it. Specifically, he spoke about a lot of the pitfalls (no inline scripts vs inline scripts all having a nonce), browser adoption rate as compared to CSP Levels (eg full adoption of CSP 1) and interesting things about the CSP Level 3 draft.
Though her talk was a bit less organized than I’d hoped, I very much enjoyed hearing Yan’s talk, “Dissecting Browser Privacy“. I’ve been following her blog for some years now so I it was nice to meet her in person. Her talk wasn’t pitching Brave browser where she works, but Yan did reference it often in her talk. I think it maybe the best browser for my laptop because it supports touch so well!
Not a highlight, but noteworthy, Gary McGraw did the opening keynote. Before he could get started he choose to be demeaning in a very public way to the AV person. It was 3-5 minutes of him being just shy of cursing out the staff about why the microphone wouldn’t work. I later told the AV staff that she was awesome and I really appreciated being professional throughout the ordeal. The other minor hiccup in the speakers was Jack Bicer’s talk, “Want to be secure? Eliminate passwords. If you don’t have a password, it can’t be stolen!”. This ended up being 15 minutes of fear mongering about how your password can get hacked all while ignoring password managers. I left early, but heard later that, unsurprising, the “solution” to all these fears was to adopt Mr. Bicer’s product :(
Being a one man web dev shop, it was painfully obvious how important automation is. Static analysis of code, feature and regression checks, pentests and more can be run in an automated fashion even if you have to manually kick off the automated tests. This provides the equivalent of many man hours of manual tests all done at no time-cost. The conundrum is that it can take months to set this automation up and that’s time when you you’ll be releasing no new features and fixing no bugs. Matt Tesauro’s talk, “AppSec Pipelines and Event-based Security: Moving beyond a traditional security test” was a good reminder about this.
Talks
These are the talks I attended with a few notes where applicable:
Let’s get this out of the way upfront: the most recent installation of the Star Trek reboot, “Beyond”, was exactly what I’d hoped it would be. It was an action packed, summer fun movie. It did not exceed, but definitely met my expectations.
The end however, was totally silly. It was the peak of the action and the sound effects and music (more on this in a second) were so loud I don’t think any one could hear my wife and I laughing. Like, laughing to the point of crying because what we were watching was so funny. But, for me at least, I kept on thinking, “wait – what?” There’s no way modern crypto would allow this scene! Let alone hyper futuristic crypto of 2263! Let me explain.
In the end of the move (yes, like I said, spoilers) the Enterprise crew is rocking the 99 year old USS Franklin. They are fighting the boss of the movie, Krall (not to be confused with Khan), who has control of a massive swarm of space ships based on alien technology. The swam is all perfectly in sync, just as you’d expect your alien swarm army to be. This, by definition, means that they are communicating with each other in real time to coordinate complex movements in 3d space. And how did they figure out how to beat the boss? Well, simply by “corrupting their communication with radio waves”. Radio waves like Sabotage, by the Beastie Boys. That’s right, the Beasties are literally weaponized to literally blow up the enemy hordes. Here’s the Franklin “surfing” the enemy swarm with them blowing up in their wake (click through to see the the preview where the gif came from):
So, aside from the fact that radio waves travel at the speed of of light and should be radiating out in all directions, not trailing behind them, how exactly was this supposed to be working? According to wikipedia, “they [Spock and Bones] learn that VHF transmissions can disrupt Krall’s communications and destroy his fleet.” But, like I said, this is the year 2263! Surely the alien technology powering this swarm has sufficient encryption to ensure that simple VHF radio waves won’t interfere with communication, right? Beyond things like TLS Handshakes, PKI (or even hash-chains if you wanna get tricky), basic header checksums, like in IPv4 would prevent this type of interference.
But, maybe not? Maybe the aliens implementing the swarm networking were just lazy? For example, the MD5 hashing algorithm was released in 1991. By the late 90’s and early 2000’s it was the de facto way to store passwords in databases. However, as early as 2005 collisions had been proven to be a reality. In 2008 at the 25th Chaos Communication Congress, researchers categorically proved that no one should trust MD5. Later that same year CERT issued a CVE agreeing. Fast forward 4 years to 2012, and what do we find? 43 million hacked passwords in unsalted MD5 is what we find. Well, we found out today (Sep 1, 2016), but the coders responsible for securing tens of millions of accounts back in ’12 should have known better. So yeah, maybe the aliens were more focused on meeting deadlines than they were in defending against VHF interference?


 Let’s get this out of the way upfront: the most recent installation of the Star Trek reboot, “Beyond”, was exactly what I’d hoped it would be. It was an action packed, summer fun movie. It did not exceed, but definitely met my expectations.
 In the end of the move (yes, like I said, spoilers) the Enterprise crew is rocking the