Category Archives: Reviews

Asterisk, LXD, Wireguard VPN and Remote “Office”

5 minutes, 9 seconds

You may remember that a while ago, I set up a fun little PBX for my kids. It was awesome! That setup allowed my partner and I to use our cell phones as SIP clients to the Asterisk instance running on the LXD server and my kids each had an analog phone going through the ATA:

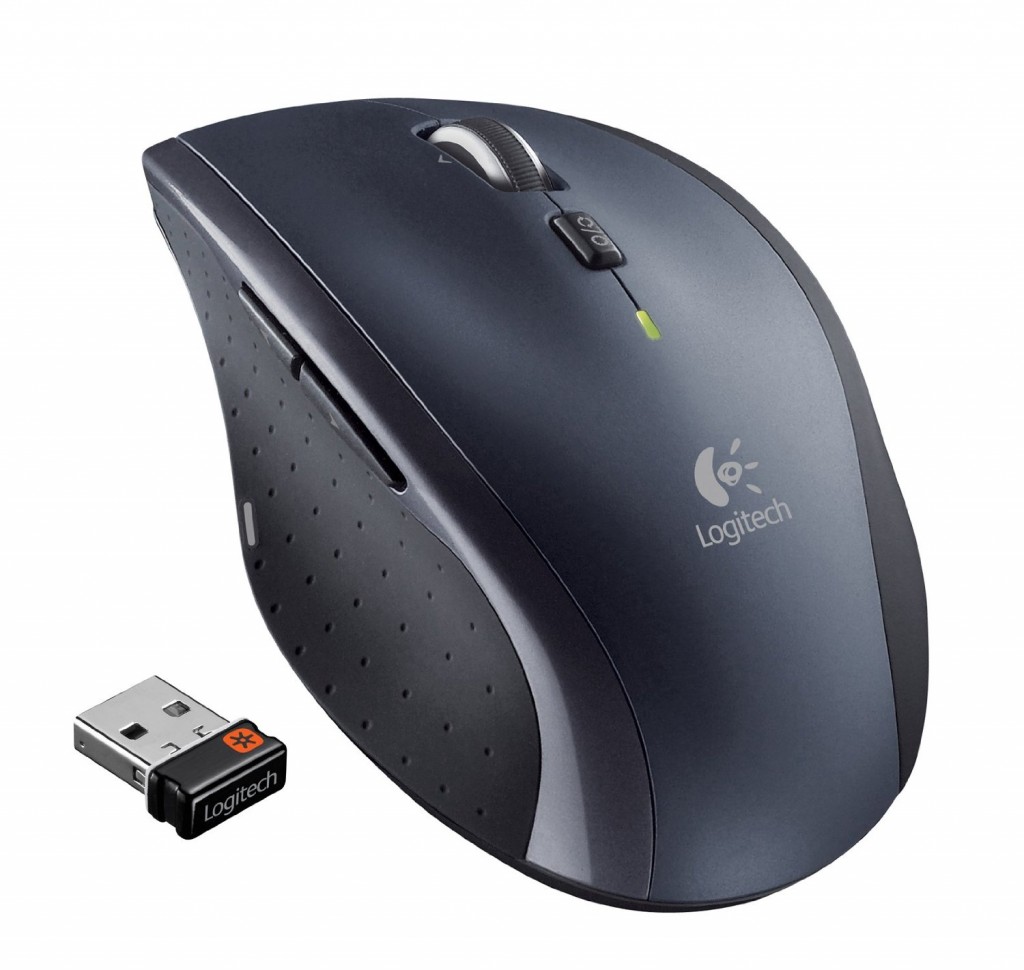
Since then, I decided it would actually be pretty cool to have a phone in our kitchen so we could call upstairs to the kids. If I was gonna wire up 1 phone, I may as well wire up 3 phones and I may as well make them all awesome. Yes, you know it, I’m talking about deploying 3 of the venerable Cisco 7960s:

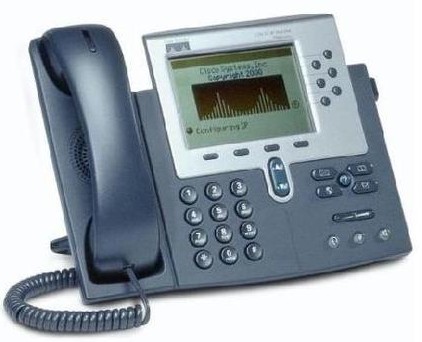
These phones, according to my research, will be 20 years old in August of next year. That’s 10 years older than my oldest kid. That’s….really old! Especially in internet time! Yet, these phones are indeed venerable. They simply work and won’t quit. Even when they do quit, all you need is a little cardboard and they’ll keep on goin’. I had a few laying around and they’re often posted for sale for $5-15 online. I won’t get into it in this post, but it is some what of an art to get them on the right SIP (not SCCP!) firmware. This guide has some good info as does Loligo’s. tl;dr – set up an TFTP server, set your DHCP with the TFTP option, tie your phones MAC to the right conf file, and away you go. Feel free to email me if you get stuck!

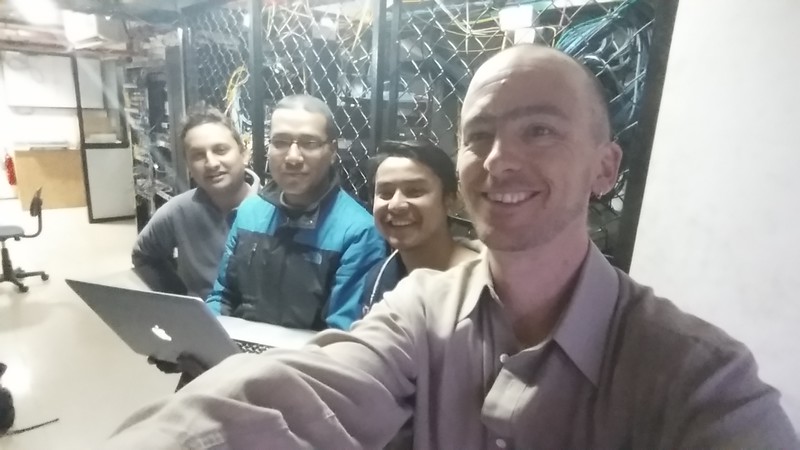
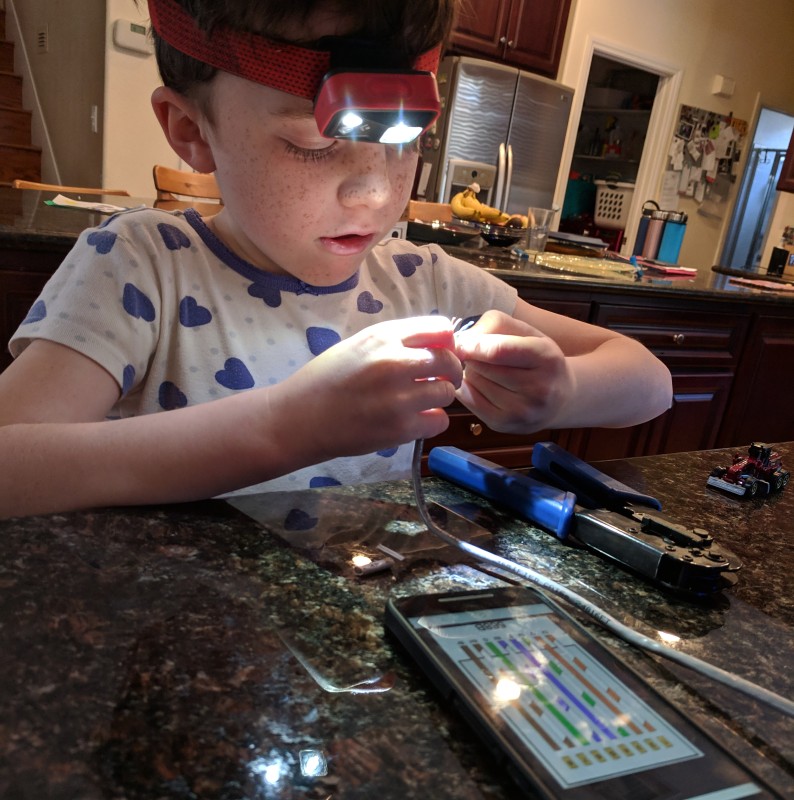
But, we’re getting ahead of ourselves. Before we could plug the phones in though, we had to string some Ethernet. This means that my kids learned the important life skill every 7 year old needs to know, how to crimp RJ45 cable ends:

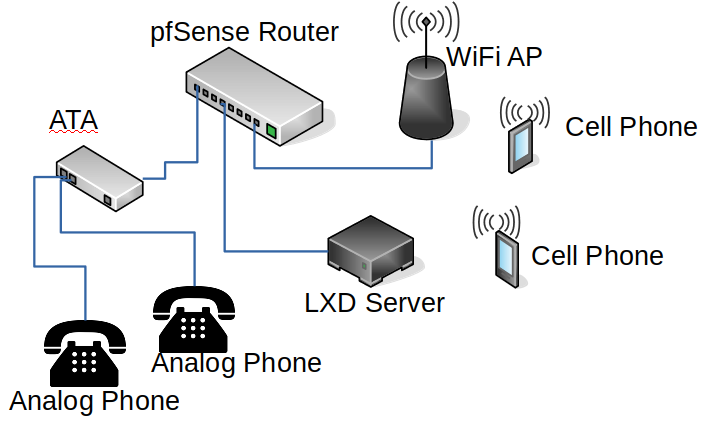
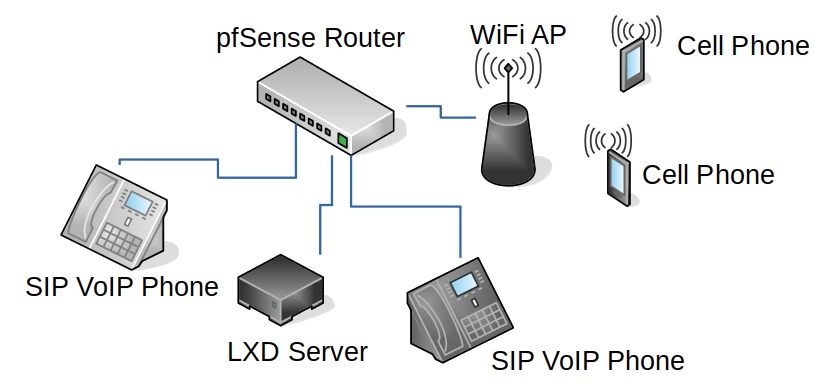
After all 3 phones were physically connected to the network (and running SIP firmware per above), they could connect to the Asterisk instance on the LXD box. Now our set up looks like this (only two SIP phones are shown, we have 3 (actually I put one on my office desk recently, so now we have 4 :))

At this point, I nuked the vanilla Asterisk instance and installed the latest version of FreePBX. Now the kids no longer get to learn about busy signals, instead they get to learn about conference calls, hold music (but not THAT hold music sadly), voice mails and a house wide paging system. It is SO much fun! And, honestly, it’s super practical too.

I was talking to my sister recently and she’d heard the kids talk about their phones and how much they loved them. I asked if she wanted one at her house. Given our kids don’t have email or a cell phone, this would give my sister a direct way to contact her niece and nephew with no middle parent man. Let’s do it! But…how?

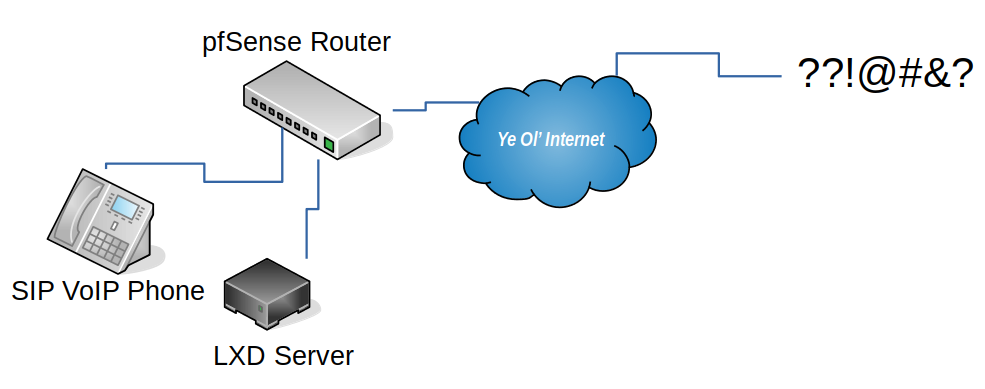
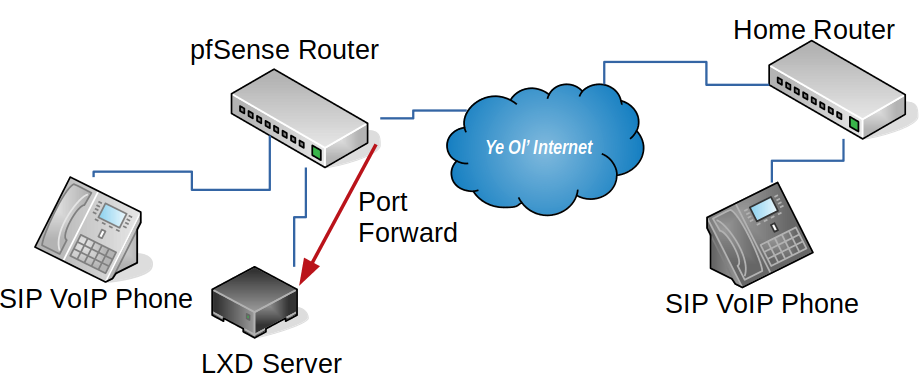
Let’s assume we just go for it. We’ll just program another phone we picked up off craig’s list to talk to the public IP of my house (no static IP, but that’s what Dynamic DNS is for), and we’ll punch a whole in the NAT Firewall Router thingy (a fanless doodad running pfSense). Asterisk uses SIP as we know, which is on port UDP 5060, so it’s pretty easy. We do a port forward like this – see red arrow:

This is a bad idea. On so many levels. First off, these hella old phones use only unencrypted tech. I mean, why use SSH when you have telnet? Why use TLS when you have good ol’ HTTP? SIP itself is unencrypted which means that any one of the many hops the traffic goes through will be able to trivially sniff the UDP packets used to authenticate against the Asterisk instance. Not only could they get on to my LAN, they could listen to all the calls. Nitpickers may note that Wikipedia speaks of SIP encryption – but that’s impossible on these old phones.

These types hacks are no theoretical either. Security researcher Ang Cui has made quite a name for him with all the vulns he’s found in these phones. In a Defcon 21 talk called “Stepping P3wns: Adventures in full spectrum embedded exploitation (and defense!)” he demonstrated how sending a resume (PDF) which would get printed on a (vulnerable) HP printer would allow a reverse tunnel to open up which could then be used hack the phone on the desk and silently enable the mic so he could listen to you discuss his “resume”. Awesome!! And scary ;) The same nitpicker as above will not this was the 7961, not the 7960 – still my OLDER phone is very likely less secure than the NEWER one.

Maybe I should encrypt the traffic? Like, what if we put a VPN server behind the firewall, do a port forward to it, and a VPN client at the remote “office”? That way the SIP traffic is never seen on the internet! Yeah!! Very similar to the diagram above, but with two more devices:

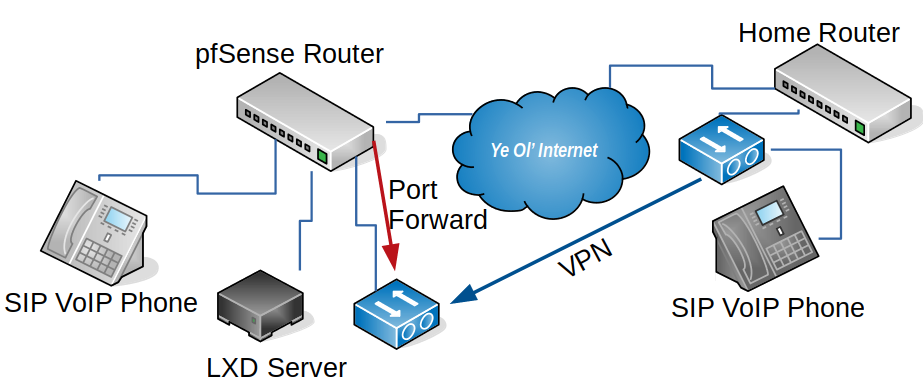
Now instead of unencrypted packets being forwarded to the Asterisk server, we only have encrypted packets being forwarded to the VPN server (again, see red arrow below). Further the remote phone uses the VPN (blue arrow) and thinks it’s on my home network – un-routable IP and all!

But where as we spent $15 before, we’ve reused existing phones with the new setup and VPNs sound hard and possibly expensive to deploy. Maybe it can’t be done the cheap-cheap? Dun dun dun!! Enter Wireguard! This insanely simple, radically secure and Sys Admin friendly VPN is great. I’ve deployed a bunch of instances now and can’t get enough of it. But what about the price of the hardware? Here’s where the final piece of this Asterisk, LXD, Wireguard VPN and Remote “Office” puzzle is put in place:

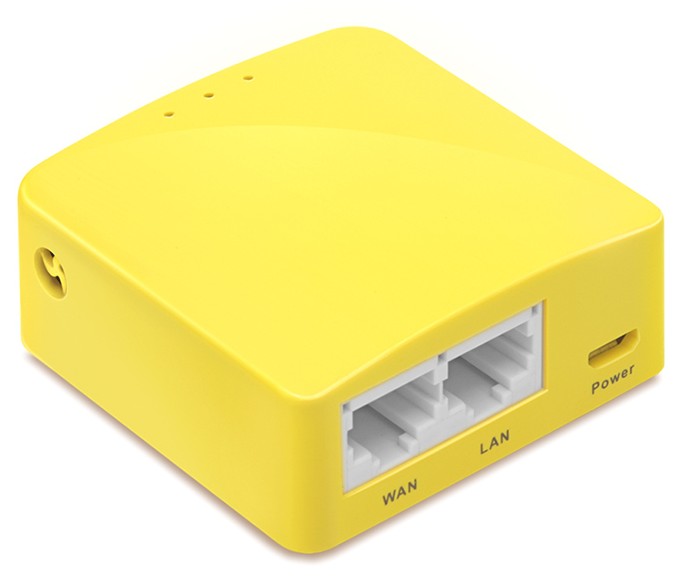
For just over $20 shipped you too can have an awesome VPN server aka the GL-MT300N-V2 made by GL Technologies (aka GL.iNet). They also work as clients too! While we’ve had to reboot the remote VPN and Phone once or twice, we’ve had months of up time using this set up. The router supports a slick GUI (what I ended up using) but if you’re retro, you can do it all manually too.

An added bonus to this whole set up is by adding a Wireguard client on my phone, I can now VPN in and use the SIP client where ever I am to call or be called.

Postscript: A few weeks ago we decided we’d experiment with letting the kids be at home alone for short periods. Per above, they have no cell phones and we have no land line. But with a perfectly good PBX in place already, I spent $4 getting a LocalPhone SIP trunk. We now pay $0.005 per outgoing call. Yes, you read that right, half a cent per call. Read more over at Ward Mundy’s site!

Poon Hill Trek

3 minutes, 53 seconds

Be sure to read my prior post about attending the APRICOT 2018 conference in Nepal before the trek!

Intro & Highlights

This was my first time trekking and my first time trekking in Nepal. While we had considered a more rigorous route of the Annapurna Base Camp (ABC), the max elevation of 4130m (13,400ft) had me concerned. I opted for a much more tame Poon Hill route, which tops out at 3210m (10,000ft) which was more my speed. In the end the elevation ended up being a non-issue. In fact, just about all my concerns were non issues ;)

We started on day 1 with celebrating Holi. At first we were reticent, but then joined the festivities by having the local kids do us up. It was lovely.

My favorite day for views was day 3. Poon Hill was clear for our pre-dawn hike and the sunrise and Annapurna mountains were breath taking. Bring money to pay for the entrance fee and hot drinks at the top of the hike! The rest of the day the mountain views kept us company and they were epic. Thanks Nepal!!

The rest of the trip was amazing. While you can feel modern amenities creeping in every town, the both benefit the towns folk and pull the “rural-ness” away from what you can tell was once a remote village. You know, the old man in me wants to have no tech when I hike/trek. I’m there to experience the place and nature, not check me email ;)

Farm animals where everywhere and it was a delight to see them. All the locals were nice, though some drove a harder bargain for their tea house prices. Check around a bit and don’t settle for the first one.

Click any of the photos in this post to see the gallery! Note, you’ll see pictures of my work conference too ;)

Finally, there was a really…oddly comforting I guess, moment when the cabi on the way to Pokhora put on “Like a Virgin“. I loved it (it’s the second clip in this video). Sorry I was too lazy to edit this video down, it’s 3 min long:

Route

Based on this write up, among others, we ended up doing this route (all prices in US Dollars and are per person):

  • Day 1: Kathmandu -> Pokhora – 30 Minute Flight $250
  • Day 1: Pokhora -> Nayapul – 1.5 hour Taxi $30
  • Day 1: Nayapul -> Hile – 1 hour Jeep $30
  • Day 1: Hile -> Uleri – trek
  • Day 2: Uleri -> Ghorepani -> Poon Hill -> Ghorepani (day hike to Poon Hill after dropping packs ;)- trek
  • Day 3: Ghorepani -> Poon Hill -> Ghorepani -> Tadapani – trek
  • Day 4: Tadapani -> Taulung -> Chomrong -> Taulung -> Chinu/Jhinudanda – trek
  • Day 5: Chinu/Jhinudanda -> Tolka – trek
  • Day 5: Tolka -> Pokhora – 1 hour Jeep $15
  • Day 5: Pokhora -> Kathmandu – 30 Minute Flight paid for on first item

I strongly encourage you pick up a map in Kathmandu or Pokhora. They’re cheap and really handy to have. We got this one which was readily available in map stores in Thamel.

Packing list

My pack was 9.5kg. I think if I didn’t carry spare running sneakers, USB battery, as fully stocked first aid kit, and micro 4 3rds camera, I’d have been around 7.5 or 8. I have no regrets though! My list is taken (and culled) from wanderingsasquatch.com. The “two shirts, one for hiking, one for not” was really great. During the warmer months you could totally skip the sleeping bag to save some real weight. The tea houses all had blankets. While I took photos with my nice camera I mentioned above, I actually was fine with cell phone’s pictures, given it’s a newer phone. Walking poles are optional, but I loved them. My gaiters and rain pants went unused the entire trip.

Hiking Clothes

  • Hiking Pants
  • 2 short sleeve shirt (preferably a “technical” shirt with synthetic fibers to help keep you dry)
  • 2 pairs of socks (in case one pair gets wet during the day, you can change socks)
  • upper and lower base layer
  • Down jacket
  • Sun hat
  • warm hat
  • Gloves (look for ones with Gore-Tex)
  • Raincoat
  • Rainpants
  • gaiters
  • Hiking Boots Water proof
  • Sunglasses
  • running shoes/flip flops

Gear

  • Backpack
  • Phone & Cord (doubles as camera)
  • Map
  • Sleeping bag
  • Water purification tabs
  • Water bladder (2 liter size)
  • Headlamp
  • Pack rain cover
  • Passport & Permits (you’ll be asked for these at every checkpoint)
  • Cash –
  • Ziplock bags for organizing/waterproof

Toiletries

Toothpaste, soap and TP can be bought along the way if you want.

  • Toilet Paper
  • Soap
  • Toothbrush
  • Toothpaste
  • Sunscreen
  • Lip balm with SPF
  • nail trimmer
  • ear plugs (tea houses can be LOUD)
  • First aid kit with at least: band aids, moleskin, ibuprofen, antidiarrheal, tweezers

Optional

  • Power Plug adapter (just about every tea house had a universal outlet that fit every wall charger)
  • Pillowcase
  • Trekking poles
  • Real Camera & Extra battery

You’ll want a small pack – no bigger than 40L likely – to fit this in. That big-ass “I fit it all on my back” pack that you carry your tent, stove, pots and pans and food for a week is too big! Here’s my pack (foot for scale) and a day pack I checked at my hotel in Kathmandu with a change of clothes and other stuffs I didn’t want to bring with:

MapTableMaker: An open source, simple-to-use, high resolution SVG map tool

0 minutes, 45 seconds

After helping release MapTable, I knew I wanted to make it more accessible for non-programmer types. While my post about using MapTable in WordPress was a start at this, you still had to have be fairly comfortable with code.

No longer! As of today, you can now use a stand alone web site to generate high resolution choropleth maps: enter MapTableMaker! This is an web application that let’s you enter CSV values for each country and quickly generate a choropleth map of the values. It allows you to specify both positive integers which will render in blue and negative ones that will show in red. It uses a percentile scale to distance the colors so they’ll be more easy to discern from each other. The resulting map is high resolution and print-ready. Here’s an example:

Of course, if you’d like run your own instance of this, MapTableMaker is fully open source (MIT). Check out the GitHub page for MapTableMaker for details on how to get your own server set up!

A great, small USB-C charger for your XPS 13 (or MacBook) (Updated 4/16/17 DO NOT BUY)

1 minute, 53 seconds

5/12/18 Update: I’ve found a new charger that’s working well (and seemingly safely) – check it out!

4/17/17 Update: These chargers have been deemed unsafe. Please do not use them. See this post for details.

While I was on vacation, I forgot my laptop charger. I found on amazon that you can get an OEM charger for the XPS 13 (9350) for about $30. This is fine, it will work the prior gen XPS 13 with out USB-C/Thunderbolt too. I got it and used it for the remainder of my trip.

Then, when I got home, I wondered if there were any good, cheap, small USB-C chargers that would work with my laptop. Lo, the RAVPower USB-C charger. Full title, on Amazon, is, “USB C Charger RAVPower 36W Dual Ports USB Wall Charger with USB-C (20V 1.5A, 15V 2A, 9V 2A, 5V 3A max) for MacBook, Dell XPS 13, Nexus 5X/ 6P and iSmart (5V 2.4A max) for iPhone and more Black”. OK, what ever RAVPower, too long on the title. But you know what is not too long? The products it works with:

  • Apple’s 2015 MacBook
  • Google’s second Chromebook Pixel
  • ASUS Transformer book T100HA
  • Dell XPS 13 & 15
  • HP Elite x2 1012 G1
  • Razer Blade Stealth, Blade (2016)
  • Nokia N1, ASUS ZenPad S8, Google’s Pixel C
  • Nexus 5X, Nexus 6P
  • Asus ZenFone 3 Deluxe
  • BLU Vivo XL and BLU Vivo 5
  • HTC 10, LG G5
  • Microsoft Lumia 950, 950 XL
  • Motorola Moto Z, Moto Z Force

Totally awesome list! I got the charger today, so I don’t have any long term usage notes just yet. However, given it can both charge my phone over speedy USB-C, or dual charge my laptop AND my phone, as it has normal USB port to charge with, I’m fairly confident it’s my new fave travel charger. One caveat is that it does not come with a USB-C to USB-C cord. I got a nice looking 10′ one which I’ll put a velcro tie on when it arrives.

If you are an XPS 13 user, or thinking about becoming one, be sure to read my write up on running Ubuntu 16.04 after purchasing the windows version of the 9350.

1/4/17 Update – I’ve been using this charger for 4 months now and it’s awesome! I got solid, braided 10′ USB-C <-> USB-C cable to use with which I recommend as well. It comes in 6′ flavors as well. Cable aside, the only caveat is that the charger does get quite hot – but so far not so much that it has me concerned; I don’t see any signs of the plastic discoloring.

Ubuntu 16.04 on Dell XPS 13 9350 (Updated 11/24/16)

4 minutes, 52 seconds

Why upgrade?

dell.xps.12.deAfter watching my shopmate get one, then seeing The Wirecutter recommend it (as of May 2016) and then seeing Dell upgrade it, I was very tempted to get a Dell XPS 13 and run Linux on it.

The straw that broke the camel’s back was seeing factory refurbished ones with 16GB of RAM, 512GB of disk, an i7, a Dell 1 year warranty and that gorgeous QHD+ resolution (3200×1800) for less than $1,300 on eBay (again as of May 2016). This is is about $700 off of retail for a comparably equipped machine (or a lot more). Though this ships with Windows 10, I figured I could install Ubuntu on it.

Ubuntu 16.04 install

Xerus_White-1024x576Before pulling the trigger on eBay, I did a lot of reading on the forums about how to install over windows. Specifically, posts like this we’re key. I knew in the BIOS that I needed to turn off Secure boot and switch disk mode to AHCI. Further reading suggested that it might be a real uphill battle to get everything, hardware wise, working.

I’m happy to report that just about everything works under 16.04! I installed it after making an install image after USB boot drive from the .iso. The touch screen doesn’t work after suspend. I was hopeful that the xinput enable/disable trick might fix it, but no such luck just yet. Given that you can’t do single finger scroll and pinch to zoom when touch is working, I’m not too bummed about this.

I was very pleased to see that this cheap USB-C to DisplayPort adapter works great. Though it can’t quite do 4k (resolution shows in “Displays”, but my Dell won’t show an image), it will do all resolutions below that. It works on boot and after repeated hot swaps. The cheap USB to Ethernet adapter worked flawlessly as well, Handy times!

The other pleasant surprise was that the Broadcom WiFi/Bluetooth card also seems to just work under 16.04. Admittedly, I’ve just been using the WiFi with no problems and haven’t tested the Bluetooth.

The trackpad works as well as my MacBook Air trackpad did under 14.04. It looks like there’s some PS/2 vs Native twiddling that might improve palm detection, but I’m happy with it as is given it’s status quo for me.

Software and eBay

air.ebayThere’s a little hiccup with OwnCloud resetting after suspend or WiFi hopping, but this is nothing to do with the XPS 13, and everything to do with 16.04. As well, the version of KeepassX that ships with 16.04 no longer supports the old version 1 flavor of the password safe. It was high time I upgraded to version 2 anyway!

Finally, anyone want to buy an 11″ Air formerly running Ubuntu 14.04, but now with a clean install of El Capitan?

6/2/2016 Update

intel.cardAfter having this laptop for a bit now and having made a few tweaks, I wanted to update this post. The first, and most important, change is that I found the Broadcom chip I mentioned above did not “just work”. Though strictly anecdotal, I found that the card had intermittent high packet loss on WiFi and was actually unusable when I went to use my Bluetooth mouse for a few hours. Swapping out the card it shipped with for the Intel 7265 802.11ac one, instantly solved all these problems. The Intal card may have caused WiFi to stop working just once after a bunch of suspend and resumes, but I can’t remember so it must not be that annoying ;)

Two notes on replacing the card: The first is that while the Amazon link cited for this is certainly the right price at $20.99 (as of Jun 6 ’16), it is a bit slow in shipping. The second is that you should totally use iFixit’s XPS 13 tear down guide as a how to for opening this laptop. As well, they cite the online Dell repair manual (pdf), if you want to reference that. And, yes, when iFixit says the bottom of the laptop takes more force to open than you think it should, they’re totally correct!

The other big change is that I installed TLP in hopes of improving battery life. Using the default config out of the box seems to yield good results. However, this is just anecdotal evidence again, nothing scientific.

Otherwise, the general update is that this laptop continues to rock. I use it about 3-10 hours a week, including some intense 4 hour work sessions at the cafe. For full dev environment I run two vagrant VMs on Virtual Box along with Chromium, Firefox and PHP Storm as my IDE. I’m pretty sure I could get 6-8 hours of battery life running these apps if I was conservative with the screen brightness. Some times when I resume it, I’ll see 14 hours remaining in the battery life. It almost always drops down, but still neat to see.

It looks like you can still get this bad boy on eBay for just under $1,400!

8/13/2016 Update

I’m still totally loving this laptop! Seeing my wife get more comfy with her laptop and it’s touch screen, I wondered if I could find a fix for mine under 16.04. After some searching around a found a fix that is…so simple it’s silly. Quickly close and open the lid:

close the lid just to enter suspend state, but then reopen it quickly, so that it stays in suspend state even when the lid is open. Then press power button to wake it up. Then the touchscreen works again!
xps9350: touchscreen stops working after sleep

After testing this over the last 4 days, I can confirm it works. Coupled with the fact that the OS and Chrome/Chromium handle single finger scroll and pinch to zoom, I’m a happy camper! The icing the cake was finding the Grab and Drag plugin for FireFox. Though pinch to zoom doesn’t work, single finger scroll does. Handy times!

11/24/2016 Update

One my fine readers pointed out that the touch screen under 16.04 has been more properly fixed. This is awesome! This gist on github has all the info you need. Be sure you read the part about using uname -r to get your kernel and make sure it matches on the line that the script is hard coded against. For it it was 4.4.0-45, but for the original author it was 4.4.0-47. As well, it didn’t fully start working for me until a restart.

5/17/2018 Update

Almost exactly two years in and this laptop is still my daily driver! It’s been *super* stable and I’ve had no problems with it. I’m still on 16.04, despite 18.04 having just been released. Also, check out my latest post about USB-C accessories I’m using!

SANOG 27

3 minutes, 17 seconds

IMG_0240

I was lucky enough that my work sent me to both visit our office and team of 4 in Nepal, and as well to attend SANOG 27. After submitting my talk on TLS using Let’s Encrypt, I was humbled to have been selected to present as well.

Tourism

Boudhanath

Boudhanath

This is my first trip to Nepal and the place is amazing. I’m sad to report that on top of the thousands killed and way more displaced, amazing, ancient sites were heavily damaged in the 2015 earthquake. I visited both Kathmandu Durbar Square and Boudhanath both of which suffered devastating damage.

Nyatapola

Thanks to my awesome co-workers, they took me on a motorbike trip to Nagarkot which gave me a chance to get away from the hotel and see something more than nearby Thamel. Kathmandu Valley countryside is beautiful. Though the smog prevented epic views of the Himalayas, staying at the mount side hotel and waking early to see the sunrise was splendid.

On our return ride to Kathmandu, we stopped at Bhaktapur Durbar Square, which suffered much less damage from the quake. The Nyatapola Temple is stunning.


Conference

SANOG 27

Conference

This is my first time attending a Network Operators Group (aka “NOG”) meeting. The bar for future NOGs has been set very high given how amazing SANOG 27 was. The conference, though attaining an all time high over 300 attendees, felt quite small. Given that I was a speaker and staying at the hotel where the conference was, I was also treated almost every night with a dinner paid for by a local sponsor (or not so local in Huawei’s case). There were a couple very sales-centric talks (which is frowned upon), otherwise most of the talks were impressive and informative. I attended them all as there was only one track with all attendees present.

YouTube

You can see my slides or you can re-watch the live streamed YouTube recording. I was humbled to receive many compliments on my talk, but I feel I have room for improvement!

Special thanks to Fakrul Alam for letting me do a brief Let’s Encrypt demonstration during the Network Security workshop (and also for doing a quick key signing!).

SANOG Workshop

Workshop

Anyone looking to up their game should seriously consider attending a regional NOG. For example, SANOG 27 was $310 all in: Conference, Tutorial and Workshops with Lunch for all 8 days. Considering flights from the US are well under $1,000, this is quite cheap compared to, say, Black Hat. At over $2,000 for Black Hat, if you took this money to SANOG 27 instead, you would be able to pay for airfare, the full Monty of conference, workshops and tutorials, your hotel AND get a trip to Kathmandu included! I can not underscore enough the level of expertise I saw in the presenters and teachers here. They’re simply amazing.

Favorites

Pottery Square @ Bhaktapur

Pottery Square @ Bhaktapur

Between both the tourism and conference, here’s my favorites:

Thanks

NPIX Install

NPIX Install

Thanks to PCH for sending me!

Thanks very much to SANOG 27, Aftab Siddiqui, Gaurab Raj Upadhaya and GZ Kabir for accepting my proposal to speak!

Most of all my thanks to the totally awesome PCH staff who live in the Kathmandu valley. Thank you thank you thank you to Kabindra Shrestha, Chatur Ratna Shakya, Rustan Shrestha, and Dibya Khatiwada. They extended an amazing amount of hospitality and made me feel very welcome at both SANOG and their homeland at large. The best gift a foreigner could ask for is the welcome and help that I received from these four. You are all amazing!

Defcon 2015

2 minutes, 33 seconds

Another year, another Defcon!  This was my third year attending.  The biggest change this year was that the conference changed locations moving from the Rio to Paris/Ballys.  Given I’m some what of a lookie loo I can’t say with super authority, but I thought the space worked as well as the prior location, leave the fact that the sky talks were on a separate floor and might have gotten less traffic.  Given that in prior years they had an hours long wait, it may have been a good thing.

Since I live in Vegas, I didn’t have any concerns getting my pick there, like I did with Hope. Otherwise, this years highlights were:

  • Seeing Cory Doctorow speak on general purpose computers.  Nothing really new here if you follow him (author ID 1!), but it was fun to see it all wrapped up nice and dense and delivered with passion.
  • Bruce Schneier is just awesome.  His talk was actually just 45 minutes straight of Q&A, but with a super nerdy crowd, it did not disappoint. Like Doctorow there was nothing new, but I found Schneier more pleasing and inspiring to see than Doctorow.
  • Holy crap Marc Rogers and Kevin Mahaffey, the Tesla hack guys, are awesome!  They literally tore into a new Tesla and gained remote root.  An amazing talk that was just high level enough to keep you following along but way deep enough to blow you away with how hard they had to work to achieve the hack.
  • Samy Kamkar‘s talk on hacking garage doors and car fobs was tons of fun.  I’d seen a video on the garage door opener before, but the fob attack was new; both were great to see revealed real time.
  • The EFF presented on their Lets Encrypt certificate authority which will feature automated cert creation and installation.  The demo was inspiring to see.  The thought of TLS for everyone and their mother is totally great.
  • I heckled Alejandro Mayorkas trying to force him to agree that crypto back doors are a Bad Thing.  Unsurprisingly, he didn’t take the bait. I was bummed that his security entourage was too strong to let me shake his hand and thank him for speaking at Defcon.

Though I didn’t make it very far through the matasano crypto challenges, it is amazing to see how relevant the lessons learned in those challenges are. Hex, Base64 and XOR…every talk I attended had one of these concepts as a critical part of their hack.

Here’s a list of talks I attended:

On really nice standing desks with really nice computers

3 minutes, 53 seconds

A good friend of mine is setting up a new workstation in his new lab and wanted some advice on what would be the best setup. Being a bit of a geek about monitors and having set up my own desk, I had a lot of ideas on this. After a detail-packed email to him, I realized it’d make a great post for others looking to do the same thing.

The overall question I got: What would be the best standing desk with the best monitors for a new Mac Pro (nMP)?

This is fun!  I get to spend imaginary money for a dream set up.  For my “what’s the best” type of questions, I always try to refer to  The Wirecutter, they’re great. As well, I try to use Amazon whenever possible for all of my shopping needs

The Desk

Though Wirecutter has a newer, cheaper recommendation, I still like their step up, the NextDesk Terra, which was their “regular” recommendation when I got mine. I see it’s now down to $1,500.terra

NextDesk upgrades: You can get a ton more bells and whistles including CPU stands, software integration, casters, batteries (for use when moving on casters) and more. The bare minimum I would get is the “Power Management,” which is really well done. Also – think on whether you want the hole(s) for cables in the desk. I regretted getting a single center one. I might have gone with none or two side ones.

Monitors and Stands

standsI use Ergotron’s single and dual arm mounts. Amazon pictures the dual with two monitors on top of each other, but it can easily do two side by side (as well, they rotate for one portrait and one landscape). You can also order the single and then add a second arm to the same pole at a later date if you decide to add another monitor.

IPS 60hz 4k displays used to be $3,000+.  This is no longer the case! The Dell P2715Q 4k 27″ is down to $500! This is insane. You could get two of these no prob for your Mac Pro. IPS means that the viewing angles are perfect.  60hz means that the refresh rate is super fast and your mouse/window movements don’t feel sluggish.  dell4k means that you can either run HiDPI for super crisp text or 1:1 for TONS of real estate. Well, assuming you have good eyes for the 1:1 ;)

Though 4k is ready for prime time, there are a few bumps in the road, specifically around displaying the boot process. As well, I see Apple’s nMP page boldly advertises “connect up to three high-resolution 4K displays.” However, I’ve also seen reports that the 3rd will be only at 30hz (boo!).

I forget which cables Dell comes with, but you can always get a 3, 6, or 9 foot (or more!); it’s nice to have the perfect length cable with no extra slack. cableSame for ethernet, USB, firewire and thunderbolt cables too! For example, here’s a 6ft mini display -> display port cable for just $7. Oh yes – don’t use any ugly looking dongles!  Get the right cable for the job.

Mac Pro and peripherals

I don’t actually have a new Mac Pro (aka nMP aka 2013 Mac Pro), so I don’t have too much to say about which CPU and GPU to get.  However, I did just get a 5k iMac that works great with the Dell         4k display! (Well, as long as you don’t mind some UI degradation. Ok, not so great, but worth the trade off for me.). To save money on the most expensive item in this monster desk setup, I strongly recommend using refurb.me – they’re the best way to effortlessly get good deals on Apple refurbed products! These are direct from Apple and include an Apple warranty.

mac.proOne new Mac purchasing trick I did learn is about buying your new Mac with more RAM direct from Apple.  Don’t do it! For example, 64GB of aftermarket RAM only costs $664 instead of Apple’s $1,300. ramConsider putting the saved money toward more cores or disk or graphics card! I love Crucial for cheap aftermarket RAM, but I usually end up buying their stuff on Amazon. Here, B00GEC3ZJQ on Amazon is cheaper than the exact same part (CT5019226) on the Crucial site. Order two kits to max out your nMP to 64GB.

Keyboard and keyboard mouse – I love Wirecutter’s recommendations for wireless versions of both mice and keyboards. They really add to the clean lines of VESA stands on the awesome desk.mouse

Despite loving the wireless mouse and keyboard, my new boss got me a “welcome to your new job!” gift of a fancy Das Keyboard 4 Pro which I NEVER would have bought on my own given it’s price. If I had office mates, they NEVER would want me to use it because it’s too loud. That said, I actually love this keyboard so much that I alternate it with Wirecutter’s bluetooth pick, but the cable does ruin the lines of your desk. ;) Oh – I see it comes in “soft tactile” model as well. This might be a more quiet option!

das.keyboardI love following this topic so drop me a note if you have any questions or want to update me with your experiences in this area!

HOPE X

3 minutes, 45 seconds

I’m on the plane back home having just attended Hope X in NYC. What fun! I’ve attended other hacker conferences, and I found Hope to be comparable.

As prep for attending, I wondered if it would be OK to carry on my lock pick set (side note: I think there’s an overlap of hackers and gun fans). Since I’m not on social media, my friend posted to her network about carrying on picks. She’s friends with a lot of hacker-lock-pick types and we got back some great responses. Here’s a bunch of anecdotal, if not contradicting, advice if you’re considering doing the same:

other countries are much saner than TSA.

Spouse’s are going in the checked bag, but mostly because there are other more pointy things in the same kit this trip. Other times they have gone carry-on. Domestically, it’s “probably” ok if you aren’t already one of TSA’s special customers. I’m sure PreCheck doesn’t hurt, either.

TSA has their own special set of bullshit to deal with. Avoid when possible.

all I can say is that wearing them as jewelry works out fine. I don’t know that I’d want to carry them.

Lockpicks can be carried on if your not a jerk. I have flown with mine and up to 50 sets(pics did happen).

I carried mine through LAS last year. TSA found them-Nevada police told then to shut up

I have been carrying an extended serepick set in my wallet for years with zero issues.

I’ve never had any issues packing mine in carry-on bags. I think I’ve traveled to/from 3-4 DefCons, + trips to SFO/PDX/LAX YMMV

added a 8″ shovit tool to carryon and had no problem through 6 or so countries so far.

As to my own experience? I had zero problems flying from LAS -> JFK and from JFK -> LAS. Though, I will say I was *SUPER* bummed I didn’t have my backpack with picks on me when I saw world lock pick champion Jos Weyers at the lockpick village. I coulda bugged him about how to pick tubulars. Next time!

The conference itself was awesome. It had the mix of talks that were spectacular and ones that were so so. The complete list is below, but here’s some highlights:

  • With out a doubt the ultimate highlight of the show was being in the room with Daniel Ellsberg to hear his keynote which was followed by a Q&A with Edward Snowden via a video chat to Russia. I was that emotional, geeky guy in the audience who kinda freaked out at how amazing it was to be in the audience listening to this event. Snowden’s parents were there in person too!
  • Nadim Kobeissi’s talk Usable Crypto: New Progress in Web Cryptography covered a neat idea about doing client side encryption in JS. Coupled with an easy way to share your public key in less than 64 bits (think 64 letters like A-Z and 0-9) and helpfully simplified (but obfuscated!) private key storage, his miniLock project looks promising.
  • Deviant Ollam and Howard Payne’s talk Elevator Hacking: From the Pit to the Penthouse was hugely entertaining and edifying. They REALLY know their stuff and are great story tellers. Note: Elevators may be your weakest point when it comes to physical security!
  • Brian Knappenberger spoke and then there was a showing of his film, “The Internet’s Own Boy: The Story of Aaron Swartz”. Aaron’s brother and Brian had a round of Q&A afterwards. It was a horribly depressing film but wonderful to watch it with the geekiest of audiences.
  • Christopher Soghoian’s talk Blinding The Surveillance State was awesome. I’ve been following him for years since way back and always make a point of seeing him when ever he speaks. He gave an update on how better policy can be changed by embracing Washington’s use of the term and concept of “Cyber” and not saying, “NSA is Evil! We need encryption”. Instead we should be coming up with solutions to security scenarios that further protect our citizens from criminals and terrorists (and SHHHHH! also from the NSA!).
  • Phillip Hallam-Baker is a smart, smart man as witness by his talk PRISM-Proof Email: Why Email Is Insecure and How We Are Fixing It. He helped Tim Berners-Lee with a little project back when, and he’s looking to do something similarly impressive with encrypted email.

Talks Attended

Solve the Hard Problem

Steepest Dissent: Small Scale Digital Fabrication

Lockpicking, a Primer

Per Speculum In Ænigmate

SecureDrop: A WikiLeaks in Every Newsroom

Keynote Address – Daniel Ellsberg

A Conversation with Edward Snowden

Usable Crypto: New Progress in Web Cryptography

Social Engineering

Movie: “The Internet’s Own Boy: The Story of Aaron Swartz”

Ethical Questions and Best Practices for Service Providers in the Post-Snowden Era

PRISM-Proof Email: Why Email Is Insecure and How We Are Fixing It

Elevator Hacking: From the Pit to the Penthouse

North Korea – Using Social Engineering and Concealed Electronic Devices to Gather Information in the World’s Most Restrictive Nation

Blinding The Surveillance State

Addendum to “Ashley’s Law”, problematic iMac VESA mounts and new desks

2 minutes, 29 seconds

I’ve been thinking recently about items you use a lot in life. For example, the internet thinks we sleep for 20+ years in our lifetimes[1][2]. As well, the internet suggest a person with a desk job will spend 80k hours sitting [3]. What does this mean? It means that you shouldn’t skimp on your mattress and your chair! In fact, you should buy the best mattress you can afford. Well…no, you should by the best mattress on which you sleep well and should try to not be price conscious. Same for your chair and your desk. So if you recall Ashley’s Law said:

If you don’t have it, you can’t use it.
– Ashley Jones, 2011

So the addendum would be:

If you’re going to use an item for more than a 1/4 of your life, it should be a quality item you didn’t skimp on.
– Ashley Jones, 2013

The list of applicable items should be quantifiable! Despite having recently purchased not one, but two cars, I would say for most folks they don’t spend 1/4 of their lives in their cars. So, unless you’re a trucker, my advise is to not spend a lot of money on your car.

Speaking of this new addendum, I wanted to set up my iMac to be mounted on an articulated arm on my desk so it could be be the perfect ergonomic height when I work on it for hours a day (8+). This would also giv my desk those really clean lines with the monitors floating over the surface. Here’s my advise to those who want to also endeavour to have this setup:

  • The $115 Ergotron MX will indeed support a 2012 30lb, 27″ imac[4]
  • Be sure to get the iMac VESA mount[5] and not the Cinema Display mount which is cheaper[6]
  • Read the instructions for your iMac VESA mount carefully.
  • Especially the warning after step 4:imac.VESA.warning
  • If you don’t follow this step and after you take off your iMac stand you see the VESA mount suck back into the dark depths of Mordor[7] otherwise known as the inside of your iMac, chill out. Go down stairs and grab a cold beer. Crack off that top, take a nice long sip.
  • Back with your beer? Great. Skip the the top search result[7] which you find where they say you’ll have to disassemble your entire iMac and void your warranty to get your VESA mount back out:

    Hopefully you can fish the inner bracket back up and out the slot, because if not the iMac may have to be completely disassembled to recover it.

  • Take another sip of beer.
  • Check out the post waaaay down yonder in the search results. That’s right, the one with pipe cleaners[8]. See? You’ve got those supplies in your house to fetch that nasty guy back out. Here’s another variation that I came up with:vesa.retreval.2vesa.retreval.1

    Yes, that’s right, using some needle nose pliers, some picture hanging wire or what ever else you have around the house, you retrieve your precious and get back to setting up your desk.

After heeding my own addendum, following the wire cutter’s advice on standing desks[8] and recreating the “you can’t stump me, I’m the internet” solution to get my VESA mount back, I have a great desk set up that’s really quite nice. I highly recommend treating yourself right with the items you use the most:

newdesk