Category Archives: Android

Keys-To-The-Tunnel 1.1.0 released

3 minutes, 14 seconds

Hey hey! I’d been meaning to consolidate some of my VMs I’m paying for and semi-accidentally deleted the place where I was hosting my work’s instance of Keys-To-The-Tunnel (KTTT). With this VM deletion, I decided to leverage my recent dabblings with Caddy and do a big refactor of KTTT by replacing Apache with Caddy.

As a reminder, KTTT is an easy way for an organization which both develops web apps and uses GitHub to share their local dev app on the internet via a publicly accessible URL all protected with solid TLS and SSH encryption.

Let’s dive into what the update means and why I did it!

Parenthetical aside about TLS for local Android development

Originally I asked if potential KTTT users :

ever need to test an Android application against a web server such that you need a valid TLS certificate?

Not so good idea on my original KTTT post

This is actually a bad idea if all you need is a valid TLS cert for Android testing. The reason is that you’ll literally be holding your phone in your hand which is less than a foot from the computer hosting your app you want to test against. By introducing KTTT into the mix, you send your traffic thousands of miles/kilometers (you pick which) and back just to get a TLS cert. Crazy times!

A much better approach is to use something like local-ip.co . If you want an easy way to keep your traffic entirely local, you can use nginx-local-ip with a one line docker compose call to set up everything you need to locally run a local-ip.co TLS. It’s a really sweet set up! (I’m biased because I help author some of it ;)

KTTT is still a great idea if you need to share your local dev environment though!

With that out of the way, back to KTTT updates…

What’s new with KTTT

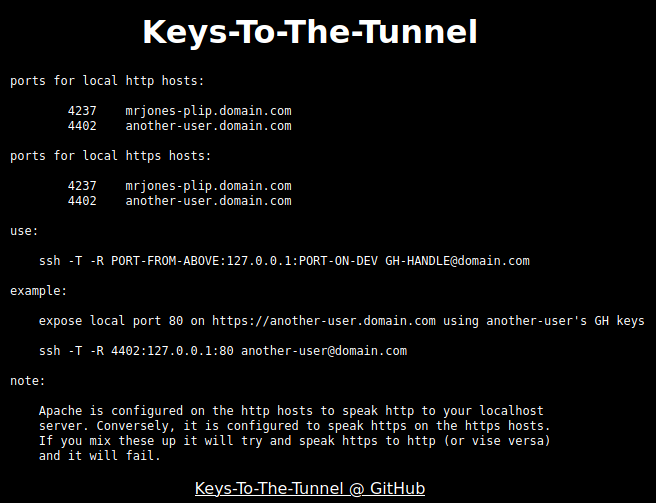
For an end user of KTTT who just wants to share their app, it’s now WAY easier to figure out which SSH command to run and which URL to share. This is thanks to the handy web app which walks you through three easy questions:

  1. What is your GitHub Username?
  2. What port is your app running on locally?
  3. Is your local app using http or https?

This is MUCH better than wading through a list of random ports and other GitHub usernames which you only cared about your username and port. Here’s what the updated web app looks like in action (15 second video):

For the administrators of KTTT, you’ll note that KTTT now uses Caddy instead of Apache. While there’s nothing wrong with Apache, Caddy is a simpler take on the needs of an app like KTTT that requires a bunch of small reverse proxies. Caddy is 7 years old and came to being in the world of Docker, containers and micro-services. Where as Apache is 27 years old and came being near the birth of world wide web.

Ironically, a key feature of Caddy, the ability to automatically provision and renew TLS certs, is NOT being used. Instead, the opportunity to use a wildcard TLS cert came up via acme-dns.io and I took it.

That all said, it’s a joy to use Caddy because I can create a simple JSON file with four lines to define a reverse proxy:

mrjones-plip.awesome-tunnel.plip.com {
   tls /etc/certs/fullchain.pem /etc/certs/privkey.pem
   reverse_proxy 127.0.0.1:3089
}

Love it!

Putting it all together

The web app above gives a pretty good idea of the improvements, but since I added a demo video of the whole KTTT experience on GitHub, may as well post it here in case you’re curious (44 second video):

Other odds and ends in 1.1.0

There’s also a bunch of other fixes and improvments I made while in there. Here’s the notes from the 1.1.0 release:

  • Replace Apache with Caddy
  • Add mini web app to help devs figure which URL and SSH command to use
  • Unify mutli SNI certs to one wildcard with acme-dns.io (still using Let’s Encrypt though) per #1
  • Don’t overwrite existing user’s ports every time you run setup per #3
  • Don’t regenerate TLS certs every time you run setup per #3
  • Don’t rewrite vhosts in web server every time you run setup per #3
  • Update MOTD on login per #4
  • Try my hand at being an artist and create a KTTT logo

On The Register’s security posts

3 minutes, 12 seconds

Intro: 2 posts, 1 bored security tinkerer

I was stuck on a cross-country plane trip recently, and I started reading up on some security posts.  I found two interesting ones, both of which happened to be written by Darren Pauli:

As a best practice, from way back in my journalism undergrad days, I try to always go to the source of news articles I read.  So, for both of these posts I dug in and tried to see the facts and chronology as the articles reported them vs what the actual sources said. Let’s dig in and see what we find!

Article 1: How unresponsive and culpable was CyanogenMod?

The first article  was published by The Register on 13 October 2014 and claimed that 10 million phones were vulnerable to a Man in the Middle (MitM) attack and it was a zero day exploit.

On October 14th CyanogenMod (CM) responded, ‘In Response to The Register “MITM” Article.

Then McAfee jumped on the bandwagon of an exploit possibly affecting a lot of Android users. On October 17th the McAfee blog published a piece on this vulnerability as well saying, “it appears easily fixable once it’s actually acknowledged and addressed by the CyanogenMod team.”

The issues I see with the scenario painted in these articles are threefold:

  1. The initial piece by Pauli states that the source of the attack is open source code in a 2 year old vulnerability. How can this be both a zero day exploit AND a 2 year old vulnerability?  Unsurprisingly, CM’s response cites this point as well.
  2. A whole 3 days had passed when McAfee posted their blog piece stating that CM hadn’t responded when, in fact, they had.  CM’s response was published 24 hours after the original Register article.
  3. The issue purportedly affected “10 million users” already sounds good, so there was no need to erroneously report that it affected “12 million” as the McAfee piece did.

Article 2: Was TOR really vulnerable?

In the second post, Pauli’s title starts off with, “STAY AWAY” and the subtitle “USB plugged into Atlas, Global servers.” He goes on to pull a quote from the tor-talk mailing list, citing Thomas White saying, “the chassis of the servers was opened and an unknown USB device was plugged in.”

More so than the first article, there’s a number of issues with this piece. Some are minor, but some are egregious:

  1. The only link to the thread about the incident on the tor-talk link is wrong.  He cited a thread about hidden services instead of the one on possibly illicitly inserted USB devices.
  2. The subtitle “USB plugged into Atlas, Global servers” references White’s instances of Atlas and Globe as if they were the one and only ones, when in fact they’re not. The Tor Project instead links directly to atlas.torproject.org, from their homepage no less.
  3. By the time the story was published, the issue had been fixed and Tor users at large didn’t even notice:
    1. Dec 21 20:17 UTC  – Initial post to the tor-talk list is made by White
    2. Dec 21 20:55 UTC  – White posts the fingerprint of all the servers he felt could have been compromised.
    3. Dec 21 21:05 UTC – Jacob Appelbaum rejects the possibly compromised nodes so that general public Tor users won’t unknowingly use them.
    4. Dec 21 23:54 UTC – White gives an extensive update.
    5. Dec 22 05:58 UTC – Pauli writes his piece for The Register.
  4. The title of the article, “STAY AWAY” goes against a explicit request from White in his 23:54 update, “Tor isn’t broken. Stop panicking.” White’s request was penned before Pauli even published his article.

Clicks clicks clicks

I feel like The Register’s articles, and the related McAfee piece, though having quite a bit of truth to them, take advantage of the facts.  The Tor piece borders on fearmongering.  Put it all together and I think that tech writers and bloggers can easily shoot out a piece that gets the clicks.  To make matters worse, both Register pieces haven’t been updated to reflect not-so-recent updates:  issues cited aren’t of concern by the developers and maintainers of CyanogenMod and Tor respectively.

Given I’m new to critiquing news pieces, I reached out to Pauli for comment. He didn’t get back to me. If he does, and it turns out I’ve gotten any of the facts wrong, I’ll be sure to post an update!

Root on Verizon Galaxy S5 on NK2 Firmware

4 minutes, 19 seconds

Galaxy-S5After my S3 took a quick, but not quick enough, drink in the kitchen sink, I upgraded to an S5. It’s a really great phone. However, I had been running Cyanogenmod 11 on my S3 and I missed all the perks of root access. I’ve rooted my S5, and it’s awesome. Here’s a write-up for those who want to know how to do it. In my guide below, I take a bit more time than some of the threads in XDA to describe each step, which will hopefully make it a bit more beginner friendly.

Rooting is always a bit of a risk and ***YOU SHOULD NOT DO IT UNLESS YOU ACCEPT THE RISK OF TURNING YOUR PHONE INTO A PAPERWEIGHT***. Also, though, you already have a good backup system, (right!?), ***BE SURE YOU HAVE A BACKUP OF YOUR DATA ON YOUR PHONE***. With those warnings out of the way, root was a snap following bdorr1105‘s excellent write-up on xda developers. On top of it all, I had zero data loss as the root process doesn’t require you to reset android, which was super handy.

Preparation:

  • Have a windows machine and install Odin on it.
  • Double check you’re on NK2 baseband: Settings -> About Phone -> Baseband version -> last 3 characters are “NK2”.
  • Install latest Samsung USB drivers on your windows machine
  • Download both G900V_NCG_Stock_Kernel.tar.md5 and NK2_Firmware_Only.zip to your windows machine. Extract the NK2 zip file so it’s an md5 file (extracts to NK2_Firmware.tar.md5).
  • Have a micro USB cable
  • Allow unknown sources on your phone: Settings -> Security -> Unknown sources – checked
  • Read through all these steps and prep items. Ask questions *BEFORE* you start if you’re confused.
  • If you’ve never used Odin, maybe check out this youtube video to see how it works. There’s a 1080p option, and you can really see exactly which buttons to click and what Odin looks like in action. Note: the steps in this video differ from mine and you shouldn’t follow the video’s steps; follow mine instead. The video is for NI2 not NK2.
  • Be patient. Don’t get frustrated!

At a high level, we’re going to be doing 4 things which I’ll label below broken into 12 steps:

  1. Prep root kit: Installing a the towelroot root kit. Steps 1 and 2 below.
  2. Revert: Reverting back to the old NCG kernel/baseband which is vulnerable to a root kit. Steps 3 through 7 below.
  3. Root: Rooting the phone. Step 8 – just one easy step!
  4. Update: Updating back to the current NK2 kernel/baseband. Steps 9 through 12 below.

Odin v3.09 configured to install Ni2 firmware.

Odin ready to install NI2. Click to see larger version.

Now, the steps, again from the great guide that bdorr1105 wrote:

  1. Prep root kit A: Install Towel root to your phone. To download the APK, open Chrome and go to towelroot.com. Hold down on the big red lambda icon and choose “Save Link.” When you click the link in Chrome it creates an infinite redirect. If you click it in Firefox, it loads the text of the APK in the browser instead of saving the file :(.
  2. Prep root kit B: After the download, click the APK and install it. Also, add a shortcut of the towelroot APK to your phone’s home screen so that it’s easy to launch (more on this later).
  3. Revert A: Put your phone in Odin mode: hold down power button and then choose “Restart.” When the phone turns off, hold down power button, home button(button on front) and down volume at the same time. When prompted, choose to continue by pressing up volume.
  4. Revert B: Connect your phone to your laptop with the micro USB cable and launch Odin. If this is the first time you’ve connected your phone in Odin mode it might take a few minutes to find all the drivers. Possibly even longer. Be patient!
  5. Revert C: Once your phone shows up in Odin in the upper left in the ID:COM section (see screenshot), click the “AP” button and navigate to where you download the “G900V_NCG_Stock_Kernel.tar.md5” file. Click “Start.” Your phone will show a progress bar on the screen, and then it will reboot. Once Odin app says, “PASS” in green, unplug your phone.
  6. Revert D: Your phone will reboot and update the apps. This will take a few minutes.
  7. Revert E: Once it’s done updating, your phone will be slow. A ton of apps will force close. This is expected. Click “OK” or “Close” to any dialogues that pop up.
  8. Root: Click on the towelroot icon we made on the desktop. Click “make it ra1n” and wait. Towelroot will confirm you have root.
  9. Update A: Restart your phone and hold down the down + power + home buttons. Press up to get into Odin mode again
  10. Update B: Plug your phone in to the USB cable again. In the Odin app on your computer, press “AP” button and select “NK2_Firmware.tar.md5”. Click “Start.” Your phone will show a progress bar on the screen, and then it will reboot. Once Odin app says, “PASS” in green unplug your phone.
  11. Update C: Your phone will reboot and update the apps for a second time. This will take a few minutes, same as before.
  12. Update D: Go to the Play Store on your phone and install “SuperSU.” Open and choose to install SU. When prompted, choose “Normal” mode instead of “TWRP.” When prompted, disable Knox and reboot.

You’re done, congrats! You can install “Root Checker Basic” if you want to have warm fuzzies of seeing you have root. To clean up, go back into settings and uncheck “allow unknown sources” as well as uninstall towelroot. Google will flag this as an unsafe app and ask you to uninstall it anyway.