Category Archives: Tips

From zero to LXD: Installing a private compute cloud on a Cisco C220 M4SFF

17 minutes, 42 seconds

Introduction

Having some nice server grade hardware on hand, I knew I needed to put it to good use.  I’m talking about the Cisco C220 M4SFF:

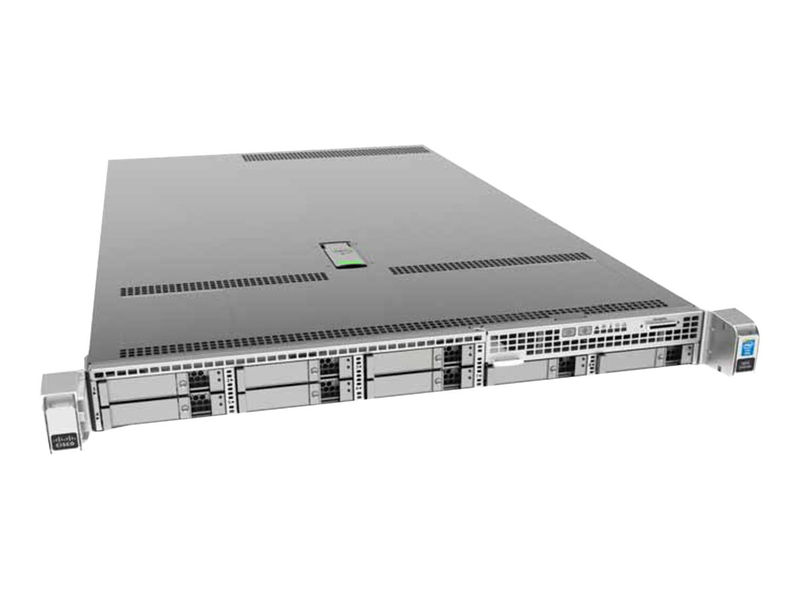
This lil’ guy comes with some nice specs. The one I have is configured thusly:

  • 1U
  • 64GB RAM
  • 8 x 240GB SSD
  • 2 x 10 core 2.4Ghz E5-2640 v4 Xeon  (40 threads)
  • 2 x PSU
  • Cisco 12G SAS RAID controller (more on this later)
  • 2 x 1Gbit on-board NIC

While having only 2 of his 24 RAM slots full, we can make do with this – besides, filling it up to 1.5TB of RAM will cost $14,400 – ouch! Specifically, I think we can make this into a nice host of lots and lots of virtual machines (VMs) via a modern day hypervisor.
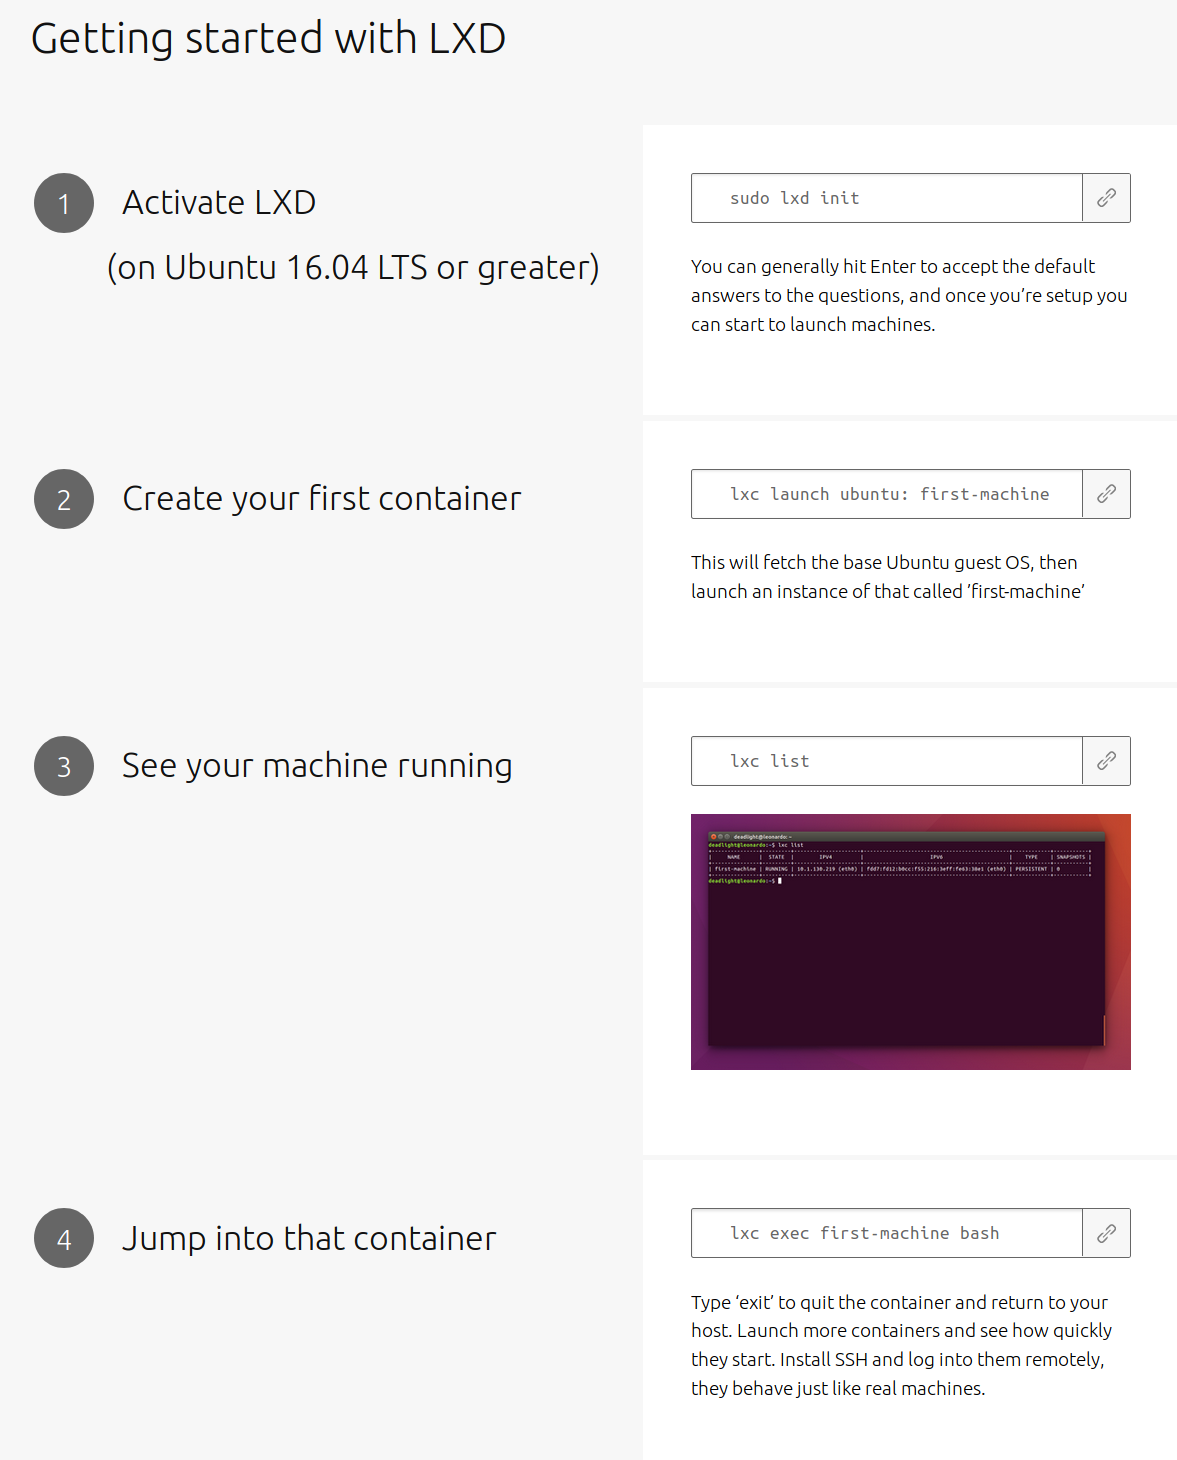
Just 4 steps!!

Looking about at what might be a good solution for this, I cast my eyes upon LXD. I’m already a huge fan of Ubuntu, the OS LXD works best with. As well, with 2.0, Canonical is really pumping up LXD as a viable, production worthy solution for a running your own cloud compute. Given that 2.0 now ships with Ubuntu 16.04, I figured I’d give it for a spin.

I’m guessing a techie at Canonical got a hold of a marketing person at Canonical; they realized that with LXD baked into Ubuntu, anyone comfy on the command could line run 4 steps to get an instant container.  This meant that while there’s a lot more complexities to getting a LXD running in a production environment (LAN bridge, ZFS Pools, ZFS Caches, JBOD on your RAID card, static IPs dynamically assigned, all covered below), it was indeed intensely satisfying to have these 4 steps work exactly as advertised.  Sign me up!

But what about the other options?  Did I look at more holistic approaches like OpenStack?  Or even the old, free as in beer vSphere? What about the up and coming SmartOS (not to be confused with the unrelated TrueOS or PureOS)? Given the timing of the demise of SmartOS’s roots in Solaris, maybe it’s time to pay my respects? Finally, there is of course KVM.

While I will still will take up my friend’s offer to run through an OpenStack install at a later date, I think I’m good for now.

This write up covers my learning how to provision my particular bare metal, discovering the nuances of ZFS and finally deploying VMs inside LXD.  Be sure to see my conclusion for next steps after getting LXD set up.

Terms and prerequisites

Since this post will cover a lot of ground, let’s get some of the terms out of the way. For experts, maybe skip this part:

  • Ubuntu – the host OS we’ll install directly onto the C220, specifically 16.04 LTS
  • LXD – say “Lex-dee” (and not this one) – the daemon  that controls LXC. LXD  ships with 16.04 LTS. All commands are lxc
  • LXC –  Linux Containers – the actual hypervisor under LXD. Yes, it’s confusing – even the man says so ;)
  • container – interchangeably used with “VM”, but it’s a secure place to run a whole instance of an OS
  • ZFS – the file system that allows for snapshots, disk limits, self healing arrays, speed and more.
  • JBOD/RAID – Two different disk configurations we’ll be using.
  • CIMC – Cisco Integrated Management Interface which is a out of band management that runs on Cisco server hardware. Allows remote console over SSL/HTML.
  • Stéphane Graber – Project leader of LXC, LXD and LXCFS at Canonical as well as an Ubuntu core developer and technical board member. I call him out because he’s prolific in his documentation and you should note if you’re reading his work or someone else’s.
  • KVM – “Keyboard/Video/Mouse” – The remote console you can access via the CIMC via a browser. Great for doing whole OS installs or for when you bungle your network config and can no longer SSH in.
  • KVM – The other KVM ;)  This is the Kernel Virtual Machine hypervisor, a peer of LXC. I only mention it here for clarification.  Hence forth I’ll always be referencing the Keyboard/Video/Mouse KVM, not the hypervisor.

Now that we have the terms out of the way, let’s give you some home work.  If you had any questions, specifically about ZFS and LXD, you should spend a couple hours on these two sites before going further:

  • Stéphane Graber’s The LXD 2.0: Blog post series – These are the docs that I dream of when I find a new technology: concise, from the horses mouth, easy to follow and, most of all, written for the n00b but helpful for even the most expert
  • Aaron Toponce’s ZFS on Debian GNU/Linux – while originally authored back on 2012, this series of posts on ZFS is canon and totally stands the test of time.  Every other blog post or write up I found on ZFS that was worth it’s salt, referenced Aaron’s posts as evidence that they knew they were right.  Be right too, read his stuff.

Beyond that, here’s a bunch of other links that I collected while doing my research. I will call out that Jason Bayton’s LXD, ZFS and bridged networking on Ubuntu 16.04 LTS+ gave me an initial burst of inspiration that I was on the right track:

LXD Info:

ZFS Info

Prep your hardware

Before starting out with this project, I’d heard a lot of bad things about getting Cisco hardware up and running.  While there may indeed be hard-to-use proprietary jank in there somewhere, I actually found the C220M4 quite easy to use.  The worst part was finding the BIOS and CIMC updates, as you need a Cisco account to download them.  Fortunately I know people who have accounts.

After you download the .iso, scrounge up a CD-R drive, some blank media and  burn the .iso. Then, plug in a keyboard, mouse and CD drive to your server, boot from it with the freshly burned disk, and upgrade your C220. Reboot.

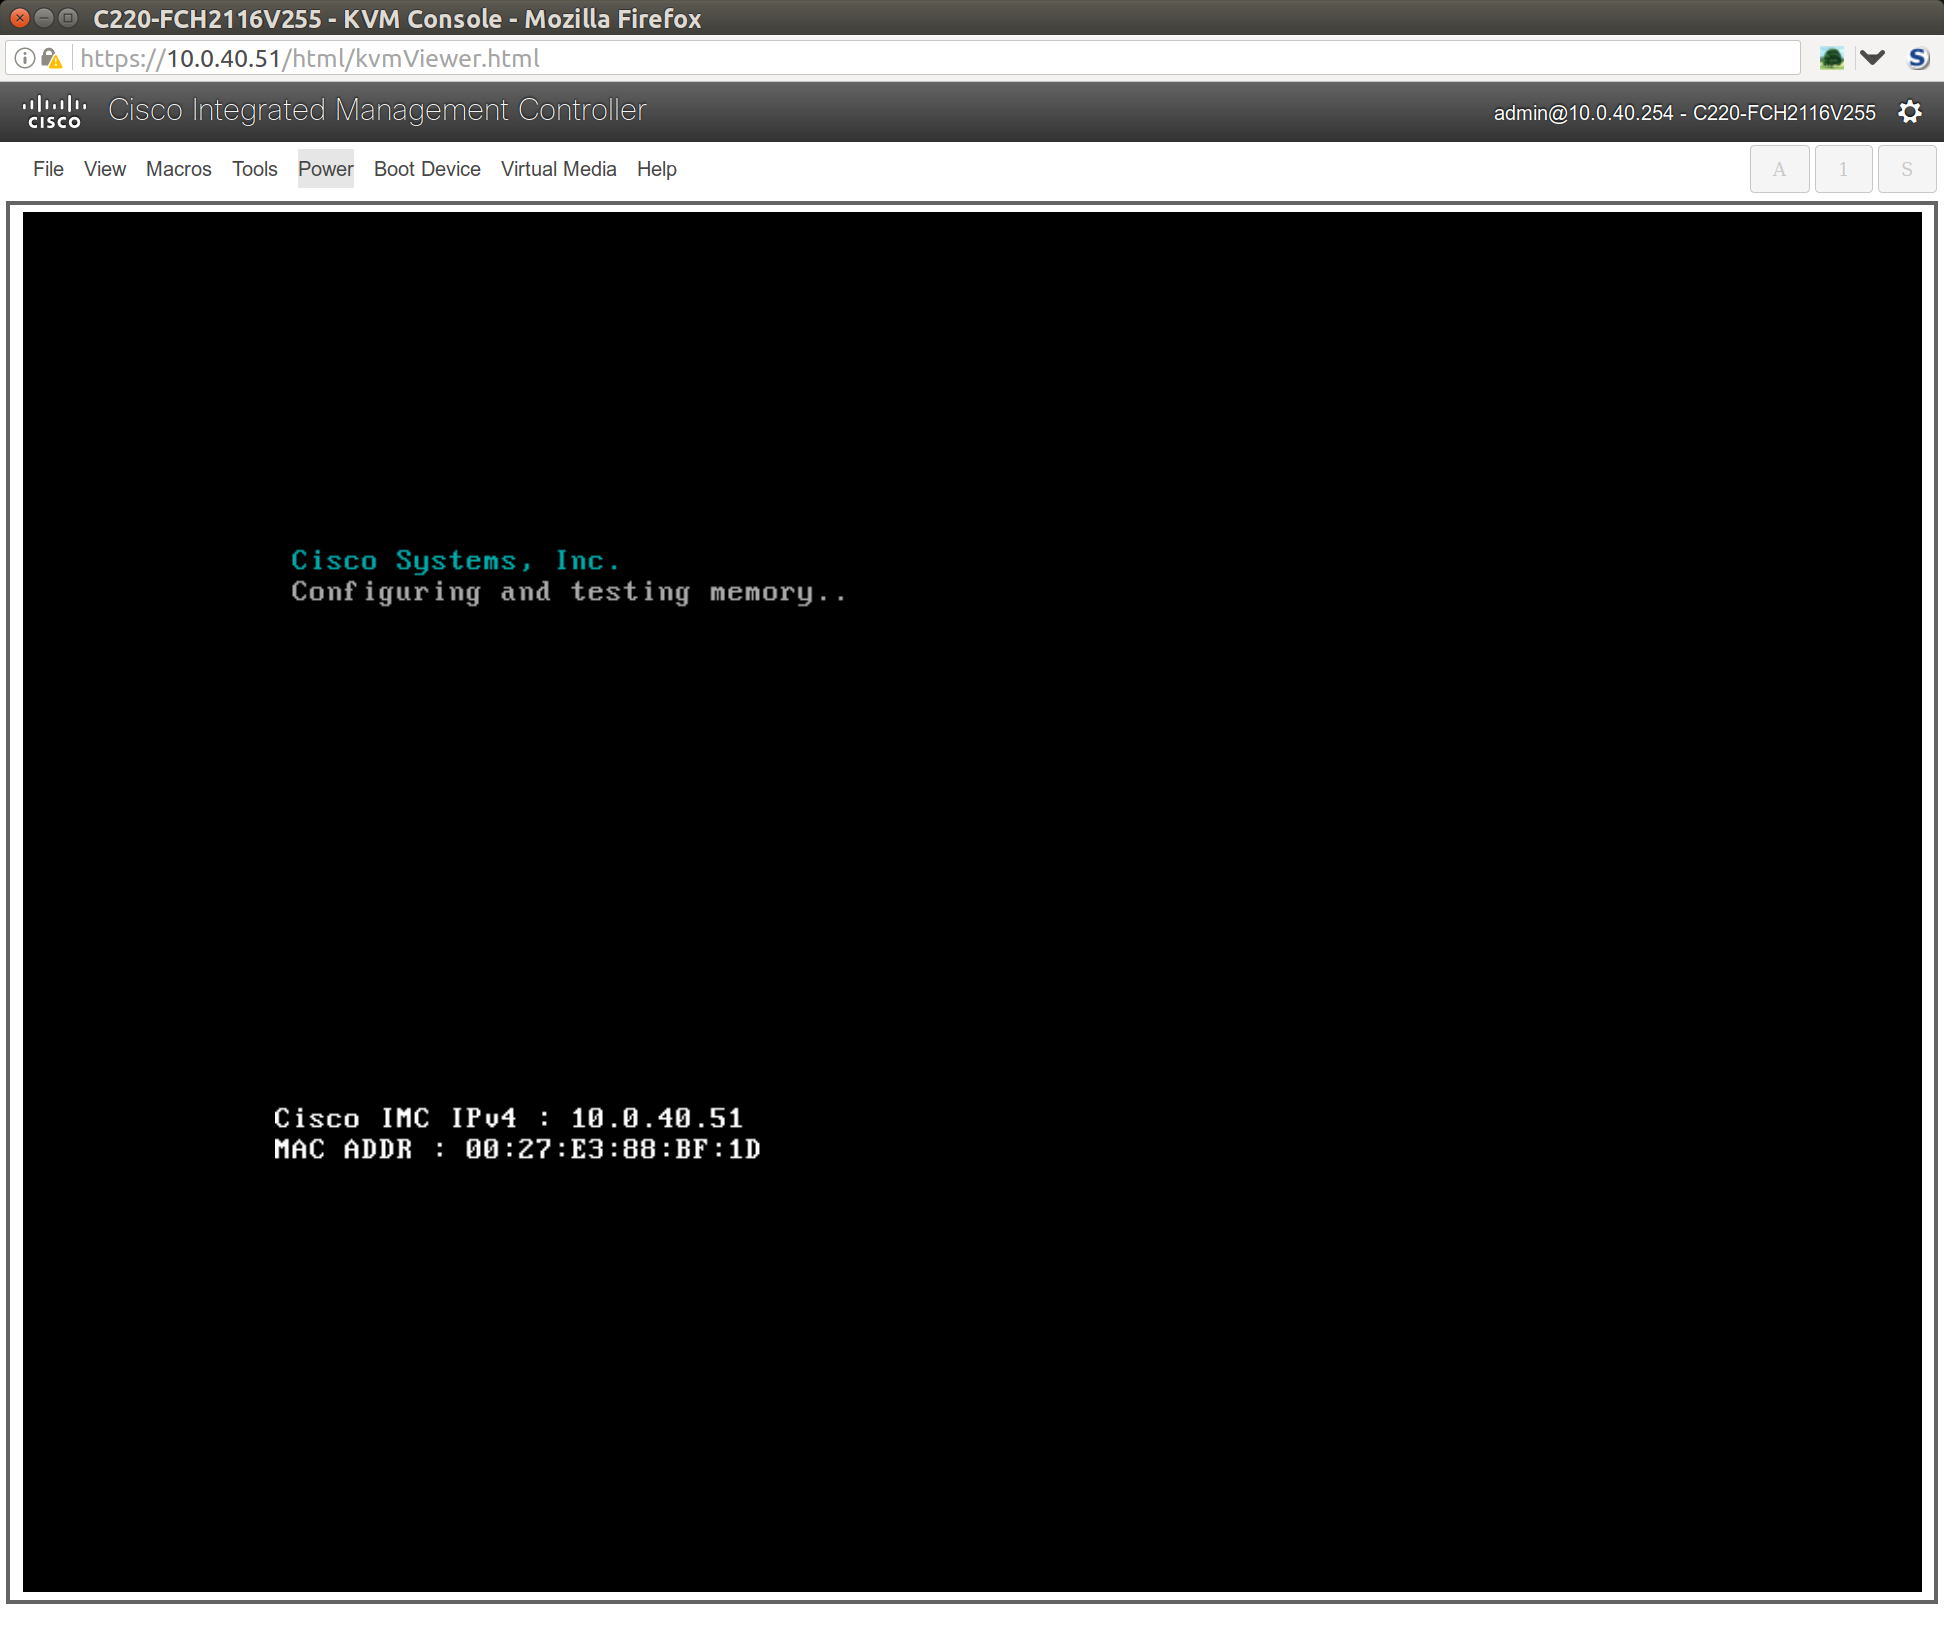
Then you should plug the first NIC into a LAN that your workstation is on that has DHCP.  What will happen is that the CIMC will grab an address and show it to you on the very first boot screen.

You see that 10.0.40.51 IP address in there (click for large image)?  That means you can now control the BIOS via a KVM over the network.  This is super handy. Once you know this IP, you can point your browser to the c220 and never have to use a monitor, keyboard or mouse directly connected to it.  Handy times!  To log into the CIMC the first time, default password is admin/password (of course ;).

The upgraded CIMC looks like this:

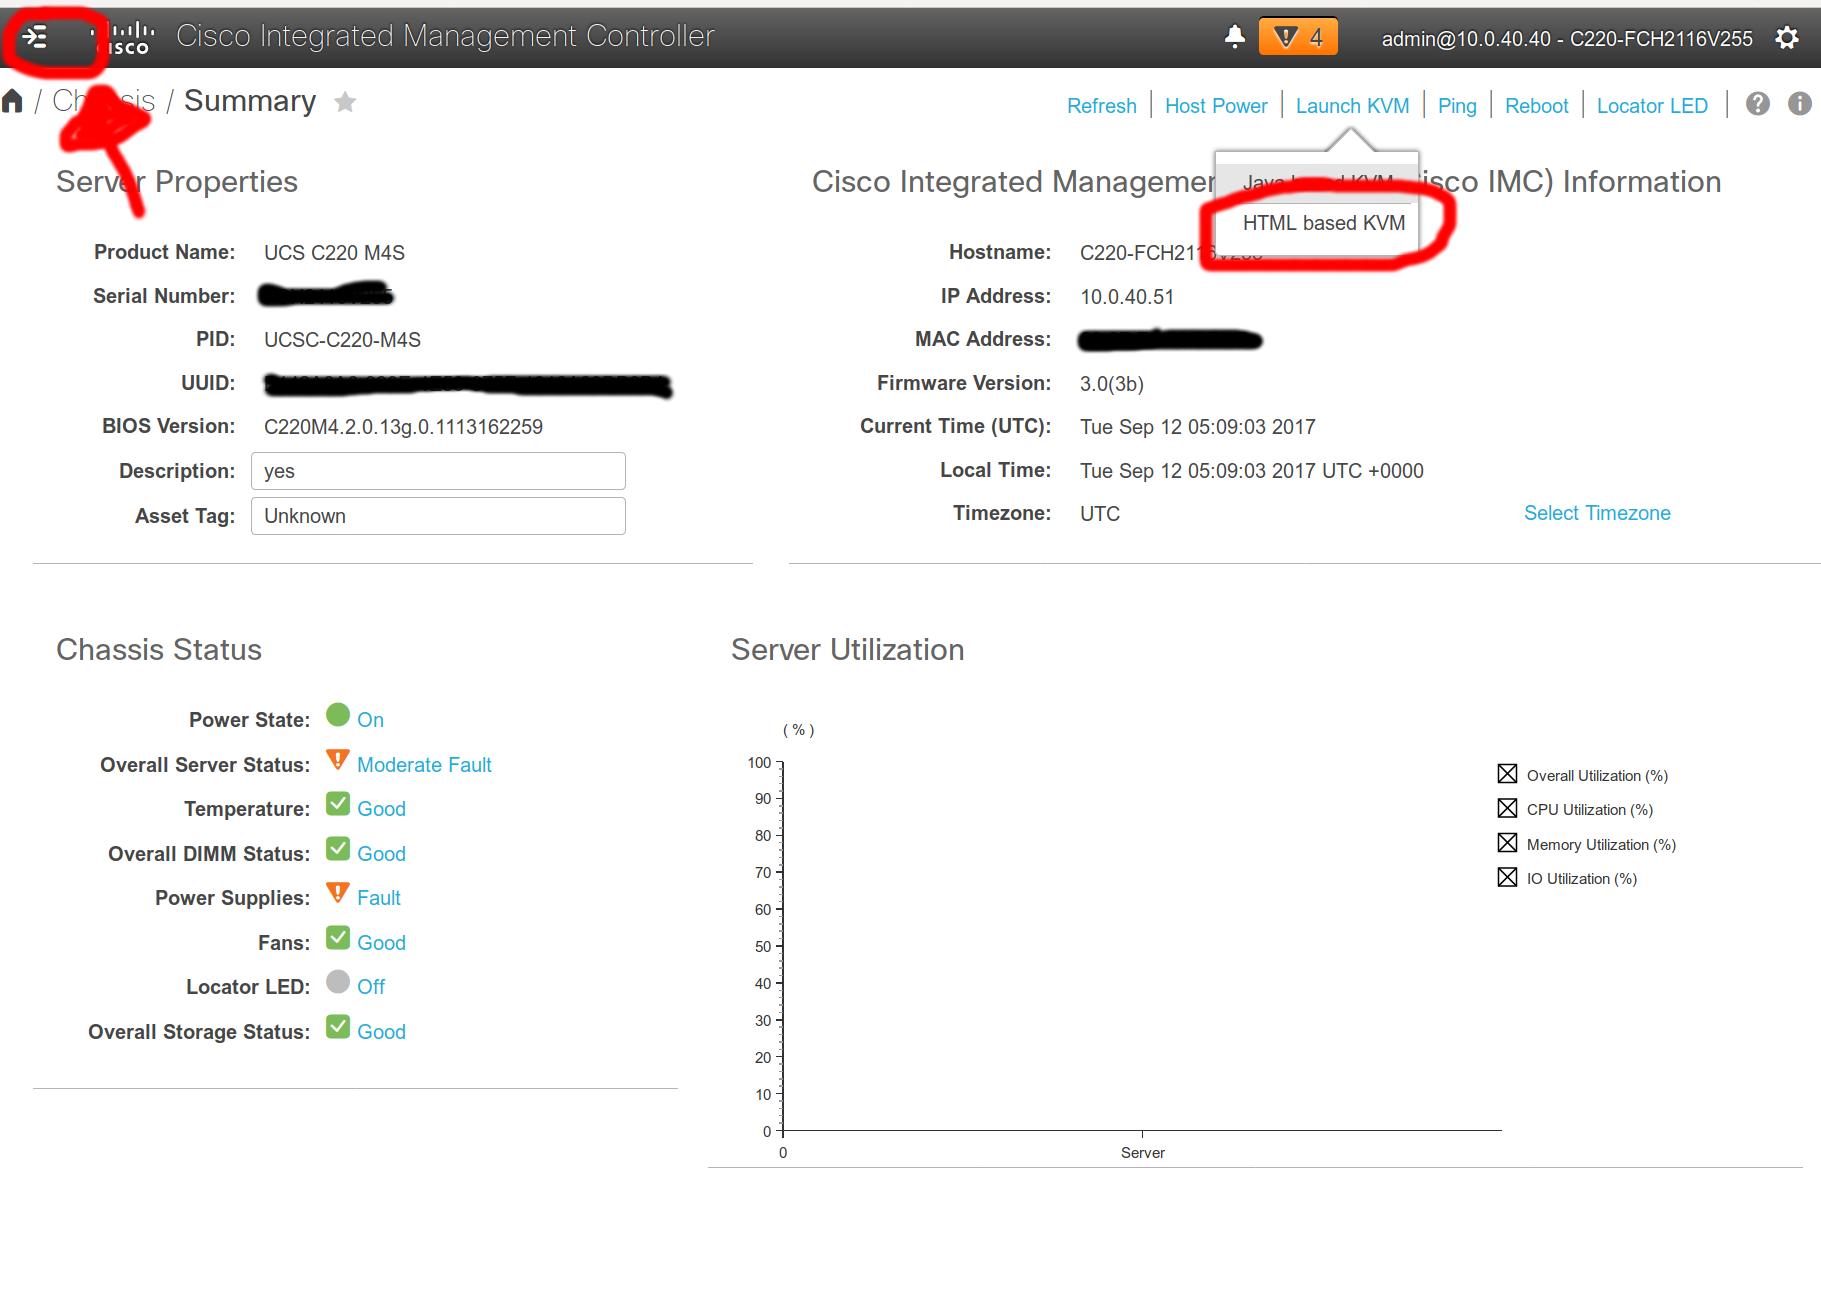
I’ve highlighted two items in red: the first, in the upper left, is the secret, harder-to-find-than-it-should-be menu of all the items in the CIMC.  The second, is how to to get to the KVM.

For now, I keep the Ubuntu 16.04 install USB drive plugged into the C220.  Coupled with the remote access to the CIMC and KVM, this allows to me to easily re-install on the bare metal, should anything go really bad.  So handy!

While you’re in here, you should change the password and set the CIMC IP to be static so it doesn’t change under DHCP.

Prep your Disks

Now it’s time to set up the RAID card to have two disks be RAID1 for my Ubuntu boot drive, and the rest show up as JBOD for ZFS use.  When accessing the boot process, wait until you see the RAID card prompt you and hit ctrl+v.  Then configure 2 of your 6 drives as a RAID1 boot drive:

And then expose the rest of your disks as JBOD.  The final result should look like this:

Really, this is too bad that this server has a RAID card.  ZFS really wants to talk to the devices directly and manage them as closely as possible.  Having the RAID card expose them as JBOD isn’t ideal.  The ideal set up would be to have a host bus adapter (HBA) instead of the raid adapter. That’d be a Cisco 9300-8i 12G SAS HBA for my particular hardware. So, while I can get it to work OK, and you often see folks set up their RAID cards as JBOD just like I did, it’s sub-optimal.

Install Ubuntu 16.04 LTS + Software

F6 to select boot drive

As there’s plenty of guides on how to install Ubuntu server at the command line, I won’t cover this in too much detail.  You’ll need to:

  1. Download 16.04 and write it to a USB drive
  2. At boot of the C220, select F6 to select your USB drive as your boot device (see right)
  3. When prompted in the install processtt, select the RAID1 partition you created above.  For me this was /dev/sdg, but will likely be different for you. I used LVM with otherwise default partitions.
  4. Set your system to “Install security updates automatically” when prompted with “Configuring tasksel
  5. For ease of setup, I suggest selecting “OpenSSH Server” when prompted for “Software select”. This way we won’t have to install and enable it later.
  6. Finally, when you system has rebooted, login as your new user and you can install the core software we’ll need for the next steps:
sudo apt-get install lxd zfsutils-linux bridge-utils
sudo apt install -t xenial-backports lxd lxd-client

ZFS

ZFS is not for the faint of heart.  While the LXD can indeed be run on just about any Ubuntu 16.04 box and the default settings will just work, and I do now run it on my laptop regularly, getting a tuned ZFS install was the hardest part for me.  This may be because I have more of a WebDev background and less of a SysAdmin background.  However, if you’ve read up on Aaron Toponce’s ZFS on Debian GNU/Linux’s posts, and you read my guide here, you’ll be fine ;)

After reading and hemming and hawing about which config was best, I decided that getting the most space possible was most important.  This means I’ll allocate the remaining 6 disks to the ZFS pool and not have a hot spare.  Why no hot spare?  Three reasons:

  1. This isn’t a true production system and I can get to it easily (as opposed to an arduous trip to a colo)
  2. The chance of more than 2 disks failing at the same time seems very low (though best practice says I should have different manufacturer’s batches of drives – which I haven’t checked)
  3. If I do indeed have a failure where I’m nervous about either the RAID1 or RIADZ pool, I can always yank a drive from one pool to another.

Now that I have my 6 disks chosen (and 2 already running Ubuntu), I reviewed the RAID levels ZFS offers and choose RAIDZ-2 which is, according to Aaron, “similar to RAID-6 in that there is a dual parity bit distributed across all the disks in the array. The stripe width is variable, and could cover the exact width of disks in the array, fewer disks, or more disks, as evident in the image above. This still allows for two disk failures to maintain data. Three disk failures would result in data loss. A minimum of 4 disks should be used in a RAIDZ-2. The capacity of your storage will be the number of disks in your array times the storage of the smallest disk, minus two disks for parity storage.”

In order to have a log and cache drive (which can be the same physical disk), I’ll split it so 5 drives store data and 1 drive with two partitions store my log and cache. Read up those log and cache links to see how these greatly improve ZFS performance, especially if your data drives are slow and you have a fast cache drive (SSD or better).

To find the devices which we’ll use in our pool, let’s first see a list of all devices from dmesg:

sudo dmesg|grep \\[sd|grep disk
[ 17.490156] sd 0:0:0:0: [sdh] Attached SCSI removable disk
[ 17.497528] sd 1:0:9:0: [sdb] Attached SCSI disk
[ 17.497645] sd 1:0:8:0: [sda] Attached SCSI disk
[ 17.499144] sd 1:0:10:0: [sdc] Attached SCSI disk
[ 17.499421] sd 1:0:12:0: [sde] Attached SCSI disk
[ 17.499487] sd 1:0:11:0: [sdd] Attached SCSI disk
[ 17.499575] sd 1:0:13:0: [sdf] Attached SCSI disk
[ 17.503667] sd 1:2:0:0: [sdg] Attached SCSI disk

This shows us that sdh is our USB drive (“removable”) and that the rest are the physical drives.  But which is our boot drive comprised of a RAID1 volume?  It’s the one mounted with an ext4 file system:

sudo dmesg|grep mount|grep ext4
[ 21.450146] EXT4-fs (sdg1): mounting ext2 file system using the ext4 subsystem

So now we know that sdb, sda, sdc, sde, sdd and sdf are up for grabs. The hard part with ZFS is just understanding the full scope and impact of how to set up your disks.  Once you decide that, things become pleasantly simple.  Thanks ZFS!  To set up our RAIDZ-2 pool of 5 drives and enable compression to it is just these two command:

sudo zpool create -f -o ashift=12 lxd-data raidz1 sda sdb sdc sdd sde
sudo zfs set compression=lz4 lxd-data

Note that there’s no need to edit the fstab file, ZFS does all this for you. Now we need to create our log and cache partitions on the remaining sdf disk.  First find out how many blocks there are on your drive, 468862128 in my case, using parted:

parted /dev/sdf 'unit s print'|grep Disk|grep sdf
 Disk /dev/sdf: 468862128s

Aaron’s guide suggests we can make both partitions in one go with this command, which will make a 4GB log partition and use the remainder to make a ~230GB cache partition:

parted /dev/sdf unit s mklabel gpt mkpart log zfs 2048 4G mkpart cache zfs 4G 468862120

However, this didn’t work for me. I had to go through the parted using the interactive mode. Run this twice starting both times with the sdf device:

parted /dev/sdf unit s

I forgot to record this session when I formatted my partitions, but you should end up with this when you’re done:

sudo parted /dev/sdf print
Model: ATA SAMSUNG MZ7LM240 (scsi)
Disk /dev/sdf: 240GB
Sector size (logical/physical): 512B/512B
Partition Table: gpt
Disk Flags:

Number Start  End    Size   File system Name Flags
 2     1049kB 3999MB 3998MB zfs         log
 1     4000MB 240GB  236GB  zfs         cache

OK – almost there!  Now, because linux can mount these partitions with different device letters (eg sda vs sdb), we need to use IDs instead in ZFS.  First, however, we need to find the label to device map:

sudo ls -l /dev/disk/by-partlabel/
 total 0
 lrwxrwxrwx 1 root root 10 Sep 15 11:20 cache -> ../../sdf2
 lrwxrwxrwx 1 root root 10 Sep 15 11:20 log -> ../../sdf1

Ok, so we’ll use sdf1 as log and sdf2 as cache.  Now what are they’re corresponding IDs?

sudo ls -l /dev/disk/by-id/|grep wwn|grep sdf|grep part
 lrwxrwxrwx 1 root root 10 Sep 15 11:20 wwn-0x5002538c404ff808-part1 -> ../../sdf1
 lrwxrwxrwx 1 root root 10 Sep 15 11:20 wwn-0x5002538c404ff808-part2 -> ../../sdf2

Great, now we know that wwn-0x5002538c404ff808-part1 will be our log and wwn-0x5002538c404ff808-part2 will be our cache.  Again, ZFS’s commands are simple now that we know what we’re calling.  Here’s how we add our cache and log:

zpool add lxd-data log /dev/disk/by-id/wwn-0x5002538c404ff808-part2
 zpool add lxd-data cache /dev/disk/by-id/wwn-0x5002538c404ff808-part1
 wwn-0x5002538c404ff808-part2 log
 wwn-0x5002538c404ff808-part1 cache

Now we can confirm our full ZFS status:

sudo zpool iostat -v
                                   capacity     operations    bandwidth
pool                            alloc   free   read  write   read  write
------------------------------  -----  -----  -----  -----  -----  -----
lxd-data                        1.37G  1.08T      0     16  3.26K  56.8K
  raidz1                        1.37G  1.08T      0     16  3.25K  56.5K
    sda                             -      -      0      4  1.04K  36.5K
    sdb                             -      -      0      4  1.03K  36.5K
    sdc                             -      -      0      4  1.01K  36.5K
    sdd                             -      -      0      4  1.02K  36.5K
    sde                             -      -      0      4  1.03K  36.5K
logs                                -      -      -      -      -      -
  wwn-0x5002538c404ff808-part2   128K  3.72G      0      0      4    313
cache                               -      -      -      -      -      -
  wwn-0x5002538c404ff808-part1   353M   219G      0      0      0  20.4K
------------------------------  -----  -----  -----  -----  -----  -----

Looking good!  Finally, we need to keep our ZFS pool healthy by scrubbing regularly.  This is the part where ZFS self heals and avoids bit rot. Let’s do this with a once per week job in cron:

0 2 * * 0 /sbin/zpool scrub lxd-data

Networking

Now, much thanks to Jason Bayton’s excellent guide, we know how to have our VMs get IPs in on LAN instead of being NATed.  Right now my NIC is enp1s0f0 and getting an IP via DHCP.  Looking in  /etc/network/interfaces I see:

# The loopback network interface
auto lo
iface lo inet loopback

# The primary network interface
auto enp1s0f0
iface enp1s0f0 inet dhcp

But to use a bridge (br0) and give my host the static IP of 10.0.40.50, we’ll make that file look like this:

# The loopback network interface
auto lo
iface lo inet loopback

# The primary network interface
auto br0 
iface br0 inet static
       address 10.0.40.50
       network 10.0.40.0
       netmask 255.255.255.0
       gateway 10.0.40.1
       broadcast 10.0.40.255
       dns-nameservers 8.8.8.8 8.8.4.4
       bridge_ports enp1s0f0
iface enp1s0f0 inet manual

This will allow the VMs to use br0 to natively bridge up to enp1s0f0 and either get a DHCP IP from that LAN or be assigned a static IP. In order for this change to take effect, reboot the host machine.  Jason’s guide suggests running ifdown and ifup, but I found I just lost connectivity and only a reboot would work.

When you next login, be sure you use the new, static IP.


Set file limits

While you can use your system as is to run containers, you’ll really want to updated per the LXD recommendations.  Specifically, you’ll want to allow for a lot more headroom when it comes to file handling.  Edit sysct.conf:

sudo vim /etc/sysctl.conf

Now add the following lines, as recommended by the LXD project:

fs.inotify.max_queued_events = 1048576
fs.inotify.max_user_instances = 1048576
fs.inotify.max_user_watches = 1048576

As well, edit limits.conf

sudo vim /etc/security/limits.conf

Now add the following lines. 100K should be enough:

* soft nofile 100000
* hard nofile 100000

LXD

Now that we have our bare metal provisioned, we have our storage configured, file limits increased and our network bridge in place, we can actually get to the virtual machine part, the LXD part, of this post. Heavily leveraging again Jason Bayton’s still excellent guide, we’ll initialize LXD by running lxd init. This go through the first time LXD guide and ask a number of questions about how you want to run LXD.  This is specific to 2.0 ( >2.1 has different questions).  You’ll see below, but the gist of it is that we want to use our ZFS pool and our network bridge:

lxd init
 -----
 Name of the storage backend to use (dir or zfs) [default=zfs]:
 Create a new ZFS pool (yes/no) [default=yes]? no
 Name of the existing ZFS pool or dataset: lxd-data
 Would you like LXD to be available over the network (yes/no) [default=no]? yes
 Address to bind LXD to (not including port) [default=all]:
 Port to bind LXD to [default=8443]:
 Trust password for new clients:
 Again:
 Do you want to configure the LXD bridge (yes/no) [default=yes]?

Note that we don’t accept the ZFS default and specify our own ZFS pool lxd-data. When you say “yes”, you want to configure the bridge, you’ll then be prompted with two questions.  Specify br0 when prompted. Again, refer to Jason Bayton’s guide for thorough screen shots:

Would you like to setup a network bridge for LXD containers now? NO
Do you want to use an existing bridge? YES
Warning: Stopping lxd.service, but it can still be activated by:
 lxd.socket
 LXD has been successfully configured

Success!  LXD is all set up now.  Let’s prep the host OS for a bunch of open files now.

Hello world container

Whew!  Now that all the hard parts are done, we can finally create our first container. In this example, we’ll be creating a container called  nexus and put some basic limitations on it. Remember, do not create these as root! One of the massive strengths of LXD is that it’s explicitly designed to be secure and running containers as root would remove a lot of this security. We’ll call lxc init and then pass some raw commands to set the IP to be .52 in our existing /24 subnet on the bridge. If you run lxc list our new container shows up. That all looks like this:

lxc init ubuntu: nexus
echo -e "lxc.network.0.ipv4 = 10.0.40.52/24\nlxc.network.0.ipv4.gateway = 10.0.40.1\n" | lxc config set nexus raw.lxc -
lxc start nexus

lxc list
+-------+---------+-------------------+------+------------+-----------+
| NAME  | STATE   | IPV4              | IPV6 | TYPE       | SNAPSHOTS |
+-------+---------+-------------------+------+------------+-----------+
| nexus | RUNNING | 10.0.40.52 (eth0) |      | PERSISTENT | 0         |
+-------+---------+-------------------+------+------------+-----------+

Finally, we want to limit this container to have 4 CPUs, have 4GB of RAM and 20GB of disk.  Like before, these commands are not run as root. They are imposed on the container in real time and do not require a restart.  Go LXD, go!

lxc config set nexus limits.cpu 4
lxc config set nexus limits.memory 4GB
lxc config device set nexus root size 20GB

You’re all done!  From here you can trivially create tons more containers.  You can let them have an ephemeral IP via DCHP on the bridge or easily set a static IP. If you have a resource intensive need, you don’t set the limits above, the container will have access to the full host resources.  That’d be 40 cores, 64GB RAM and 1TB of disk. If you created more VMs with out resource limiting, LXC would do the balancing of resources so that each container gets it’s fair share.  There’s a LOT more configuration options available.  As well, even the way I declared a static IP can likely be done via dnsmasq, (see this cyberciti.biz article), but I had trouble getting that to work on my setup, hence the raw calls.

Next steps

Now that you you’ve bootstrapped your bare metal, dialed in your storage back end, specifically deployed your LAN, you should be all set, right?  Not so fast! To make this more of a production deployment, you really need to know how (and practice!) your backup and restore procedures.  This likely will involve the snapshot command (see post 3 of 12) and then backing those snapshots off of the ZFS pool. Speaking of the ZFS pool, our set up as is doesn’t have any alerting if a disk goes bad.  There’s many solutions out there for this – I’m looking at this bash/cron combo.

Having a more automated system to provision containers integrated with a more DevOps-y set up makes sense here. For me this might mean using Ansible, but for you it might be something else!  I’ve heard good things about cloud-init and Juju charms. As well, you’d need a system to monitor and alert on resource consumption.  Finally, a complete production deployment would need at least a pair, if not more, of servers so that you can run LXD in a more highly available setup.

Given this is my first venture into running LXD, I’d love any feedback from you!  Corrections and input are welcome, and praise too of course if I’ve earned it ;) Thanks for reading this far on what may be my longest post ever!

Howto: Sympa 6.2 on Ubuntu 17.04

2 minutes, 55 seconds

This post is a continuation of the my last post on the topic, “Howto: Sympa 6.1 on Ubuntu 16.04“.  It should come as no surprise that this is about installing Sympa on the most recent version of Ubuntu to get the most recent version of Sympa (at the time of this writing).  That’d be Sympa 6.2.16 and Ubuntu 17.04. The steps only vary a little between between the two, but here’s the all them for completeness.

Assumptions/Prerequisites

Like the last post, this one assumes you have root on your box.  It assumes you have Apache2 installed.  It assumes you’re running a stock Ubuntu 17.04 install.  It assumes you want to run Sympa on your server.  It also assumes you’ll be using Postfix as the lists MTA. It assumes you have a DNS entry (A record) for the server.  As well it assumes you also have an MX record pointing to the A record or no MX record so the MX defaults to the A record.  If this doesn’t apply to you, caveat emptor!

To recap, that’s:

  • Apache 2 installed and working
  • Postfix as MTA
  • Ubuntu 17.04 server
  • Existing DNS entry
  • Run all commands as root

I also was using this server solely to serve Sympa mail and web traffic so if you have a multi-tenant/multi-use server, it may be more complicated.

Steps

These steps assume you’re going to install Sympa on list.example.com.  There’s no reason you couldn’t use example.com instead. Your zero step should be sudo apt-get update&& sudo apt-get upgrade.

  1. First step is to install Sympa. As well, we’ll install some packages that are used to fix a bug in 6.2’s GUI where the drop down nav menus don’t work:
    apt-get install -y sympa javascript-common libjs-jquery-migrate-1
  2. When prompted during this install:
    1. Choose a good mysql root password and enter it when prompted
    2. Please select the mail server configuration type that best meets your needs: Internet Site
    3. System mail name: list.example.com
    4. Which Web Server(s) are you running?: apache 2
    5. Configure database for sympa with dbconfig-common?: Yes
    6. Database type to be used by sympa: mysql
    7. MySQL application password for sympa: <blank> (will assign random one)
  3. Now it’s time to fix that css bug in 6.2 with a copy:
    cp /usr/share/sympa/default/web_tt2/head_javascript.tt2 /etc/sympa/web_tt2

    And then edit /etc/sympa/web_tt2/head_javascript.tt2 and add the jquery-migrate-1.js file after jquery.js:

    <script src="[% static_content_url %]/external/jquery.js"></script>
    <script src="/javascript/jquery-migrate-1.js"></script>
  4. Edit /etc/sympa/sympa/sympa.conf to match the following values:
    listmaster listmaster_here@domain.com,other_here@domain.com
    domain list.example.com
    wwsympa_url https://list.example.com/wws
    default_home home
    create_list intranet

    The “intranet” value will prevent some one from signing up and requesting a list with any approval.

    lists.example.com should show the sympa UI, w00t!

  5. Ensure Sympa starts at boot:
    update-rc.d sympa defaults
    update-rc.d sympa enable
  6. ensure postfix is updated in /etc/postfix/main.cf edit these values to match:
    myhostname = list.example.com
    alias_maps = hash:/etc/aliases,hash:/etc/mail/sympa/aliases
    alias_database = hash:/etc/aliases,hash:/etc/mail/sympa/aliases
    mydestination = $myhostname, example.com, list.example.com, localhost.example.com, localhost
    relay_domains = $mydestination, list.example.com
    local_recipient_maps =
  7. add default aliases for sympa at the top of /etc/mail/sympa/aliases:
    ## main sympa aliases
    sympa: "| /usr/lib/sympa/bin/queue sympa@lists.example.com"
    listmaster: "| /usr/lib/sympa/bin/queue sympa@lists.example.com"
    bounce+*: "| /usr/lib/sympa/bin/bouncequeue sympa@lists.example.com"
    sympa-request: email1@example.com
    sympa-owner: email1@example.com
  8. reboot and rebuild aliases:
    newaliases
    reboot

Sympa should now be up and running at lists.example.com!  All mail in and out should work so you can run your own list server. Please report any problems so I can keep this post updated and accurate – thanks!

Howto: Sympa 6.1 on Ubuntu 16.04

3 minutes, 6 seconds

Recently I was tasked at work to get an instance of Sympa set up. Their docs are a bit scattered, but I found a promising post on debian.org which suggested I could get away with an apt-get install instead of needing to compile from source. Well, it turns out I did get it working, but only after a lot of trial and error. Given that some one else might be trying to do this, and because I had to document the exact steps for work, here’s a handy dandy blog post which I hope will help some one trying to do the same thing.

Good news for those looking to do this for Sympa 6.2 (latest at time of publishing), I have a post on how to do this exact thing on the soon to be released Ubuntu 17.04 with Sympa 6.2.  Stay tuned!

Assumptions/Prerequisites

This post assumes you have root on your box.  It assumes you have Apache2 installed.  It assumes you’re running a stock Ubuntu 16.04 install.  It assumes you want to run Sympa on your server.  It also assumes you’ll be using Postfix as the lists MTA. It assumes you have a DNS entry (A record) for the server.  As well it assumes you also have an MX record pointing to the A record or no MX record so the MX defaults to the A record.  If this doesn’t apply to you, caveat emptor!

To recap, that’s:

  • Apache 2 installed and working
  • Postfix as MTA
  • Ubuntu 16.04 server
  • Existing DNS entry
  • Run all commands as root

I also was using this server solely to serve Sympa mail and web traffic so if you have a multi-tenant/multi-use server, it may be more complicated.

Steps

These steps assume you’re going to install Sympa on list.example.com.  There’s no reason you couldn’t use example.com instead.

  1. Install sympa:
    apt-get install -y sympa
  2. When prompted during this install:
    1. Choose a good mysql root password and enter it when prompted
    2. Please select the mail server configuration type that best meets your needs: Internet Site
    3. System mail name: list.example.com
    4. Which Web Server(s) are you running?: apache 2
    5. Database type to be used by sympa: mysql
    6. MySQL application password for sympa: <blank> (will assign random one)
  3. Sympa 6.1 has a present! It ships with a bug.  Fix the regex on line 126 of /usr/share/sympa/lib/SympaSession.pm so it looks like this (note “{” is now “\{” ):
    if ($cookie and $cookie =~ /^\d\{,16}$/) {
  4. Edit /etc/sympa/wwsympa.conf to change line 81 to 1 instead of 0:
     use_fast_cgi 1

    If you don’t do this step, you’ll see full HTML pages show up in /var/logs/syslog and only 500 errors in the browser :(

    lists.example.com should show the sympa UI, w00t!

  5. Ensure Sympa starts at boot:
    update-rc.d sympa defaults
    update-rc.d sympa enable
  6. ensure postfix is updated in /etc/postfix/main.cf edit these values to match:
    myhostname = lists.example.com
    smtpd_tls_cert_file=/full/path/to/cert/apache/uses.pem
    smtpd_tls_key_file=/full/path/to/key/apache/uses.pem
    alias_maps = hash:/etc/aliases,hash:/etc/mail/sympa/aliases
    alias_database = hash:/etc/aliases,hash:/etc/mail/sympa/aliases
    mydestination = $myhostname, lists.example.com, , localhost
    relay_domains = $mydestination, lists.example.com
  7. Update /etc/sympa/sympa.conf so that these values match:
    listmaster email1@example.com,other_here@domain.com
    domain lists.example.com
    wwsympa_url https://lists.example.com/wws


  8. update /etc/sympa/wwsympa.conf so that these values match:
    default_home lists
    create_list intranet

    The “intranet” value will prevent some one from signing up and requesting a list with any approval.

  9. add default aliases for sympa at the top of /etc/mail/sympa/aliases:
    ## main sympa aliases
    sympa: "| /usr/lib/sympa/bin/queue sympa@lists.example.com"
    listmaster: "| /usr/lib/sympa/bin/queue sympa@lists.example.com"
    bounce+*: "| /usr/lib/sympa/bin/bouncequeue sympa@lists.example.com"
    sympa-request: email1@example.com
    sympa-owner: email1@example.com
  10. reboot and rebuild aliases:
    newaliases
    reboot

Sympa should now be up and running at lists.example.com!  All mail and and out should work so you can run your own list server. Please report any problems so I can keep this post updated and accurate – thanks!

Happy Histogram

2 minutes, 3 seconds

The other day I was working on redoing our old Internet governance meeting page. On it, there was a simple histogram of the meetings across a year. It looked like this:

Seeing this server side generated, non-responsive, raster based image, I thought, “We can make this waaaaay better”. So, I went about looking for a drop in replacement that would fix all that, much like MapTable fixed our server side, raster based non-responsive maps.

I tried a number of full blown graphing libraries (jqPlot, Flot and jQuery sparkline, all awesome in their own right) as well, I looked at the top available JS solutions. They all failed me in one way or another. Some of them didn’t like having hundreds of data points being rendered on them. Some of them added unwanted anti-aliasing on 1 pixel wide elements (I’m looking at you Canvas!). Many of them were going to take a lot of effort to look good on mobile devices at the horizontal scaled I was looking for.

So, decided roll our own. And, of course, I decided to open source it ;) Had I drawn it before I made it, I would have drawn something like this:

img_20161025_205850

The idea is that the whole thing would just be made of DIVs styled by CSS. Since CSS is insanely precise, even allowing for negative margins, you can skooch things like x and y axes labels just where you want them.

Thus, Happy Histogram was born:


What you see there is the exact same graph as above, rendered with a whopping 900 byte JavaScript Library. Check it out on Github!

If you want to customize it, just throw a little CSS at it and make it your own:

#year2 .yearHistogram .emptyTop { background-color: yellow; }
#year2  .yearHistogram .filledBottom:hover {background-color: #ddd;}
HappyHistogram('year2', Months, 'orange');


Or maybe you just want to show one value per month? Easy Peasy:


Likely I won’t do too much more development on this unless as it is fully formed and already deployed. However, part of my job satisfaction right now stems from the fact that all new features always get pushed upstream, so y’all might see more work on this soon!


Untangling odd behavior of stupidtable.js

0 minutes, 54 seconds

I’ve been doing a lot of work in the day job working with Joseph McCullough’s wonderful Stupid-Table-Plugin for jQuery. This allows you to take a static table and with a little JS code, make it into a dynamic, client side sortable table. As well it’s HIGHLY configurable and totally awesome!

The Odd Behavior

However, I noticed when I had a table with data like this:

Fruit Color
banana yellow
peach yellow
squash yellow
apple red

Sorting by “Fruit” worked exactly as expected. However, sorting by “Color” yielded odd results. While the 4 colors always were in the correct order (grouped together before or after “red”), the fruit column would change order if you clicked the “Color” header more than twice. Very confusing! Upon close inspection, on the 1st, 5th, 9th etc. clicks of “Color” the “Fruit” columns would be the same order and the same is true of 2nd, 4th, 6th etc. clicks. It then dawned on me that Stupid-Table-Plugin was reverse sorting rows with identical values each time I clicked the same “Color” column head.

The untangle

The fix, once knowing the problem, was easy. Just declare a data-sort-value for each color and append a random string to it (eg foo, bar, baz):

banana
    
Fruit Color
yellow
peach yellow
squash yellow
apple red

This way the colors will always be sorted in a consistent order. Point haired bosses rejoice – your underling coder made your table sort right!

Addendum

I want to again thank Stupid-Table-Plugin for being awesome. Great discussions like Issue #106, “weird behavior when td have empty values” both gave me faith in the author as being open to feedback, and made me trust the plugin to be well thought out. Long term, this of course should be fixed, and hopefully will be with Issue #112 – “Sort on Multiple Columns”.

Finally, if you are sorting a BIG table with a lot of data-sort="int" instead of data-sort="string", like above, you can simply make your values into data-sort="float" and concatenate a random, but unique to that row, decimal onto data-sort-value (eg, “300” => “300.0002” and “90” => “90.0301”). This way the sort will still work. If you tried to sort the float values as a strings, it would put “300” before “90” ;)

Weak Crypto in Star Trek Beyond (SPOILERS!!)

2 minutes, 20 seconds

Star-Trek-BeyondLet’s get this out of the way upfront: the most recent installation of the Star Trek reboot, “Beyond”, was exactly what I’d hoped it would be. It was an action packed, summer fun movie. It did not exceed, but definitely met my expectations.

The end however, was totally silly. It was the peak of the action and the sound effects and music (more on this in a second) were so loud I don’t think any one could hear my wife and I laughing. Like, laughing to the point of crying because what we were watching was so funny. But, for me at least, I kept on thinking, “wait – what?” There’s no way modern crypto would allow this scene! Let alone hyper futuristic crypto of 2263! Let me explain.

spock.bonesIn the end of the move (yes, like I said, spoilers) the Enterprise crew is rocking the 99 year old USS Franklin. They are fighting the boss of the movie, Krall (not to be confused with Khan), who has control of a massive swarm of space ships based on alien technology. The swam is all perfectly in sync, just as you’d expect your alien swarm army to be. This, by definition, means that they are communicating with each other in real time to coordinate complex movements in 3d space. And how did they figure out how to beat the boss? Well, simply by “corrupting their communication with radio waves”. Radio waves like Sabotage, by the Beastie Boys. That’s right, the Beasties are literally weaponized to literally blow up the enemy hordes. Here’s the Franklin “surfing” the enemy swarm with them blowing up in their wake (click through to see the the preview where the gif came from):

beasties.loop

So, aside from the fact that radio waves travel at the speed of of light and should be radiating out in all directions, not trailing behind them, how exactly was this supposed to be working? According to wikipedia, “they [Spock and Bones] learn that VHF transmissions can disrupt Krall’s communications and destroy his fleet.” But, like I said, this is the year 2263! Surely the alien technology powering this swarm has sufficient encryption to ensure that simple VHF radio waves won’t interfere with communication, right? Beyond things like TLS Handshakes, PKI (or even hash-chains if you wanna get tricky), basic header checksums, like in IPv4 would prevent this type of interference.

MD5But, maybe not? Maybe the aliens implementing the swarm networking were just lazy? For example, the MD5 hashing algorithm was released in 1991. By the late 90’s and early 2000’s it was the de facto way to store passwords in databases. However, as early as 2005 collisions had been proven to be a reality. In 2008 at the 25th Chaos Communication Congress, researchers categorically proved that no one should trust MD5. Later that same year CERT issued a CVE agreeing. Fast forward 4 years to 2012, and what do we find? 43 million hacked passwords in unsalted MD5 is what we find. Well, we found out today (Sep 1, 2016), but the coders responsible for securing tens of millions of accounts back in ’12 should have known better. So yeah, maybe the aliens were more focused on meeting deadlines than they were in defending against VHF interference?

A great, small USB-C charger for your XPS 13 (or MacBook) (Updated 4/16/17 DO NOT BUY)

1 minute, 53 seconds

5/12/18 Update: I’ve found a new charger that’s working well (and seemingly safely) – check it out!

4/17/17 Update: These chargers have been deemed unsafe. Please do not use them. See this post for details.

While I was on vacation, I forgot my laptop charger. I found on amazon that you can get an OEM charger for the XPS 13 (9350) for about $30. This is fine, it will work the prior gen XPS 13 with out USB-C/Thunderbolt too. I got it and used it for the remainder of my trip.

Then, when I got home, I wondered if there were any good, cheap, small USB-C chargers that would work with my laptop. Lo, the RAVPower USB-C charger. Full title, on Amazon, is, “USB C Charger RAVPower 36W Dual Ports USB Wall Charger with USB-C (20V 1.5A, 15V 2A, 9V 2A, 5V 3A max) for MacBook, Dell XPS 13, Nexus 5X/ 6P and iSmart (5V 2.4A max) for iPhone and more Black”. OK, what ever RAVPower, too long on the title. But you know what is not too long? The products it works with:

  • Apple’s 2015 MacBook
  • Google’s second Chromebook Pixel
  • ASUS Transformer book T100HA
  • Dell XPS 13 & 15
  • HP Elite x2 1012 G1
  • Razer Blade Stealth, Blade (2016)
  • Nokia N1, ASUS ZenPad S8, Google’s Pixel C
  • Nexus 5X, Nexus 6P
  • Asus ZenFone 3 Deluxe
  • BLU Vivo XL and BLU Vivo 5
  • HTC 10, LG G5
  • Microsoft Lumia 950, 950 XL
  • Motorola Moto Z, Moto Z Force

Totally awesome list! I got the charger today, so I don’t have any long term usage notes just yet. However, given it can both charge my phone over speedy USB-C, or dual charge my laptop AND my phone, as it has normal USB port to charge with, I’m fairly confident it’s my new fave travel charger. One caveat is that it does not come with a USB-C to USB-C cord. I got a nice looking 10′ one which I’ll put a velcro tie on when it arrives.

If you are an XPS 13 user, or thinking about becoming one, be sure to read my write up on running Ubuntu 16.04 after purchasing the windows version of the 9350.

1/4/17 Update – I’ve been using this charger for 4 months now and it’s awesome! I got solid, braided 10′ USB-C <-> USB-C cable to use with which I recommend as well. It comes in 6′ flavors as well. Cable aside, the only caveat is that the charger does get quite hot – but so far not so much that it has me concerned; I don’t see any signs of the plastic discoloring.

Laser Cut Acrylic SYN Shop Dice

2 minutes, 19 seconds

Back in May for this past Las Vegas Science and Technology Festival, the SYN Shop hosted an open house. It was awesome!

first.draftI volunteered to show folks our Laser Cutter. This is by far one of, if not *the*, most popular tool at the SYN Shop. In preparation of showing folks how it worked, I made a bunch of cubes. Not just any cubes though! I started with a 1.6″ cube at Maker Case with finger joints. I then added our logo. I did a test run and quickly saw that the translucent side of the acrylic I was using looked much better when viewing it from through the oppisite clear side, instead of viewing it directly. close.upI reversed our logo and as well added a very small mark in the upper left. This mark would allow me to run two discrete jobs: an engrave job and then a cut job. If you do them as one the laser cutter will engrave all your cuts and then cut them – a huge waste of time. The mark in the upper left allows me to keep the registration the same as long as I don’t move the bed or the piece on the bed.

1.6.inch.box After feeling confident I had a good prototype design and size, I embellished it a bit by adding the 5 dice sides 1-5, the sixth would be our logo. I then laid it out as many up on the design as our laser cutter would handle, 4 x 3. Each sheet took over an hour to engrave the logos and dice faces and cut. I think I ended up making 48.

IMG_20160429_142319I learned after doing one sheet later on that though you get a bit less burn marks when you leave the protective sheets of paper on – it takes WAAAAAAY longer to peel when it has a logo engraving into it one side and then the cube face cutting it too. I pre-peeled both faces to save time. However, my son was totally into the production of peeling, stacking, and rubber banding the whole thing. I didn’t even need to tell him that he and his sister would get one to share after we ere done. We had fun!

IMG_20160504_231512During the event it self, I wanted to keep the laser cutter running to show how it works. As well, we quickly ran out of acrylic dice, so I needed another design to cut. I found a good, butterfly image that I traced in Ink Scape to create a nice looking SVG. From that, I made a bunch of test cuts and then just left it running during the day. As soon as the job was done I could pop open the lid and hand out hot, freshly cut butterflies.

OPEN.house.butterfly.trimAll of the SVGs in this post are free to use for what ever purpose you want. It’d be great to hear of any uses though! I actually have a huge backlog of SVGs I’ve created over the past 1+ year that I should share…

Finally, here’s a video of my kids very much enjoying two octopi 3D printed with heat sensitive filament (also free handouts that day ;)

https://vimeo.com/179411667

Blogs I Read

1 minute, 54 seconds

After my upgrade to my new phone, I accidentally deleted the list of all my RSS feeds I follow. It took some months to remember all the different ones, but I’ve finally recreated the entire list and re-subscribed to them all. I use RSS Reader on Android with pro version (no ads, no tracking!).

After completing the great resubscribe of ’16, I decided to make a post about my list mainly so I have a backup but also so my friends who sometimes ask where I get my news can follow along if they so desire.

A list of blogs I follow, non-personal:

Blogs I follow, personal (people I know):

MapTable in WordPress

3 minutes, 31 seconds

After my last post on MapTable, a friend of mine asked how he might include a map and table in a blog post on a WordPress Instance. In this post I’ll outline the steps to doing just that.

Overview

The steps to render a MapTable in WordPress post are:

  1. Include MapTable and related JS and CSS files
  2. Generating and posting your .csv file
  3. Author and post the actual JS for rendering the MapTable

Though this is specific to WordPress, the same logic applies to generically creating an HTML page in which you want to include a MapTable.

1: Ye Old <script> and <link> tags: MapTable, D3 and TopoJSON

Thanks to all the working examples hosted on the MapTable GitHub page, there’s no shortage of code snippets to look at on how to assemble the JavaScript and CSS to render a MapTable. I’ll be using the Example titled “Global Airport by Countries – +6000 rows, Log scale for country colors, tooltip“.

Looking at the source of that page, we see this code:


In order to render these in your blog post you need to switch to “Text” mode when editing your post (as opposed to Visual). Please note WordPress’s word of caution:

Switching between Visual and Text view can cause some of your HTML entities to be lost. This is due, in part, to the manner in which TinyMCE handles your HTML. If formatting is very important, do not switch between views. If you’re writing a lot of code, we suggest you remain in the text editor.

Following their advice, I don’t ever edit in visual mode.

So, now that you’re in text mode, go ahead an paste in the those three script and two style blocks.

2: CSV (or JSON) FTW

MapTable is very lenient on the format of the data you give it. While you do need to have at least Latitude and Longitude fields to render a map, you don’t need them if you’re just rendering a table! For our 6k aiport example, here’s what the first bit of the CSV will look like:

airport_id,name,city,country,iata_faa,latitude,longitude
1,Goroka,Goroka,Papua New Guinea,GKA,-6.081689,145.391881
2,Madang,Madang,Papua New Guinea,MAG,-5.207083,145.7887
3,Mount Hagen,Mount Hagen,Papua New Guinea,HGU,-5.826789,144.295861
4,Nadzab,Nadzab,Papua New Guinea,LAE,-6.569828,146.726242
5,Port Moresby Jacksons Intl,Port Moresby,Papua New Guinea,POM,-9.443383,147.22005
6,Wewak Intl,Wewak,Papua New Guinea,WWK,-3.583828,143.669186
7,Narsarsuaq,Narssarssuaq,Greenland,UAK,61.160517,-45.425978

Unlike the script and CSS files, this needs to originate from the same domain as your blog is hosted on. To facilitate this, you’ll need to upload the .csv file to your blog via the “Add Media” feature. If you get an error like “Sorry, this file type is not permitted for security reasons.” then you’ll need to try and allow this file to be upload. This forum post does a good job of describing how to do it – however please note: this may introduce some security risks to your site. Please make this change with caution!

In the end, despite explicitly adding “json” as a file type, I could not upload a file ending in “.json”. I had to change the name of “ne_110m_admin_0_countries.json” to “ne_110m_admin_0_countries.js”.

JavaScript

We’ll cull a bit of the javascript, but it otherwise is just about identical to the one on the MapTable demo page. As well, we prepend the JS with a bit of HTML and styles. Here is the complete code I’ll use to render my map:


MapTable now!

This is a MapTable of “Global Airport by Countries – +6000 rows, Log scale for country colors, tooltip” embedded in WordPress:

Caveats

If you use more than one MapTable on your blog, you’ll really want to move the .css and .js files to be in your template, as you’ll be including them many times, possible more than once on places like your home page. As well, if you do use more than one MapTable – you’ll only need to upload the ne_110m_admin_0_countries.json (or .js in our case ;) once and re-use the URL.

As well, I had some trouble getting the tooltip to work just as it is in the example. If I used HTML in it, the JS would break :( I suspect this has to do with the way WordPress aggressively adds line returns to HTML. This included taking a lot of line returns out above the MapTable JS and between my <script>, <link> and <style> tags.

Finally, if there is sufficient interest, I can see that a MapTable WordPress plugin would be really handy! Let me know if you’re interested and I’ll see what I can do!