Back when I was writing Cattrotar on a Raspberry Pi (or really, any other of the myriad times I was hacking on a small embedded device), I often faced some sort of problem or another:
I thought I set up the network for a device, but can no longer remotely access it over WiFi
I’ve just written a new OS to a microSD card, want to further configure the OS but it’s not yet reachable on the network
I want to take my set up to the hacker space to be social while I work on an issue
I’m waiting in the library for my kids to finish up a class and can’t easily get my Pi on the library WiFi to hack on it from my laptop
I don’t want to carry around, or even bother setting up, a keyboard and monitor to get access to my Pi
The Solution
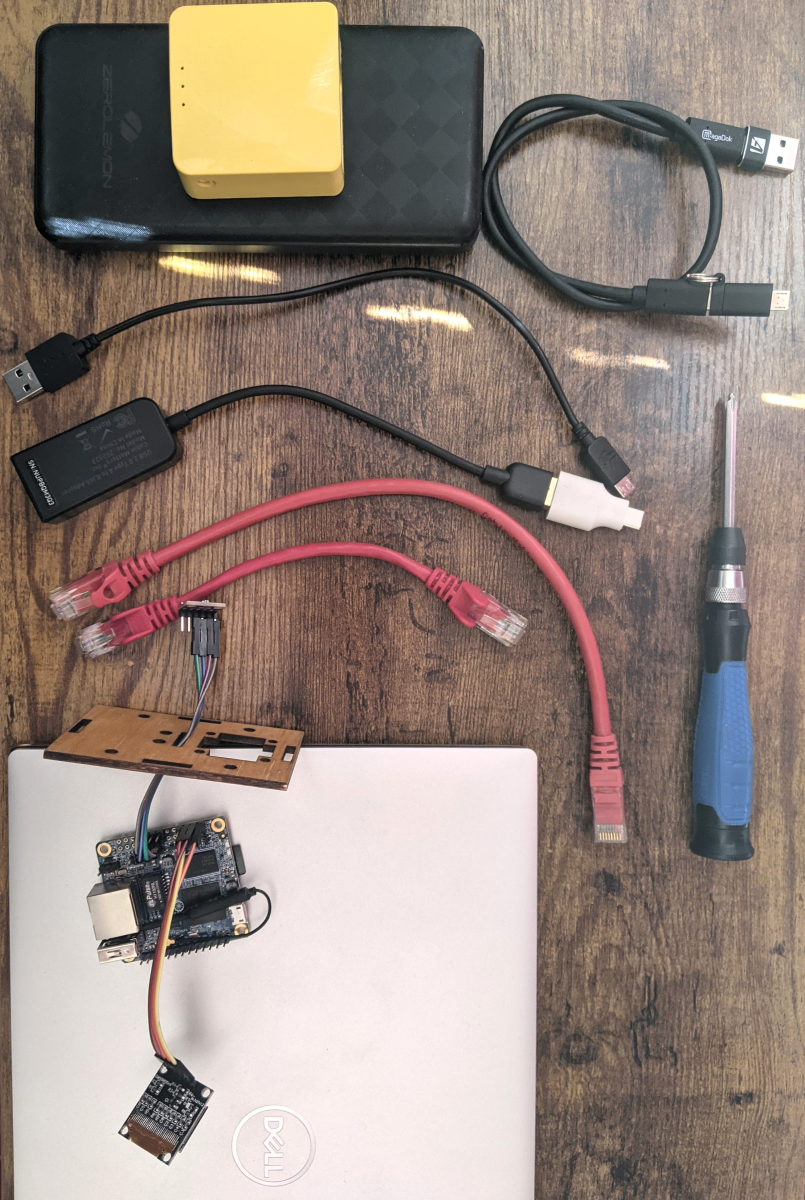
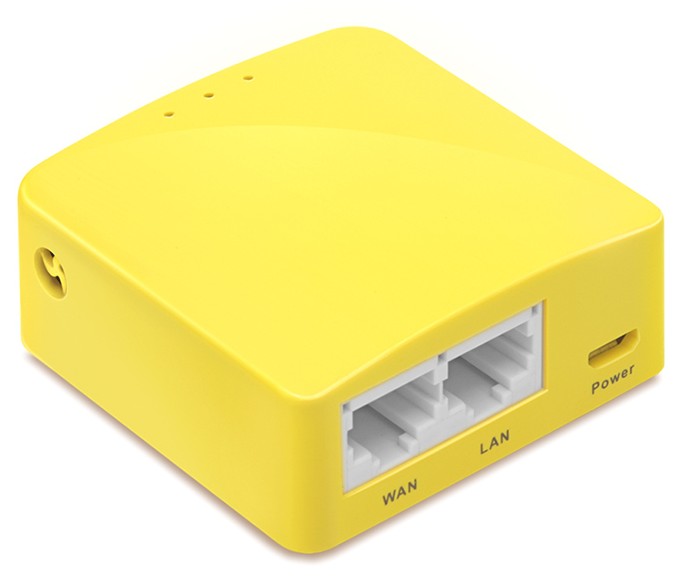
As many of you lovely readers may know, I’m already a fan of small travel routers made by GL.iNet, like the fine GL-MT300N-V2. For a scant $20 dollars (shipped!) you get DHCP server you can not only bring with you, but will happily run off a battery. Better yet, because it has a USB port, you can actually power your Pi off the wee router. Daisy chain USB power for the win! The final icing on the cake is that you can make the two Ethernet ports on be both LAN (instead of LAN & WAN). While these are great devices, their WiFi stack is a bit flaky, so being able to hardwire your network devices is a great, if not slightly cumbersome, work around.
The net result is that your around town bag can have:
Pi (In the picture below I have an Orange Pi Zero with a temp sensor and a screen threaded through one side of a case)
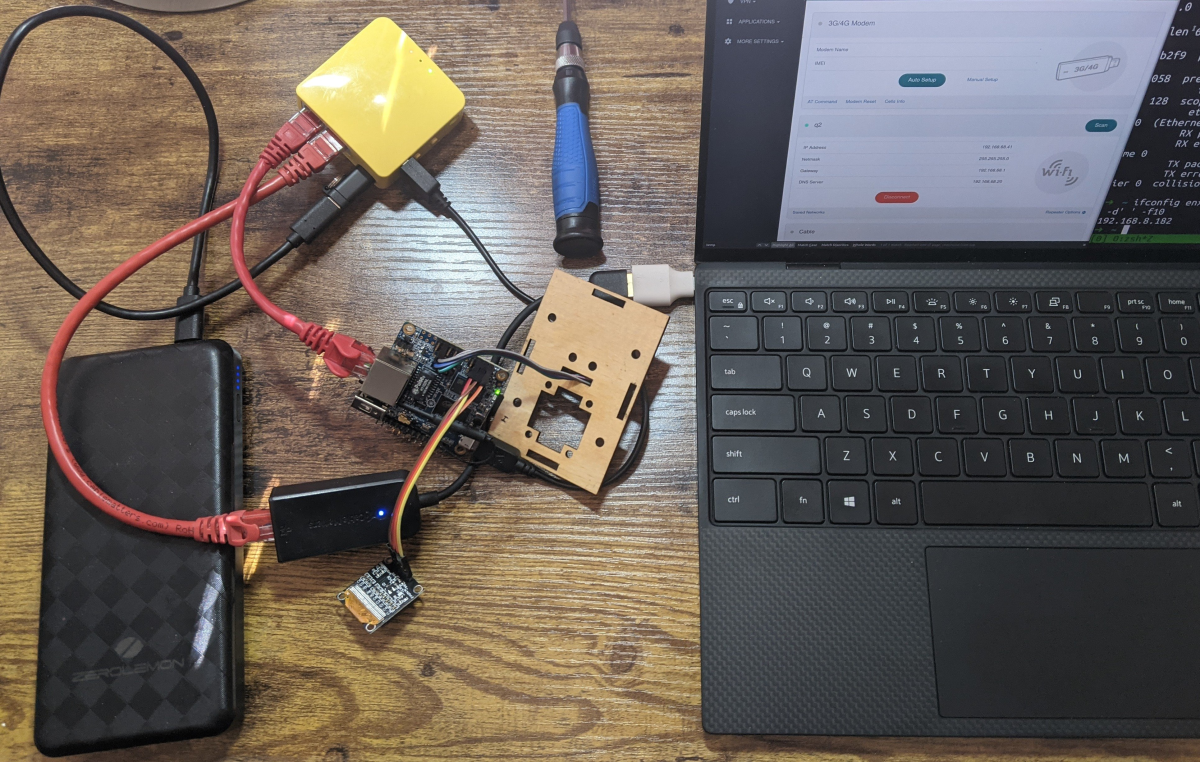
When you put it all together, you get a nice tidy mess and it works just great, solving all of the above problems. Your laptop can be on two networks so it can have local access to the Pi and to the internet too. Further, if the WiFi your on isn’t too hostile with their captive portals and such, you can actually have the GL.iNet router act as a WiFi repeater and backhaul that bandwidth to your Pi. Run your apt update away!
This set up is not only small and lightweight, but lets me work un-tethered on my Pi setup and Python code. Now if this frickin pandemic would just be solved, I’d actually be able to take this out of the house instead of just co-working with my partner in our office in our house!
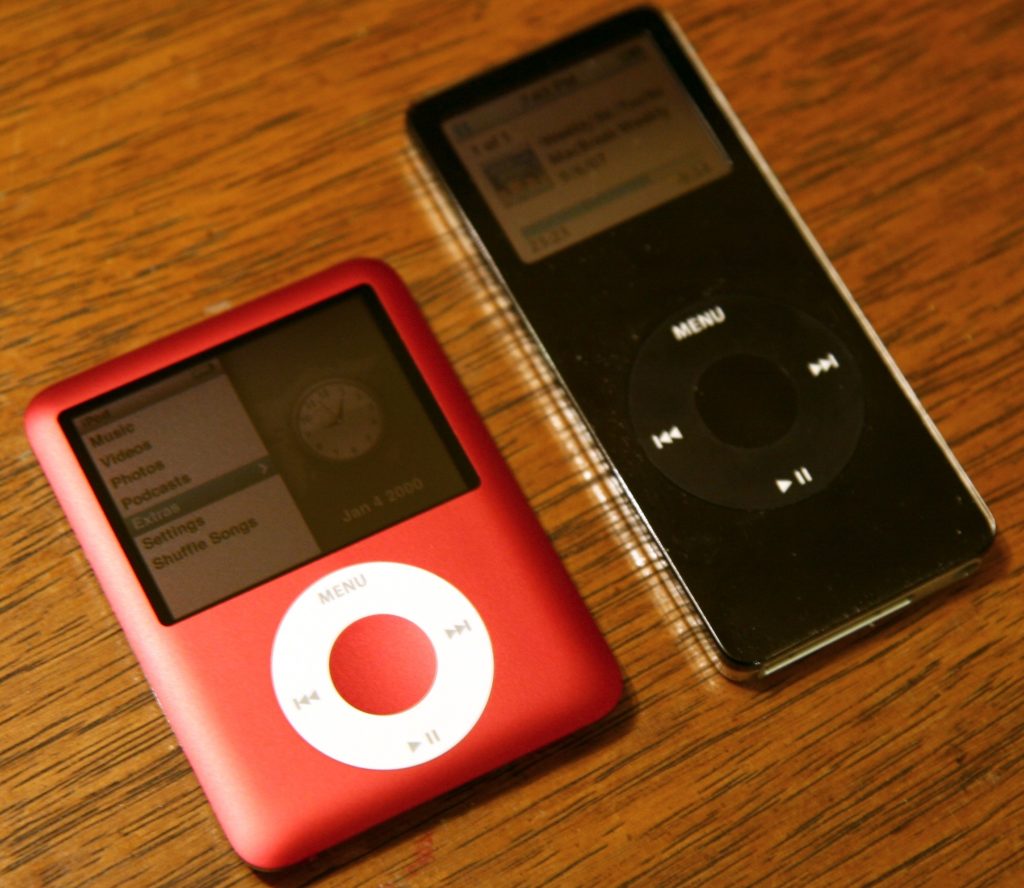
13 years ago we got an iPod to actually listen to music on the go. It was awesome! Some time later we had our first kid and some time after that smart phones became prevalent, so our iPod fell out of use. But it was about 9 years ago that we started to use the old iPod as an easy way to play the same a bedtime playlist for our kids (oh yeah, we had a 2nd kid at some point too ;). Soon, the kids split into their own bedrooms so we picked up a used iPod on eBay and loaded up the same bedtime playlist onto it. These two iPods dutifully played the same songs day in and day out every night for years. They’re even more utilitarian than designed, but worked well at their finite task (Photo by Nicnicoleleeolee):
However, over time things started to not work. First one of the fancy docks we used as a speaker stopped charging which ever iPod was in it. This meant every week or so we’d have to swap it over to the good dock to charge up. But then one started to lock up and had to be rebooted. We feared we’d have to replace them soon.
It was around this time that I starting using the Cast All The Things software (aka catt) in my quest to both (finally) learn Python and to easily control the volume on a chromecast. Checkout my cattmate and cattrotar projects! catt is a command line script and python library that allows you to easily control and play videos/music on Chromecasts. It was also around the time that Chomecast Audio’s were stopped being made so I’d stocked up them. We have about 4 or 5 plugged in here and there about the house, including one in each kids room. They work really well!
By now you can likely see how this post is going to resolve itself, but lets find out, shall we?
Yes, that’s right, I wrote a full featured web site that you could pull up and easily play music in which ever room needed to hear the play list. It was simple, yet fancy ;) On the front end there was a series of 2 buttons, one for each room. When you pressed a button, it sent an AJAX call to a to the single endpoint on the back end. The back end then made an exec call to a bash script. This in turn used catt to play a MP3 on the specified Chromecast.
This worked great for a day or so. But then a bug reared it’s ugley had. Let me tell you, the cost of a software bug in your web app which involves waking your child up at 10.30pm is EXTREMELY high. Like, unacceptably high. Sleeping children are gold. Parents get grown up time, the kids get much needed rest and we’re all better for it the next day. Don’t fuck with a kid’s sleep.
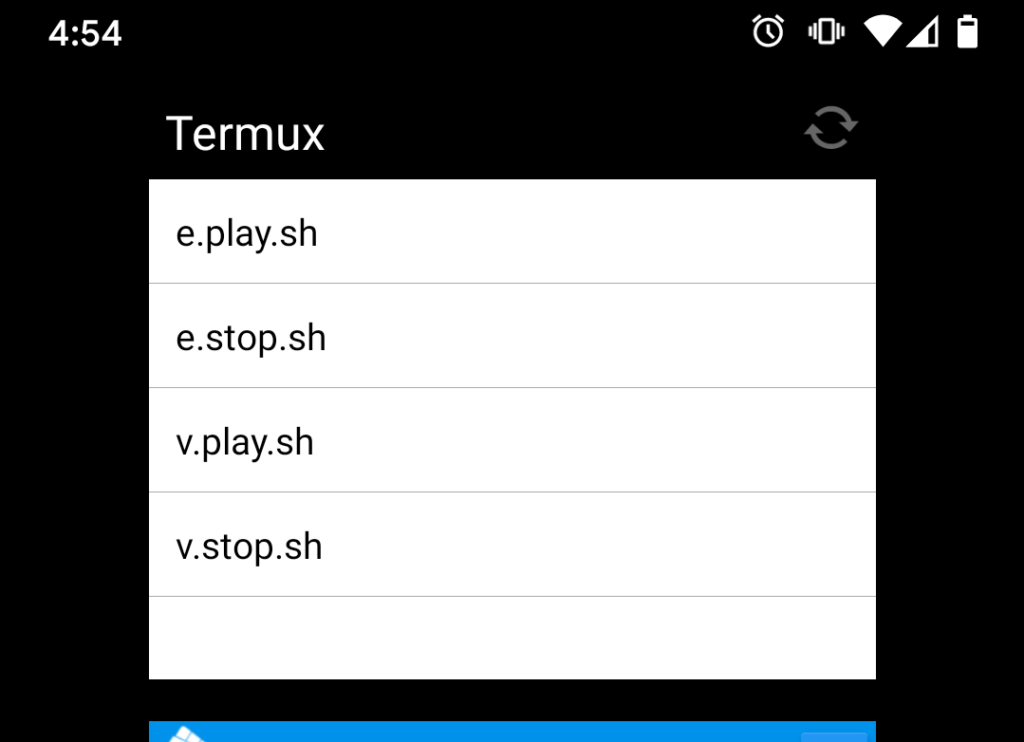
After some unfruitful debugging, I got lazy and realized I’d already installed the wonderful termux on my phone, along with a $2 add on to have a bash script launcher widget on my phone’s desktop. So, after a dozen or so minutes of coding and a little ssh-keygen -t ed25519for good measure, I had this on my phone:
Here’s what happens when you press one of those four links:
Call a local script on the phone with the same name shown above
Each script has the same contents but just calls the remote server with a different argument: ssh napserver controlmusic.sh CHILD PLAY_STOP. So for the first one above, that’d be ssh napserver controlmusic.sh e play
The remote server, (hardened of course to only allowing one command to be run for that SSH key,) inside controlmusic.sh runs a catt command: /usr/bin/catt -d DEVICE COMMAND OPTIONAL_COMMAND. Again for the first button that’d look like: /usr/bin/catt -d "E's Chromecast" cast songs.mp3
So, while not nearly has fancy as the web app I initially wrote, it works every time, has saved me the time of debugging the web app (aka let me be lazy ;) and most importantly, does not wake the kids up after they’ve gone to sleep! Icing on the cake is that continued my lazy streak and bought the app for my partner’s phone so they could activate the playlist while I’m out of town (instead of me VPNing in and activating it remotely on request ;).
Remember that awesome Dell XPS 13 I got back in 2016? The one that came with Windows 10 but then I wiped clean with Ubuntu 16.04? Well, it’s still goin’ strong! So strong that it’s time to sell it to another happy user now that work got me an upgrade. In that post I just linked you can read about how I upgraded it to have a better wireless card. Since then I’ve also upgraded to Ubuntu 18.04 with zero hardware compatibility issues. Further, I put in a faster NVMe drive and replaced the battery with an OEM Dell one to give it a bit more running time (battery health in the BIOS showed as bad).
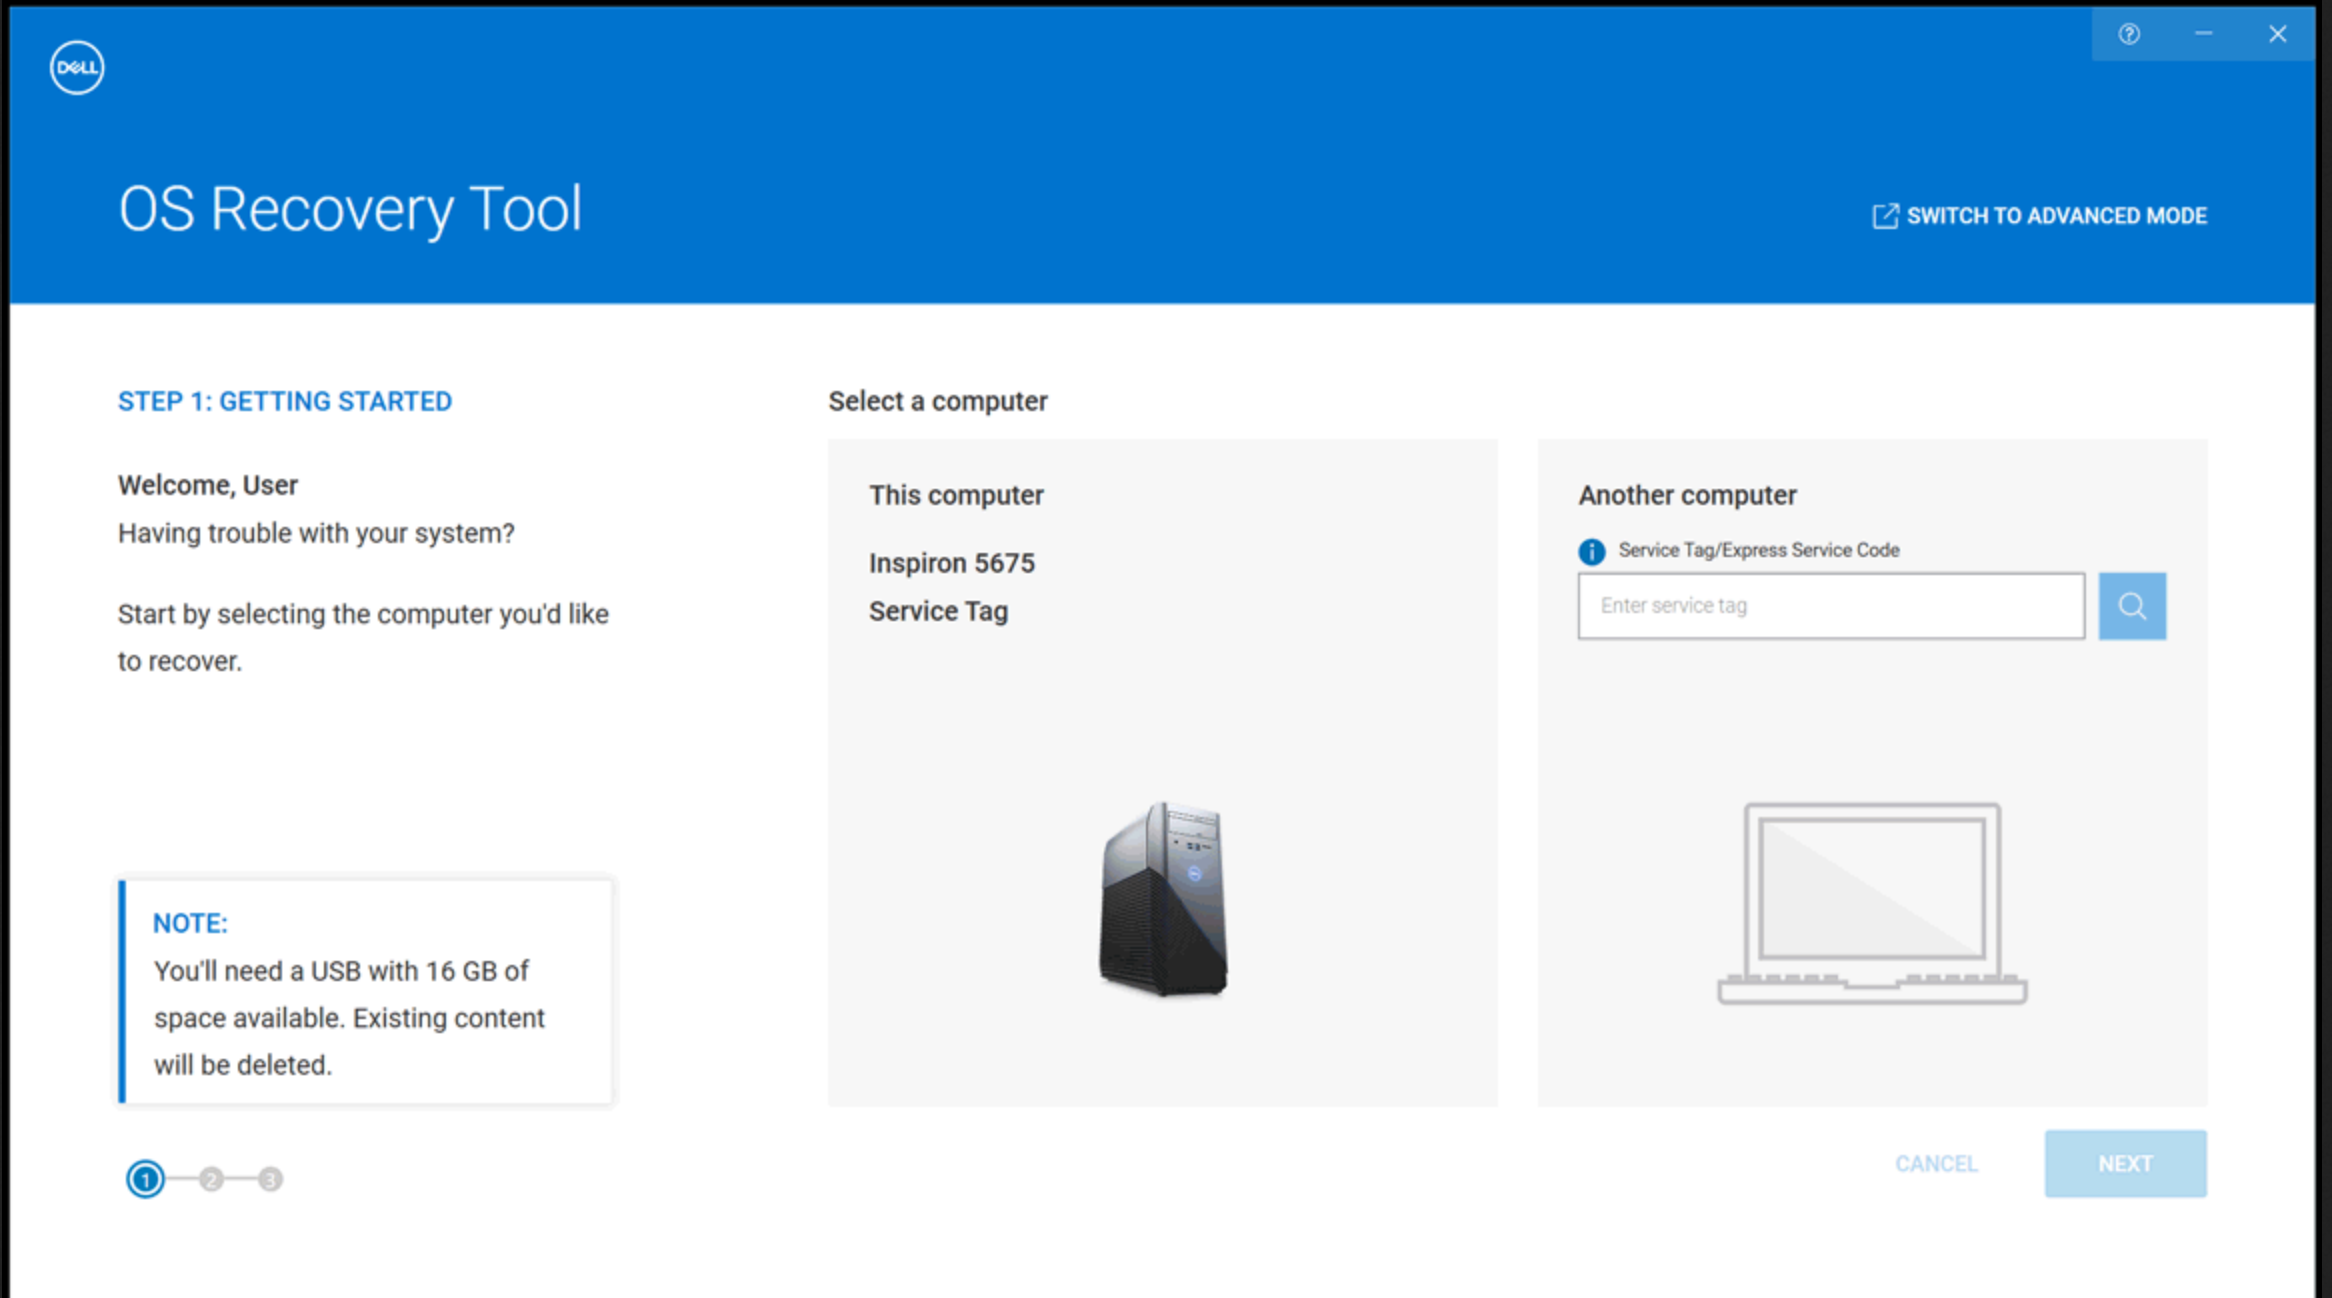
My buyer wanted to run the stock Windows 10 OS, so it was up to me to get it back to it’s roots to close the deal. Dell, it turns out, makes it REALLY easy to do a clean re-install of Windows 10 on your XPS laptop. They have this great tool called the Dell OS Recovery Tool. First you go to their site and punch in your Dell Service Tag. Then you download a windows executable. When you run that, you again punch in your Service Tag. The magic happens here then: the software builds a USB bootable image for Windows 10 with all the drivers needed for your specific laptop. This is totally awesome and saves a TON of time. Thanks Dell!
If you’re not on a Dell then that center panel isn’t available, still works though!
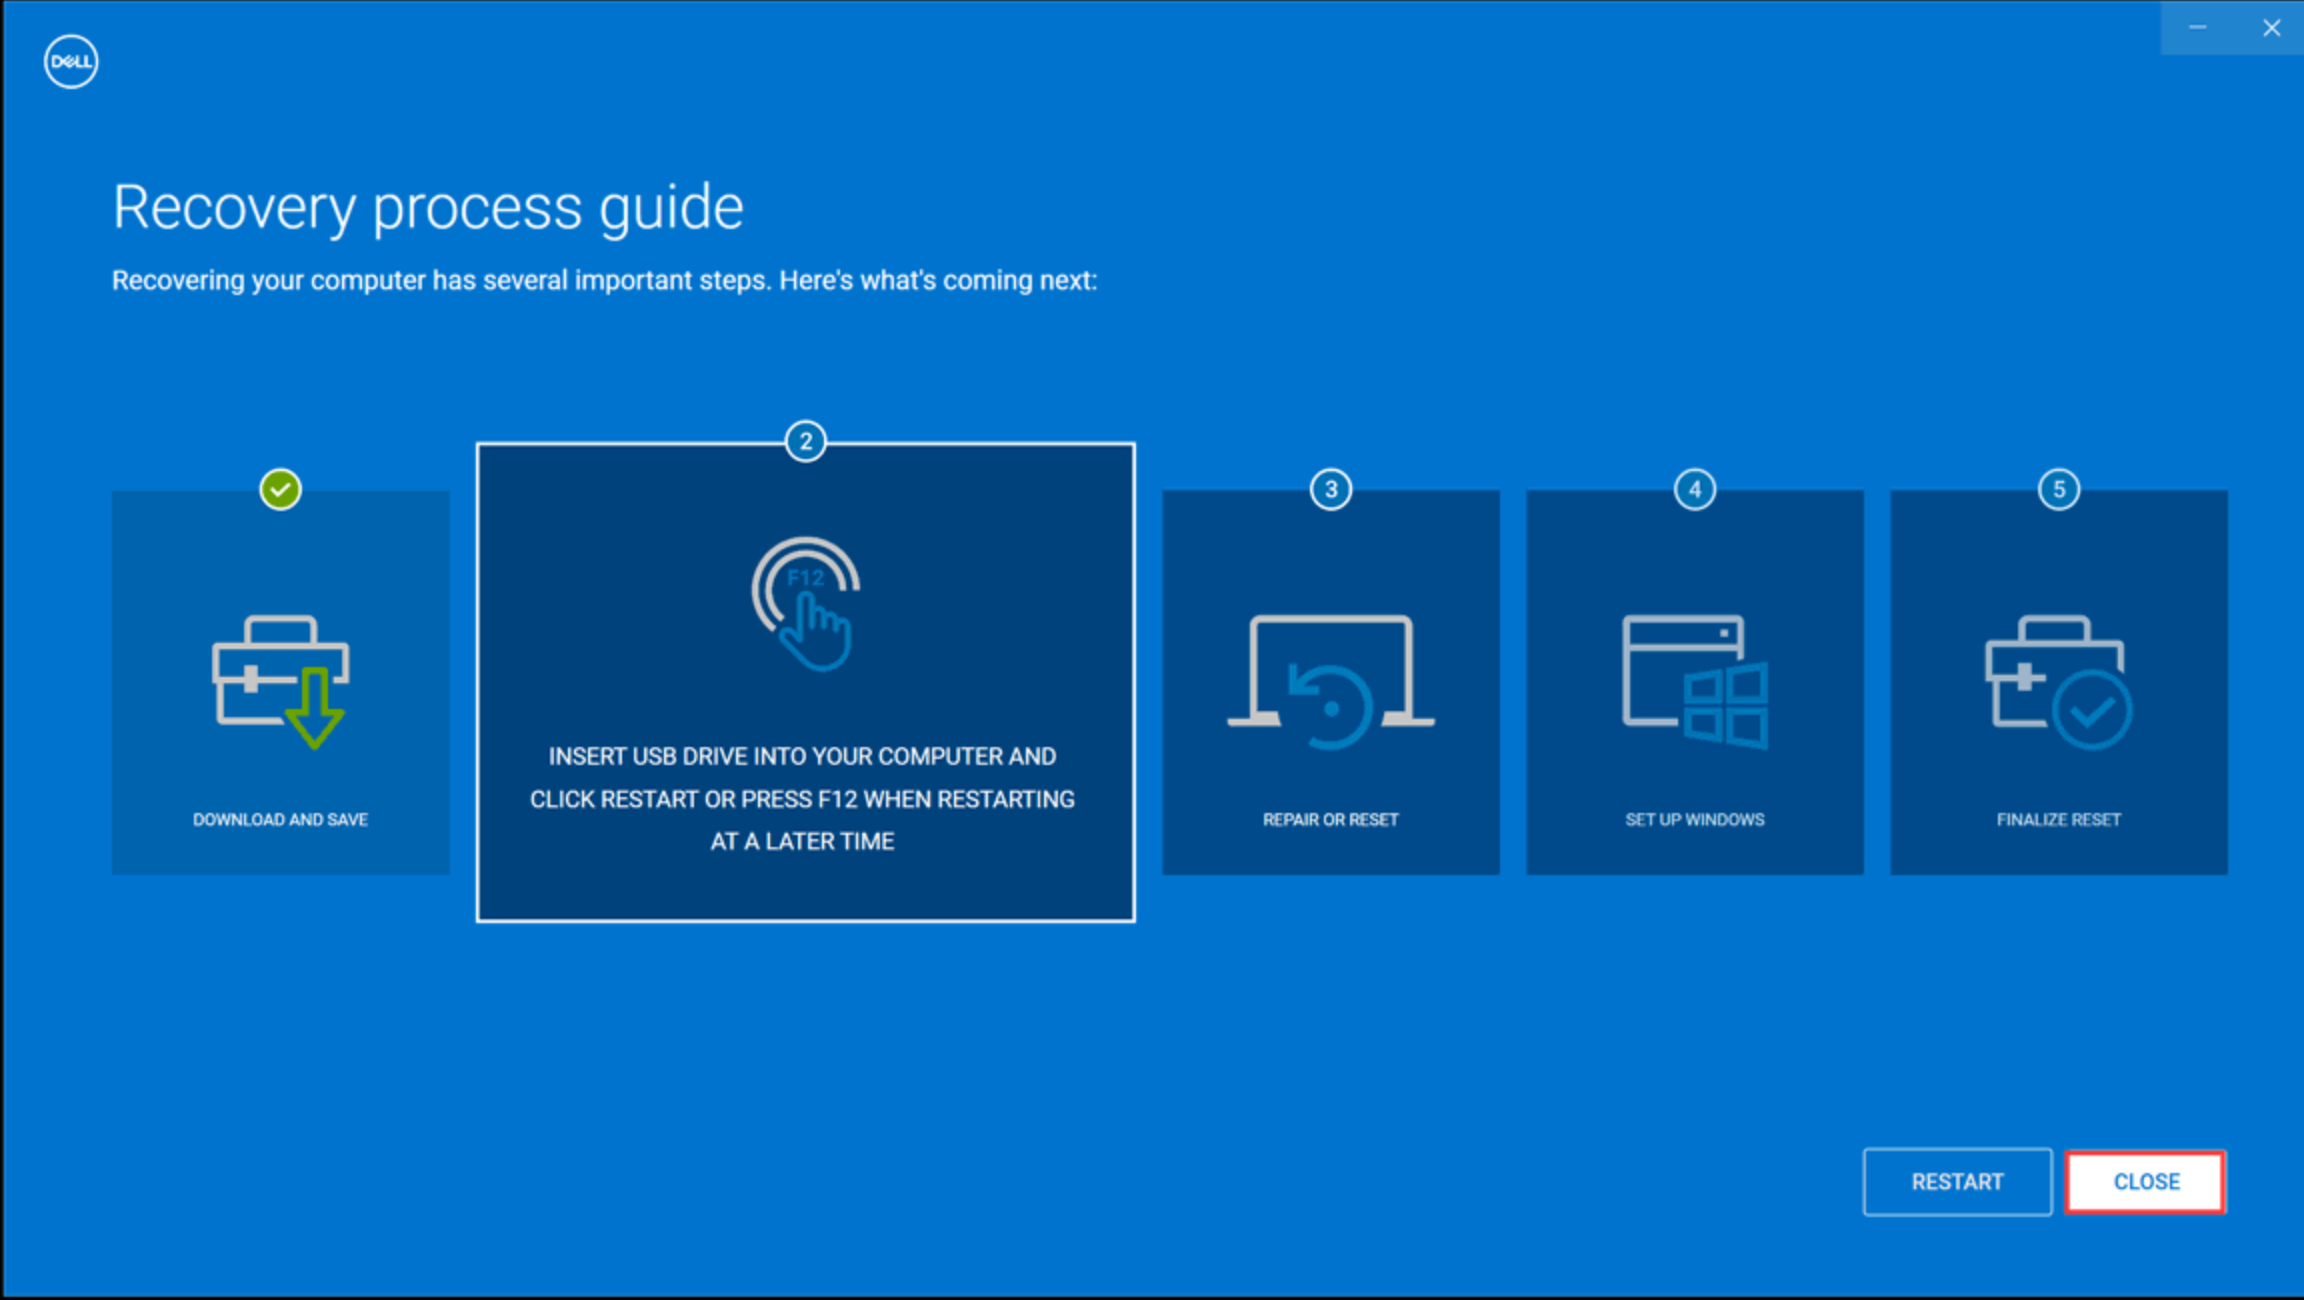
Then you wait a while (10 min?) while the program runs it’s course and you see the final screen saying it’s done. Odly, the other steps are not clickable to find out more information, they’re just showing you’re on step two of five:
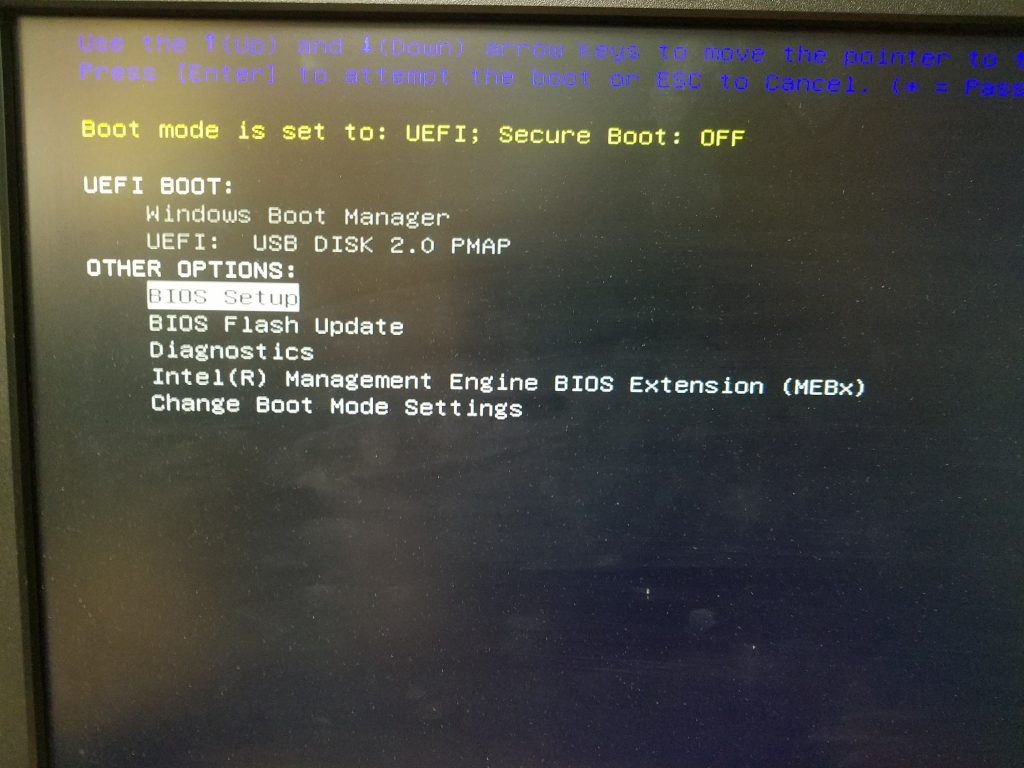
Now you should just need to reboot your laptop and press “F12” to get the one time boot prompt to go so you can specify the USB drive to boot off of (screen shot curtesy of jasoncoltrin.com):
However, no matter what I did, my USB drive never showed up under “UEFI BOOT” there. My Ubuntu 18.04 install drive? It showed up. Ubuntu 20.04 server install drive? Yup, no problems. Ok, maybe it’s the brand of USB drive? I reflashed a different brand USB drive and it had the same problem. Maybe BIOS settings are tweaked? I reset BIOS back to defaults, still no option to boot. After a couple hours, i walked away and slept on it.
The next day I was researching more and some one mentioned something about an NTFS partition:
One thing folks may not realize is the Flash Drive has to be formatted as FAT 32 in order to boot as UEFI..
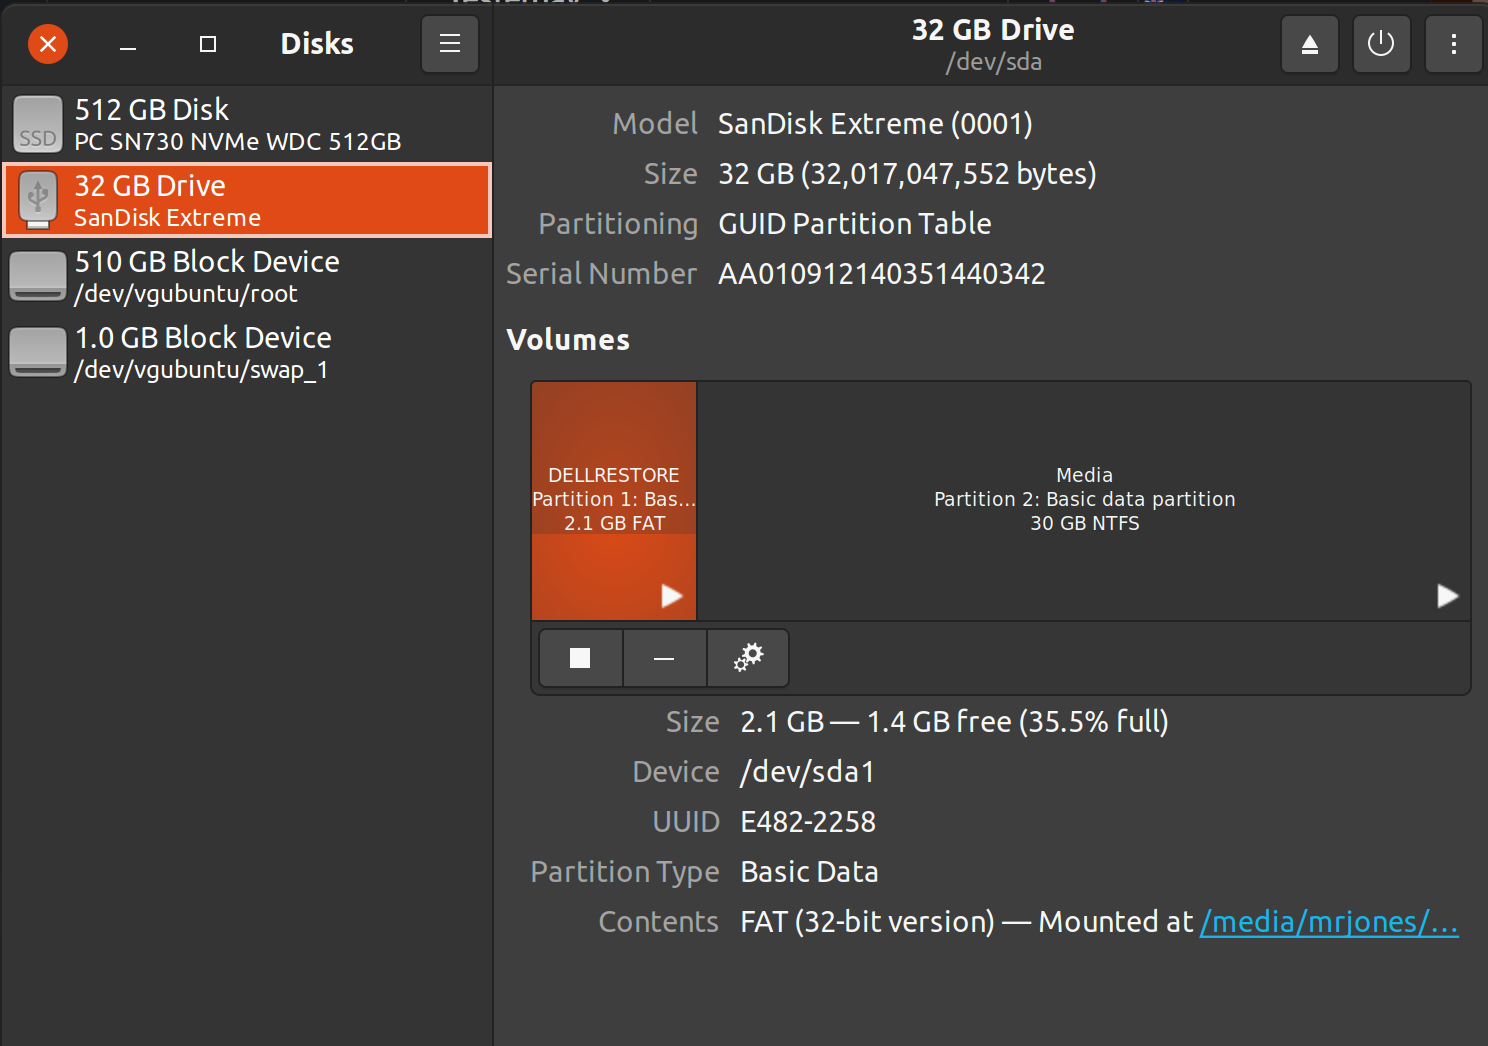
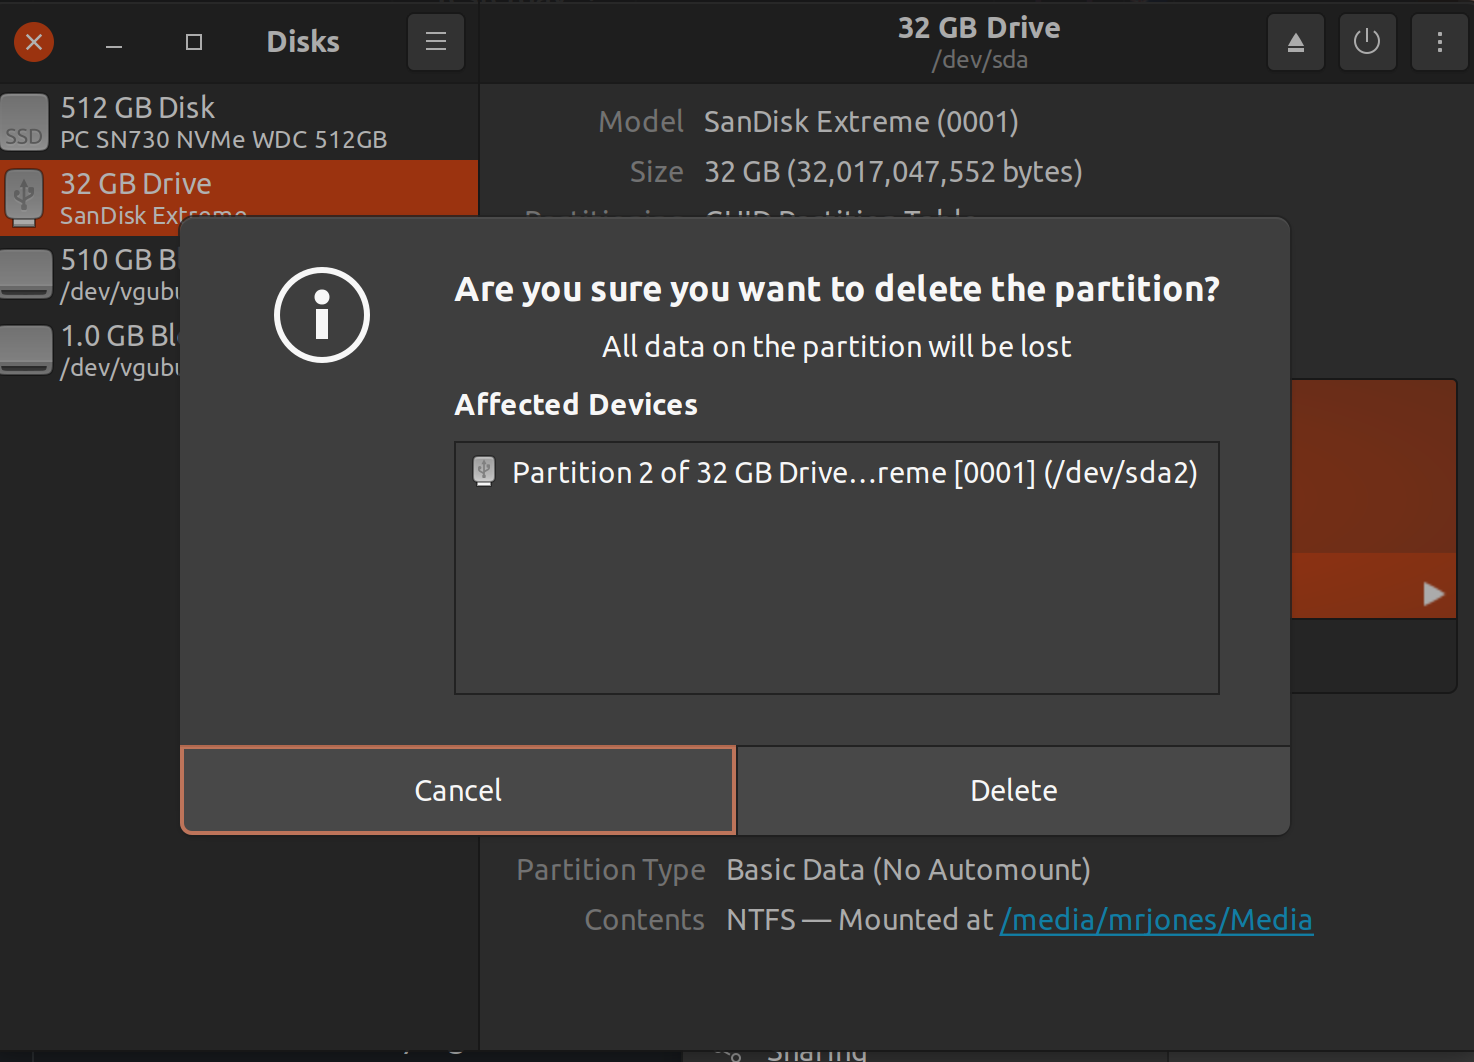
This was a bit silly though – the Dell Recover Tool completely formats the USB drive so it’s pristine and nothing is left on it but the FAT boot partition. Wait, is it silly? Let’s look at the USB drive in question in the Ubuntu 20.04 Disks utility:
Yup, see, just like I said, FAT boot par….hey!! What’s that other partition there!?
What? What’s this possibly BIOS confusing NTFS partition doing there? Let’s click that minus icon:
Yes I’m sure, delete that thing!!
Now let’s see what the BIOS thinks when I reboot with a USB drive with just the one FAT partition that DELL originally wrote. It thinks life is wonderful and is happy to proceed with re-installing Windows 10. This, by the way, takes a good number of hours. Be patient.
So, tl;dr – if you can’t get your Dell USB Windows 10 Restore image to boot on your Dell XPS 13 9350, and likely a lot of other Dell models, consider deleting this extra partition on the USB drive. It worked magic for me.
Like all of you parents lucky enough to still have a job during the COVID19 layoffs, I’ve been struggling to balance time at work, personal time, family time and being the family’s IT person. With school closed, and now all summer camps closed, our use of kids screen time (aka internet time) has gone up from 0.5hrs/day to 3hrs+/day. How do we ensure we have safe computing environment for them?
DoT by Design
Originally, we had a MacOS workstation for the kids with parental controls enabled. This allowed us to do things like set up a 30 min per day limit, create separate accounts for each kid, limit which apps they could use and, most importantly, limit which URLs they could use (deny all, allow some). When coupled with my love of LXD/Pi-Hole/Quad9, that looked like this:
In this scenario the kid’s single shared workstation would get an IP lease from the DHCP server running on the pfSense router. This lease would specify the house wide Pi-Hole which sent all it’s DNS clear text queries to Stubby which in turn sent them encrypted to Quad9 via DNS over TLS (DoT). This is really nice as not only do we do get LAN wide ad blocking, but we get LAN wide encrypted DNS too. Score!
The kids workstation gets no special treatment on the network and is a peer of every other DNS lease on the LAN. However, with them needing to do school work and have fun and learn over the summer, they’ve since each gotten their own workstations. Now we have three workstations! This is starting to be a hassle to maintain the lock down on which sites they can browse. As a result, we just told them “be good” and let them use their new workstations with out any filters. This is sub-optimal!
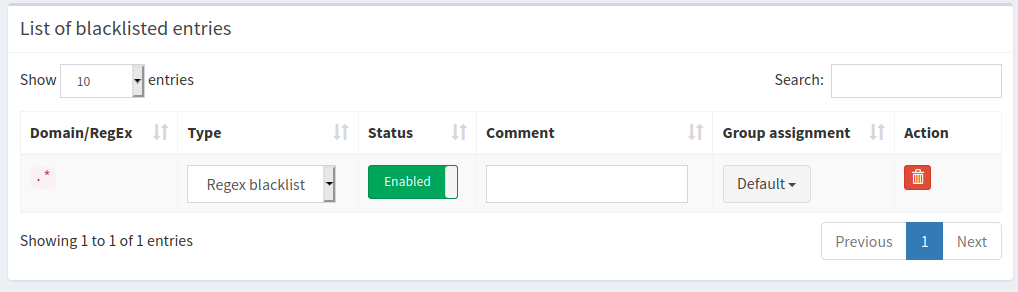
.* Blacklist
How can we improve this situation to make it more tenable and more secure? By adding more instances of Pi-Hole, of course! It’s trivial to add a new instance of Pi-Hole with LXD. Just add a new container lxc launch ubuntu: pi-hole2 and then install Pi-Hole on the new container with curl -sSL https://install.pi-hole.net | bash . It’s two one liners that take all of 5 minutes.
For those of you like me that want an easy way to export their existing whitelist from MacOS’s parental controls, check out the “Directory Service command line utility” aka dscl. With this command you can create a file with all the URLs you’ve whitelisted. You can then easily import them into your new Pi-Hole instance (be sure to swap out USERNAME for your user):
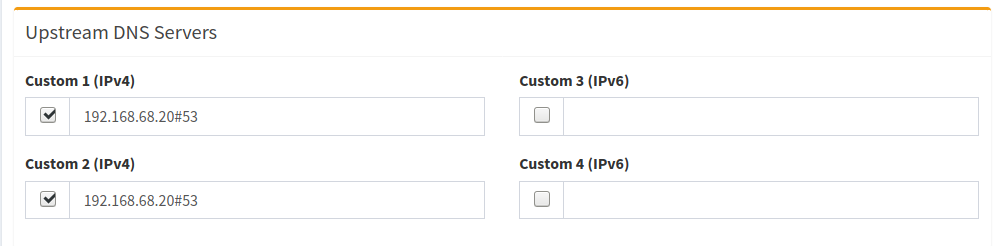
Back to the new Pi-Hole instance, if we set the upstream DNS server to be the initial Pi-Hole, this means the kids DNS gets all the benefits of the existing encrypted infrastructure, but can add their own layer of blocking. Here I configure their Pi-Hole to just use the existing Pi-Hole as the resolver:
Specifically, if you add .* as a blacklist, EVERY site on the internet will fail to resolve. Then you can incrementally add sites you want resolve to your whitelist:
Once we hard code each of the three workstations to use the new Kids DNS, we’re good to go! And, this indeed works, but the savvy technologist will see the time suck of a flaw in my plan: If you whitelist example.com, there’s 5 or more sites you need to whitelist as well in order for example.com to work. This is because 99% of all sites use 3rd party javascript via content delivery networks (CDNs), have integrations with social media and of course often use the ever present Google Analytics. It gets even more tricky because if you want to keep your kid from searching on Google, you can’t think, “Oh, I’ll just whitelist *.google.com and then all it’ll save a bunch of time!”. Along with that will come Gmail and who knows what ever else. I knew this issue would be there going in, so I wasn’t afraid to take the time to get it to work. But caveat emptor!
Teaching Kids to be Smart
Speaking of caveats of a plan – all parents should know that this plan is VERY easy to bypass once your kids starts to figure out how the internet and their specific devices work. I’ve literally told my kids what I’m doing (stopping just about every site from working) why I’m doing it (the internet can be a horrible place) and that they can likely figure a way around it (see Troy Hunt’s tweet – as well as his larger write up on parenting online).
Like Troy Hunt, I’ll be super proud when they figure a way around it – and that day will come! But I do want to prevent them from randomly clicking a link and ending up somewhere we don’t want them to be. They can then ask us parents about why they can’t access a site or when it might allowed.
Being honest with your kids about what you’re doing is the way for them to be aware that this is for their benefit. The end goal is not to lock the entire internet away forever, it’s actually the opposite. The end goal is to prepare them to be trusted with unfettered access to the internet. This will happen soon enough whether we parents want it or not!
Banning 8.8.8.8 et al.
While I was in there tuning up the DNS, I remembered that some clients on my network (I’m looking at you Roku!) weren’t listening to the DHCP rules about using my preferred, encrypted DNS and going direct to Google’s DNS (8.8.8.8) or others I didn’t like. After a little research I found I could redirect all outbound TCP and UDP DNS traffic so that all devices use my Pi-Hole/Stubby/Quad9 DNS* whether they thought they were or not. For others running pfSense and want to do this, see the steps to “Blocking DNS Queries to External Resolvers” and then “Redirecting all DNS Requests to pfSense” (both thanks to this Reddit thread).
Some of you may be thinking, “this seems like a lot of work, why don’t you just implement an existing off the shelf solution?” Good question! For one, I like to DIY so I control my data and what’s done with it instead of letting a 3rd party control it. As well, while there’s home based solutions, I prefer open source solutions. To put my money where my mouth is, I’ve just donated for the 2nd (3rd?) time to Pi-Hole. I encourage you to do the same!
To be clear though, this set up is a pretty crude tool to achieve the end result. It looks like there’s some quite polished solutions out there if you’re OK with closed source, cloud hosted solutions. As well, there’s of course other variations on the “Use Pi-Hole For Parental Controls“.
Wrapping Up
Now that we have all in this in place, we can trivially support N clients which we want to force to use the kids more lock down DNS set up. This looks like exactly like it did before, but we have an extra container in the LXD server (and, some what orthogonally, a fancier pfSense DNS blocking setup):
I suspect this set up won’t last for more than a year or two. As more and more sites get added to the white list, it will be harder and harder to maintain. Maybe after that I’ll give each kid their own Pi-Hole instance to run on an actual Raspberry Pi and let them do with it as they please ;)
(Of course just after I deployed this, Pi-Hole 5.0 came out which offer the concept of groups, so you can likely do this idea above in a single instance instead of multiple. A bummer for me now, but a win for all other Pi-Hole users, including my future use!)
I’ve had a few of these queued up for a while now, so time to release them into the wild:
Antagonizing the Soup – On the beach with friends, it came up in conversation that a one of us was not being as nice as they could their kid’s Superintendent
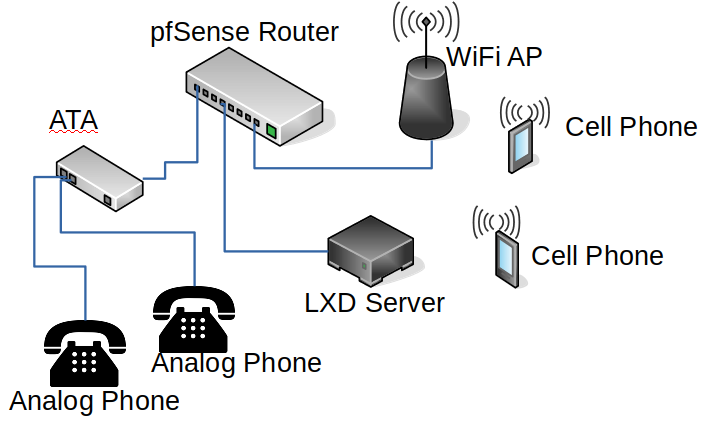
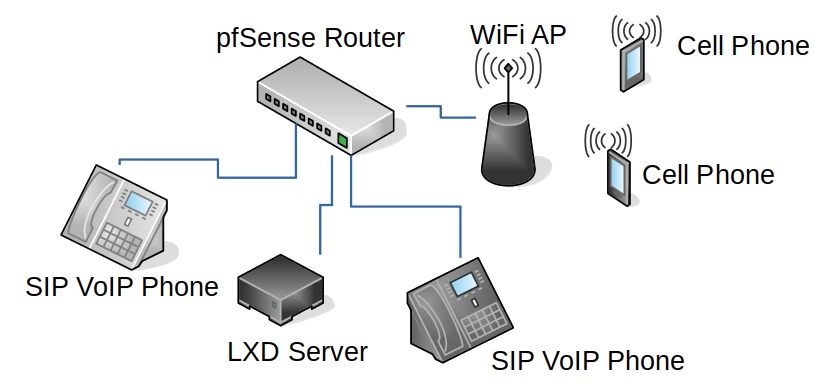
You may remember that a while ago, I set up a fun little PBX for my kids. It was awesome! That setup allowed my partner and I to use our cell phones as SIP clients to the Asterisk instance running on the LXD server and my kids each had an analog phone going through the ATA:
Since then, I decided it would actually be pretty cool to have a phone in our kitchen so we could call upstairs to the kids. If I was gonna wire up 1 phone, I may as well wire up 3 phones and I may as well make them all awesome. Yes, you know it, I’m talking about deploying 3 of the venerable Cisco 7960s:
These phones, according to my research, will be 20 years old in August of next year. That’s 10 years older than my oldest kid. That’s….really old! Especially in internet time! Yet, these phones are indeed venerable. They simply work and won’t quit. Even when they do quit, all you need is a little cardboard and they’ll keep on goin’. I had a few laying around and they’re often posted for sale for $5-15 online. I won’t get into it in this post, but it is some what of an art to get them on the right SIP (not SCCP!) firmware. This guide has some good info as does Loligo’s. tl;dr – set up an TFTP server, set your DHCP with the TFTP option, tie your phones MAC to the right conf file, and away you go. Feel free to email me if you get stuck!
But, we’re getting ahead of ourselves. Before we could plug the phones in though, we had to string some Ethernet. This means that my kids learned the important life skill every 7 year old needs to know, how to crimp RJ45 cable ends:
After all 3 phones were physically connected to the network (and running SIP firmware per above), they could connect to the Asterisk instance on the LXD box. Now our set up looks like this (only two SIP phones are shown, we have 3 (actually I put one on my office desk recently, so now we have 4 :))
At this point, I nuked the vanilla Asterisk instance and installed the latest version of FreePBX. Now the kids no longer get to learn about busy signals, instead they get to learn about conference calls, hold music (but not THAT hold music sadly), voice mails and a house wide paging system. It is SO much fun! And, honestly, it’s super practical too.
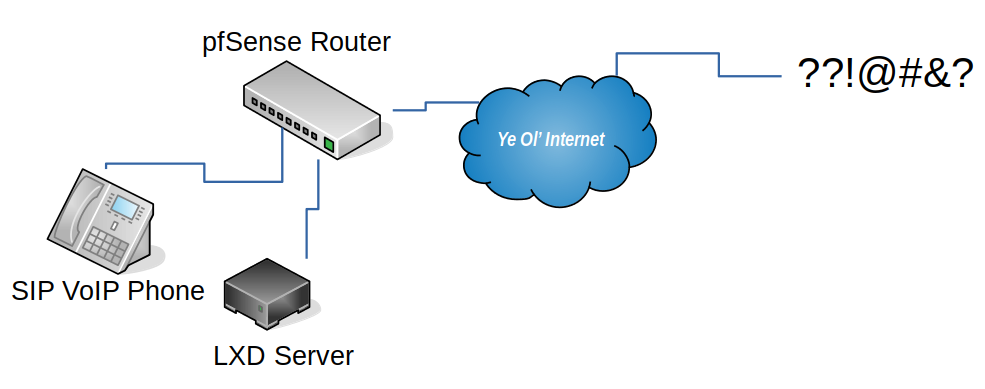
I was talking to my sister recently and she’d heard the kids talk about their phones and how much they loved them. I asked if she wanted one at her house. Given our kids don’t have email or a cell phone, this would give my sister a direct way to contact her niece and nephew with no middle parent man. Let’s do it! But…how?
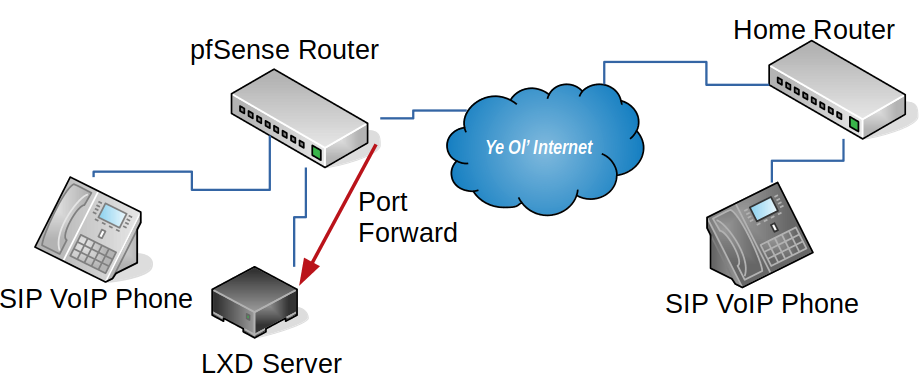
Let’s assume we just go for it. We’ll just program another phone we picked up off craig’s list to talk to the public IP of my house (no static IP, but that’s what Dynamic DNS is for), and we’ll punch a whole in the NAT Firewall Router thingy (a fanless doodad running pfSense). Asterisk uses SIP as we know, which is on port UDP 5060, so it’s pretty easy. We do a port forward like this – see red arrow:
This is a bad idea. On so many levels. First off, these hella old phones use only unencrypted tech. I mean, why use SSH when you have telnet? Why use TLS when you have good ol’ HTTP? SIP itself is unencrypted which means that any one of the many hops the traffic goes through will be able to trivially sniff the UDP packets used to authenticate against the Asterisk instance. Not only could they get on to my LAN, they could listen to all the calls. Nitpickers may note that Wikipedia speaks of SIP encryption – but that’s impossible on these old phones.
These types hacks are no theoretical either. Security researcher Ang Cui has made quite a name for him with all the vulns he’s found in these phones. In a Defcon 21 talk called “Stepping P3wns: Adventures in full spectrum embedded exploitation (and defense!)” he demonstrated how sending a resume (PDF) which would get printed on a (vulnerable) HP printer would allow a reverse tunnel to open up which could then be used hack the phone on the desk and silently enable the mic so he could listen to you discuss his “resume”. Awesome!! And scary ;) The same nitpicker as above will not this was the 7961, not the 7960 – still my OLDER phone is very likely less secure than the NEWER one.
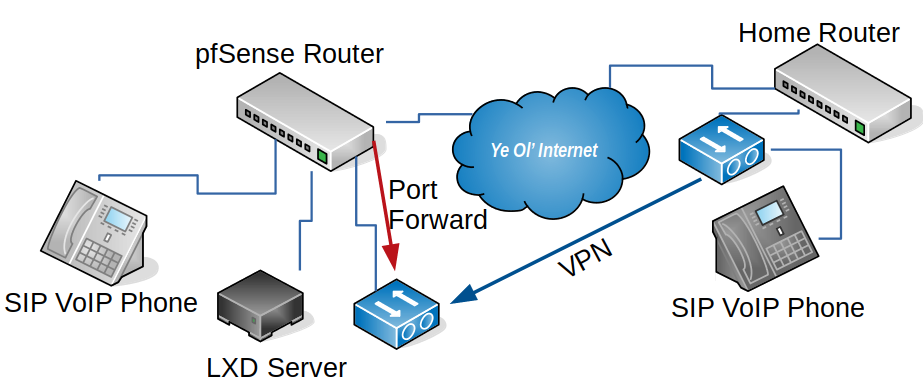
Maybe I should encrypt the traffic? Like, what if we put a VPN server behind the firewall, do a port forward to it, and a VPN client at the remote “office”? That way the SIP traffic is never seen on the internet! Yeah!! Very similar to the diagram above, but with two more devices:
Now instead of unencrypted packets being forwarded to the Asterisk server, we only have encrypted packets being forwarded to the VPN server (again, see red arrow below). Further the remote phone uses the VPN (blue arrow) and thinks it’s on my home network – un-routable IP and all!
But where as we spent $15 before, we’ve reused existing phones with the new setup and VPNs sound hard and possibly expensive to deploy. Maybe it can’t be done the cheap-cheap? Dun dun dun!! Enter Wireguard! This insanely simple, radically secure and Sys Admin friendly VPN is great. I’ve deployed a bunch of instances now and can’t get enough of it. But what about the price of the hardware? Here’s where the final piece of this Asterisk, LXD, Wireguard VPN and Remote “Office” puzzle is put in place:
For just over $20 shipped you too can have an awesome VPN server aka the GL-MT300N-V2 made by GL Technologies (aka GL.iNet). They also work as clients too! While we’ve had to reboot the remote VPN and Phone once or twice, we’ve had months of up time using this set up. The router supports a slick GUI (what I ended up using) but if you’re retro, you can do it all manually too.
An added bonus to this whole set up is by adding a Wireguard client on my phone, I can now VPN in and use the SIP client where ever I am to call or be called.
Postscript: A few weeks ago we decided we’d experiment with letting the kids be at home alone for short periods. Per above, they have no cell phones and we have no land line. But with a perfectly good PBX in place already, I spent $4 getting a LocalPhone SIP trunk. We now pay $0.005 per outgoing call. Yes, you read that right, half a cent per call. Read more over at Ward Mundy’s site!
This past week I had to invoice a customer for some consulting I did for them. Late last year I used some rando site I couldn’t find again to generate an earlier invoice. This time, however, I thought that maybe I might be doing more consulting, so I wanted to be sure to use the same app going forward. Even better, it would be great if there was something that I could host myself to ensure any sensitive information in the invoice didn’t leak by accident.
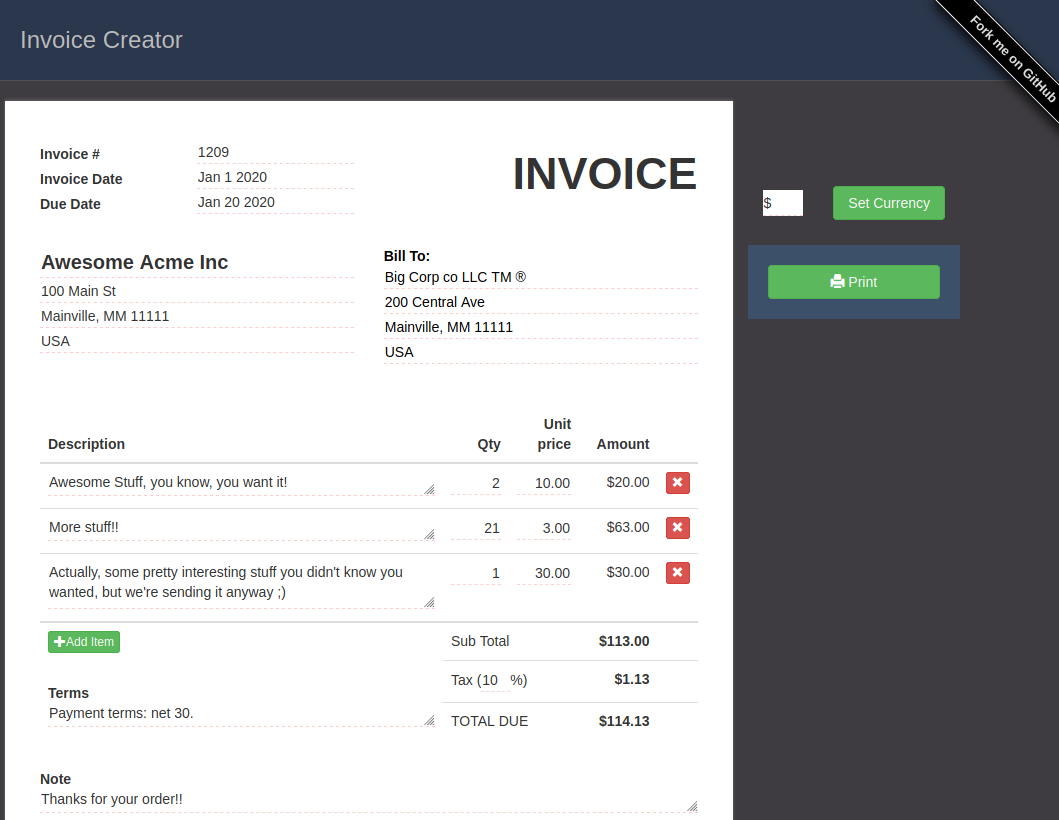
After spending some time looking, I found a more than capable web app called “InvoiceOnline” written by Alex P. out Ukraine. It was near perfect!
I downloaded the repo and opened the index.html file in my fave browser. It just worked as expected, no web server, python or PHP needed. Sweet!
However, I went to add a long line item and the text just got cut off. What I needed was to have the input fields be changed to textarea fields. Since this was an open source project, easy peasy, lemon squeezy!
Oh, and I need to make sure when you print you don’t see any of the textarea artifacts (resize handle, scrollbars etc). Oh yeah, I also wanted to be able to set the currency explicitly. Also the “Save” and “Print” buttons didn’t seem to do anything. I also wanted to be able to add a note to say a nice “hey!!” to my customers when they see the bill. Penultimate, it’d be nice to host a version of it on my site and add the quintessential “Fork me on Gitub!” overlay banner. Finally, I reached out to Alex to see if he’d like to merge my changes back up to his master.
So, yeah, my “quick” generation of a “simple” invoice, ended being a morning gleefully spent incrementally improving an invoice app I didn’t write. I loved it!
See the live version on my site and check out the Github repo. Free invoice generation and free software for the win! Pull requests welcome ;)
Feb 8, 2010 Update – I had a feature request to support a logo being displayed. This feature has been added!
The way it works is that you provide a URL of your logo and then click “show” and size the logo to your liking. Default is to not use or show a logo. Enjoy!