0 minutes, 9 seconds
And one Bay Area one while flying out of OAK ;)
#6 was taken on this evenings quickie MTB ride to my fave local spot. Here’s what it looked like when you turned the camera around:
0 minutes, 9 seconds
And one Bay Area one while flying out of OAK ;)
#6 was taken on this evenings quickie MTB ride to my fave local spot. Here’s what it looked like when you turned the camera around:
0 minutes, 22 seconds
Yay! I’m proud to announce that plip has been running a Tor middle relay for exactly a year. I believe in on-line privacy and anonymity and when I had some time after leaving my last gig, I spent quite a bit of time learning about Tor. Though I aspired to run an exit relay, the potential hassle was too much. Instead, I was happy to learn about The Amnesic Incognito Live System (aka Tails) and set up a middle relay. Here’s to another year!
2 minutes, 6 seconds
I recently fat fingered the partitions on my 5k iMac when installing Ubuntu (more on Ubuntu on a 5k later!), so I was stuck doing a double clean install of both OS X and Ubuntu. Given how often I find myself re-installing a system from scratch, I’ve gotten pretty good at getting all my core apps set up. All the software I run is open source or free, so downloading it is quite easy. But how do you log in using all your secure passwords? The passwords are stored in my password safe, but the password safe is stored in a password protected, self hosted cloud file server. Classic chicken and egg scenario. Here’s how I get around it:
Now, when you need to bootstrap a new computer, it’s simple as pie:
Thus we solve the chicken and egg problem. As well, since we’re pointing to the most up to date version of your password safe on your cloud server, you’ll always have your latest passwords!
Yes, yes, we are exposing our selves here to some risk that some one will guess the shortened URL of our our password safe. However, this is pretty unlikely that it’ll be guessed. As well, you use a good pass phrase on your password safe, right?!
For smart phones, I’ve had similar problems bootstrapping when I can’t download the password safe app because I can’t log into the app store. Another chicken and egg! Here’s how I work around this (which would work for the desktop scenario too):
Though it seems like a number of painful steps they both go more quickly than you think and I seem to do them enough they’re second nature.
4 minutes, 9 seconds
Are you using Linux but cannot get your LT2P-IPSEC VPN hosted on your Mac OS X server working? Do you write code on your Ubuntu client and check into a git server behind your VPN? Maybe you should consider ditching the VPN client and using SSH tunnels instead. Really, this will work for any server that’s on the remote LAN that you have SSH access to, but in my case it was the same host as the VPN Server, a mac. As well, this can be any client as well, not just Ubuntu.
In all the notes below, any time you see “mrjones” or USERNAME, replace it with your username. Anytime you see an all caps computer name that’s SERVER_NAME.com, replace it your server’s name. The VPN server, SSH jump host and jump host are all the same.
You’ll need:
You can use SSH to create an SSH tunnel, specifically one that has dynamic ports and hosts as specified by the requesting app – aka a SOCKS5 proxy. To do this, you can use any local port above 1024, but I use 1080. It looks like this:
ssh -D 1080 mrjones@SECRET_DOMAIN.com
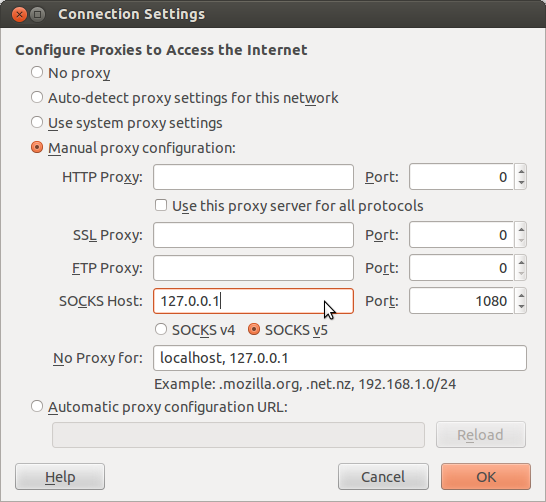
In your browser then, for example FireFox, you set up the proxy by:
The benefit of setting up a SOCKS5 proxy is that your URLs are the same as if you were on the VPN. This means that when you copy and paste them into/out of IM chats and emails, they just work as opposed to having localhost in them or trailing, odd ports.
You may still need to SSH to a production machine via the remote server jump host. In order to do this and not have to re-federate your private key the SSH jump host (or generate a new private key on the jump host and then federate that out to the production machines), you can just do this:
ssh -A -t -l mrjones SECRET_DOMAIN.com ssh -A -t -l root SECURE_INTERNAL_SERVER.com
After running that you should have a prompt on SECURE_INTERNAL_SERVER.com as root. This assumes that you have your public on your *local* box added to the authorized_keys of the account your SSHing to on the remote most box (SECURE_INTERNAL_SERVER.com). This is a thing of beauty.
If you’re like me, you need to git clone for repos hosted on your stash/gitlab/whatever server which is only accessible on the VPN or LAN. You can do this with tunnels as well! For me, I use Stash professionaly, so instead of running this command to clone a repo:
git clone ssh://git@STASH_SERVER.com:7999/path/to/repo.git
You can run this to add a tunnel to the stash host and then clone via a specialized host:
ssh mrjones@SECRET_DOMAIN.com -N -L 7999:STASH_SERVER.com:7999 git clone ssh://git@localhost:7999/path/to/repo.git
subsequent git commands like commit, pull, status etc. work with out modification transparently.
If you’re like me, you need to push using git via awesome git post-commit hooks. You can do this with tunnels as well! Instead of running this command to add your remote:
git remote add live ssh://git@PROD_WEB.com/opt/git/web.git
You can run this to add a tunnel to PROD_WEB.com and then add a specialized remote:
ssh mrjones@SECRET_DOMAIN.com -N -L 2200:PROD_WEB.com:22 git remote add live ssh://git@localhost:2200/opt/git/web.git
subsequent git commands to push new branches work with out modification transparently.
Side note, you can push specific tags using this syntax:
git push live +TAG_HERE^{}:master
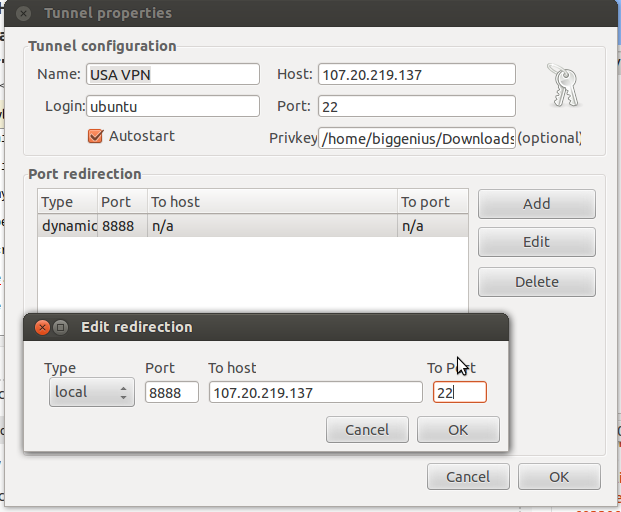
DDG gSTM pic
Managing all these tunnels is a total pain. You could create a shell script to do it, but the cleanest way by far is to use a tunnel manager. For me on Ubuntu this gSTM (Gnome SSH Tunnel Manager). This allows you to, with one click, turn on and off all the tunnels listed above.
Right now the biggest caveat with this set up is that *ALL* your web traffic goes over the VPN host (this is actually the same as when you’re on your mac based VPN). Further, your browser will not work *at all* with out the tunnels set up, even for any hosts (not same as VPN ;). Which means even if you want to use your browser for non-work when you’re not working, all your browser traffic goes through your VPN server.
As well, if you run a vagrant dev environment, you can not access your VMs via their local Virtual Box IP, as they’re not accessible from VPN server.
You can fix both of these issues by either using a different browser for non work/vagrant hosts or disabling the proxy by flipping it back to “no proxy” back in settings.
I believe that Foxy Proxy might solve this, but haven’t tried it yet!
0 minutes, 1 second
2 minutes, 25 seconds
My mom just got her first smart phone, an iPhone 5S. What should she learn to do on it first? Fortunately, she has an iPad already so the iOS as a whole isn’t entirely foreign.
First up is the core list of phone phone features which is actually only limited to 6:
My mom wants to barely use her phone so she doesn’t have to pay a lot per month. Right now she’s paying $17.50 for 250 minutes, 300 texts and 30 MB per month from Consumer Cellular. With these tight constraints, airplane mode will be your friend to ensure while you’re phone is not actively being used that it’s not using data while your email is checked or while some app is sucking down bits. As well, knowing if you’re phone is going to sound like Defcon level 1 alert when some one calls you is important. Know your sounds vs your silence!
The second set of features to learn are centered around how your phone is not just a phone, but a super powerful mini computer that fits in your purse:
I don’t know if she agrees (Mom?), but I think some of the best advice I gave her was that she didn’t need to rush things with the new phone. She could take as long as she needed to learn how to do a task (or wait until I’m free to walk her through it).
Do you know someone who just got a smart phone for the first time? What do you think should be on the top items to learn?
2 minutes, 33 seconds
Another year, another Defcon! This was my third year attending. The biggest change this year was that the conference changed locations moving from the Rio to Paris/Ballys. Given I’m some what of a lookie loo I can’t say with super authority, but I thought the space worked as well as the prior location, leave the fact that the sky talks were on a separate floor and might have gotten less traffic. Given that in prior years they had an hours long wait, it may have been a good thing.
Since I live in Vegas, I didn’t have any concerns getting my pick there, like I did with Hope. Otherwise, this years highlights were:
Though I didn’t make it very far through the matasano crypto challenges, it is amazing to see how relevant the lessons learned in those challenges are. Hex, Base64 and XOR…every talk I attended had one of these concepts as a critical part of their hack.
Here’s a list of talks I attended:
0 minutes, 42 seconds
So, we all know that in PHP, you configure it with a php.ini file. And in there, you can set the amount of RAM a script can use with the memory_limitsetting (remember this is “M” not “MB”!). And if you get this error:
PHP Fatal error: Allowed memory size of 134217728 bytes exhausted (tried to allocate 234881025 bytes)
Then you can increase the memory_limit to be larger (don’t forget to restart apache!). However, what if you want a script to hit that limit to see how your error logs and such are set up? I had more fun than I thought I would writing a textbook solution to a textbook problem. Here it is in it’s 4 line glory:
$str = 'memory!';
$i = 1;
while ($i++ != 100) $str .= $str ;
print "done!";
When you run this you should see an error as this will exceed 128M of memory. If not, so salt to taste ($i++ != 200) if you run with a higher memory_limit setting!
3 minutes, 53 seconds
A good friend of mine is setting up a new workstation in his new lab and wanted some advice on what would be the best setup. Being a bit of a geek about monitors and having set up my own desk, I had a lot of ideas on this. After a detail-packed email to him, I realized it’d make a great post for others looking to do the same thing.
The overall question I got: What would be the best standing desk with the best monitors for a new Mac Pro (nMP)?
This is fun! I get to spend imaginary money for a dream set up. For my “what’s the best” type of questions, I always try to refer to The Wirecutter, they’re great. As well, I try to use Amazon whenever possible for all of my shopping needs
Though Wirecutter has a newer, cheaper recommendation, I still like their step up, the NextDesk Terra, which was their “regular” recommendation when I got mine. I see it’s now down to $1,500.
NextDesk upgrades: You can get a ton more bells and whistles including CPU stands, software integration, casters, batteries (for use when moving on casters) and more. The bare minimum I would get is the “Power Management,” which is really well done. Also – think on whether you want the hole(s) for cables in the desk. I regretted getting a single center one. I might have gone with none or two side ones.
I use Ergotron’s single and dual arm mounts. Amazon pictures the dual with two monitors on top of each other, but it can easily do two side by side (as well, they rotate for one portrait and one landscape). You can also order the single and then add a second arm to the same pole at a later date if you decide to add another monitor.
IPS 60hz 4k displays used to be $3,000+. This is no longer the case! The Dell P2715Q 4k 27″ is down to $500! This is insane. You could get two of these no prob for your Mac Pro. IPS means that the viewing angles are perfect. 60hz means that the refresh rate is super fast and your mouse/window movements don’t feel sluggish. 4k means that you can either run HiDPI for super crisp text or 1:1 for TONS of real estate. Well, assuming you have good eyes for the 1:1 ;)
Though 4k is ready for prime time, there are a few bumps in the road, specifically around displaying the boot process. As well, I see Apple’s nMP page boldly advertises “connect up to three high-resolution 4K displays.” However, I’ve also seen reports that the 3rd will be only at 30hz (boo!).
I forget which cables Dell comes with, but you can always get a 3, 6, or 9 foot (or more!); it’s nice to have the perfect length cable with no extra slack. Same for ethernet, USB, firewire and thunderbolt cables too! For example, here’s a 6ft mini display -> display port cable for just $7. Oh yes – don’t use any ugly looking dongles! Get the right cable for the job.
I don’t actually have a new Mac Pro (aka nMP aka 2013 Mac Pro), so I don’t have too much to say about which CPU and GPU to get. However, I did just get a 5k iMac that works great with the Dell 4k display! (Well, as long as you don’t mind some UI degradation. Ok, not so great, but worth the trade off for me.). To save money on the most expensive item in this monster desk setup, I strongly recommend using refurb.me – they’re the best way to effortlessly get good deals on Apple refurbed products! These are direct from Apple and include an Apple warranty.
One new Mac purchasing trick I did learn is about buying your new Mac with more RAM direct from Apple. Don’t do it! For example, 64GB of aftermarket RAM only costs $664 instead of Apple’s $1,300.
Consider putting the saved money toward more cores or disk or graphics card! I love Crucial for cheap aftermarket RAM, but I usually end up buying their stuff on Amazon. Here, B00GEC3ZJQ on Amazon is cheaper than the exact same part (CT5019226) on the Crucial site. Order two kits to max out your nMP to 64GB.
Keyboard and mouse – I love Wirecutter’s recommendations for wireless versions of both mice and keyboards. They really add to the clean lines of VESA stands on the awesome desk.
Despite loving the wireless mouse and keyboard, my new boss got me a “welcome to your new job!” gift of a fancy Das Keyboard 4 Pro which I NEVER would have bought on my own given it’s price. If I had office mates, they NEVER would want me to use it because it’s too loud. That said, I actually love this keyboard so much that I alternate it with Wirecutter’s bluetooth pick, but the cable does ruin the lines of your desk. ;) Oh – I see it comes in “soft tactile” model as well. This might be a more quiet option!
I love following this topic so drop me a note if you have any questions or want to update me with your experiences in this area!
0 minutes, 1 second
https://vimeo.com/134379398