4 minutes, 28 seconds
Intro
There’s a trope among computer nerds that any complex problem that you’re struggling to figure out WTF is going on, was probably caused by DNS. There’s a whole slew of sites that capture this sentiment including itwasdns.net , itwasdns.io/was-it-dns, itwasdns.org and it’s even available as a T-Shirt!
Wait – was it DNS?
I was recently reminded of “it was DNS” during a server upgrade I was doing. For the self-hosted setup I run at home, I have two identical Ubuntu servers. This allows me to easily move services between the two servers to do potentially destructive maintenance on one and the other will still be up and running. This prevents family from complaining, “The Internet is down!! I need the Internet!!!” (which of course has never happened…noooope, no self inflicted internet outages here).
In preparation for the Ubuntu 22 -> 24 upgrade I’d been putting off, I had just moved the main file server and the DNS server (Nextcloud, Pi-Hole and Stubby) from primary to backup servers. Notably, the services keep the same IP address on either server.
After moving all the services, I checked that both DNS and Fileserver were working, like the good little sys admin I am. I completed the Ubuntu uplift from 22 to 24 (hello sudo do-release-upgrade). After the uplift completed, I stopped the services on the backup server and started up on the main server. I immediately checked if DNS worked – all good there! Then I checked Nextcloud. Nope, down on the desktop. Um… a little panic is setting in… Ah hah! I’ll double check on another device – my phone! Also not working there. Ok, stomach just dropped, sinking feeling that I’ll have to fail back over to backups and have a day of troubleshooting ahead. Ugh.
Parenthetical aside: Why might it be DNS
(The title of this blog post already tells how this story ends, but let’s have a brief interlude to talk a little bit about DNS works. For a big explainer, I highly recommend Julia Evan’s DNS blog post series (or her DNS Zine!). Specifically, her post DNS “propagation” is actually caches expiring is especially applicable here. Otherwise, when your client queries a DNS server it hands back a “time to live” (TTL). This is then cached locally for the TTL duration. A common value might be 3600 (60 minutes) or possibly 86400 (1 day). Parenthetical aside over!)
Back to our hero fighting a possible outage and fail-over to backup
I was baffled how the file server was unavailable. I the used dig tool to check from 3rd system that wasn’t my desktop or my phone. Something odd happened: it resolved fine. What!?! I then did a curl to the Nextcloud URL and it worked perfectly.
This was baffling.
When things get baffling I try to artificially induce a shower thought. I stepped away from the keyboard, took a deep breath and played a game of boggle.
180 seconds later, with no shower thoughts forming over boggle, I retraced my steps. And then it hit me: I didn’t refresh the backup of the DNS server! Aha!! An NXDOMAIN no doubt was cached. Here was my theory
- I deployed the Nextcloud server on the main server, including a Local DNS Host entry – an
Arecord that only works on my home LAN on my Pi-Hole. TheArecords has a TTL of0 - Notably, I did NOT sync the Pi-Hole to the backup server
- In preparation of bringing down the main server, I copied the file server’s data to the backup server and then started the file server and DNS server on the backup.
- I tested both DNS and file server worked, presumably using a client cache of DNS*
- I upgraded Ubuntu 22 -> 24
- Somewhere in here, both my phone and my desktop, running the Nextcloud clients, queried the out of sync Pi-Hole for the Nextcloud IP.
- Since there was no
Arecord for Nextcloud, the Pi-Hole dutifully returned anNXDOMAINresponse with a TTL of3600to both my phone and my desktop. - Upgrade completes in 10 minutes later, I stop services on the backup server, start them on the production server
- Nothing works
- I feel terrible
So if I had just synced DNS to the backup server, my two main clients wouldn’t have had the problem on step 7 above.
Conclusion
The most baffling thing of all of this, and a bit embarrassing to only find out now, is this fact:
Records added using [local DNS] feature always get served with TTL=0
– Pi-Hole forum post
Wait…what?! So every query to local DNS records on my LAN are NEVER cached?! Further, NXDOMAIN entries are cached for a full hour?! This is a big DNS footgun! Every successful lookup is rewarded with a request to please check again the very next time you need to know this address. Every failed lookup is cursed to remember that failure for an hour. Yay?
In the end, I’m going to change my TTL of local DNS records to be 3600 like a sane person. And I’m going to be extra sure my DNS is synched to my backup server first!
May the next SysAdmin benefit from my failures ;)
Postscript
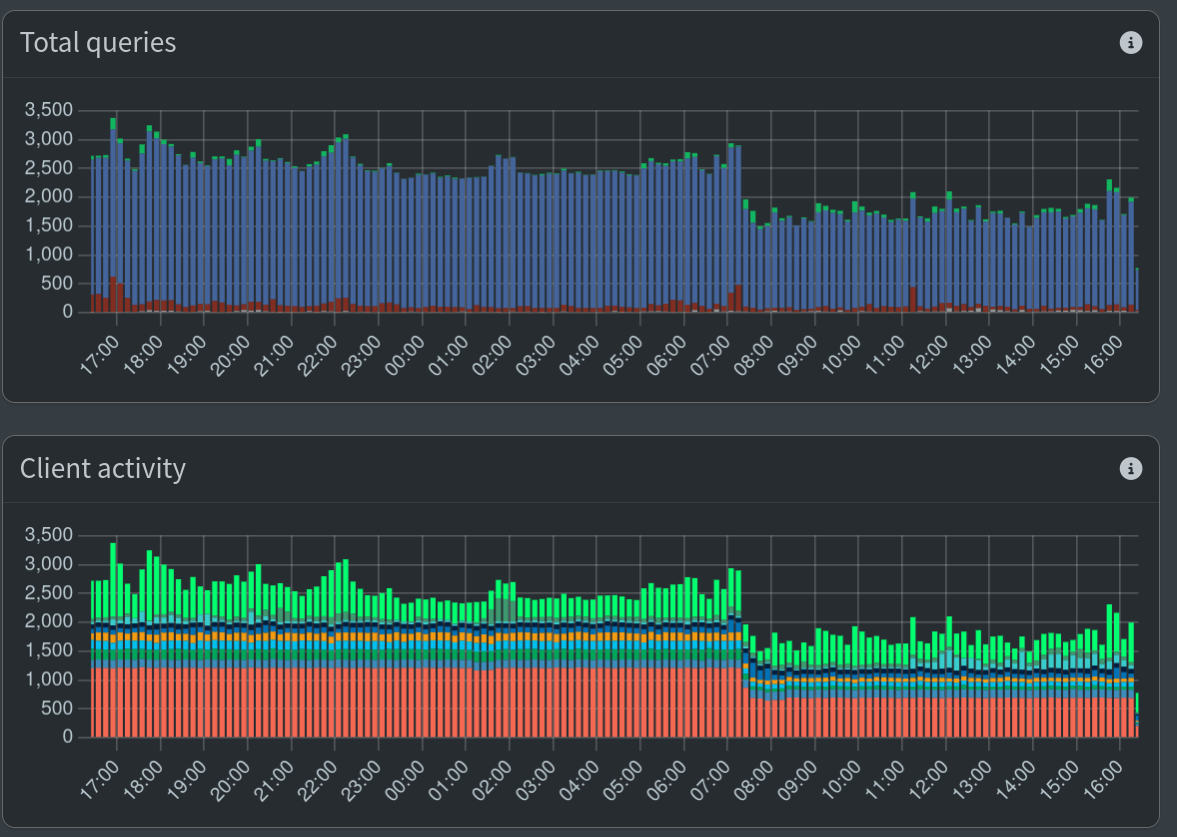
Some hours later I checked the Pi-Hole admin dashboard and was happy to see that the queries had gone down quite a bit (see graph at the top of the post). However, I’m still not 100% sure why it didn’t go down dramatically more. If every query is cached for 60 min where before it was never cached, I would have expected a bigger drop.
In the end queries take 5ms or less (see dig and the Query time result) and the load average on the server is really good (0.07, 0.13, 0.18) so it’s OK if I solve this problem another day!
* I’m also not sure why, at the end of the “Wait – was it DNS?” section why the tests didn’t fail immediately. If before the move, all DNS lookups were not cached and after the move the backup DNS server didn’t have the fileserver entry, it should have failed immediately. Input from my dear readers welcome!


