1 minute, 15 seconds
I’m testing out using two of these cute, cheap security cameras:
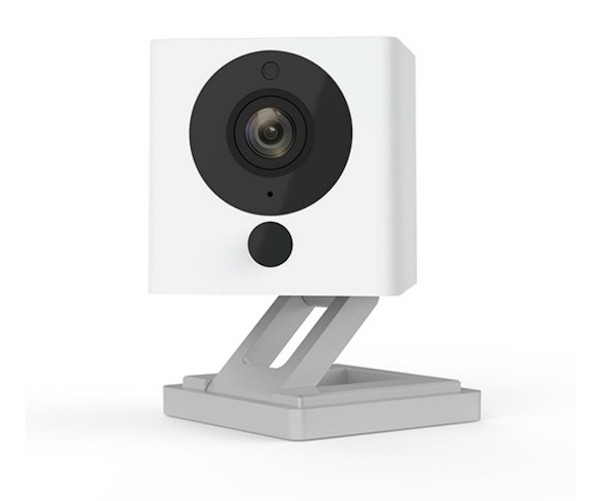
It’s the v2 of the WyzeCam and it’s only $25 shipped.
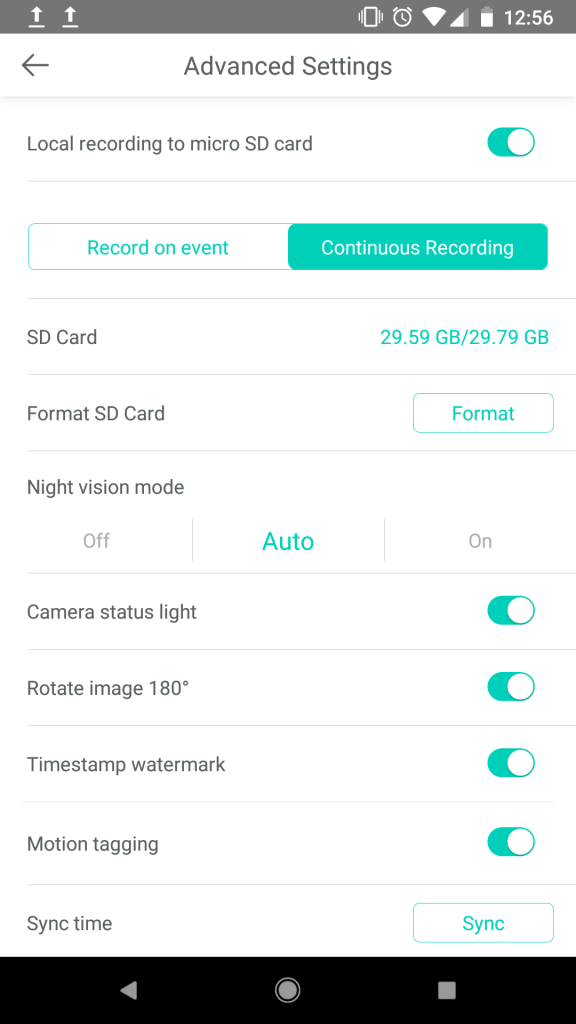
While they’re easy to set up, there doesn’t seem to be a way to turn off the mics on them. Here’s the config screen for a camera on the android app as of version 1.2.76 on Apr 26, 2018:
So what’s a hacker to do? Open it up and remove the mic, of course ;)
2019/01/10 Update – At this point in the post, I should let you know that we’re about to permanently remove your camera microphone. As well, there’s a chance you can rip off the antenna cable, effectively bricking your camera. Only one reader has reported any problems, but as with all DIY modifications, proceed at your own risk and happy hacking!
2018/05/08 Update! – If you just yank off the mic there’s a LOT less disassembly. I had two more cams come through, so I made a video of the whole thing. 10 minutes or less! Otherwise, read on below for old, solder method.
Old Solder method – I was too impatient to take all the step by step photos, but the only tricky part was getting the two plastic plates off after the initial two outer screws. My advise: it takes more force than you think!
You have to fully disassemble the camera to be able to solder out the mic. There were 5 or 6 screws, two ribbon cables and an antenna, speaker and camera power lead that all needed to be taken apart.
Here’s a before and after picture:

After re-assembling both cameras everything still works – w00t! Here’s to hardwired audio privacy, as it should be.
Thanks for the video! I’m always by the internet, but this was 100% exactly what i needed. I’m not going to have a live audio feed to my interior via this camera when I’m not sure of the security. So this was an excellent and relatively simple fix. thanks!
Paul B – Yay! Glad to have helped.
Cool. It has been asked to put the setting into the app but the company has refused from what I see is 10 months or more ago. I think if they were going to they would have done it by now.
There is a reason they don’t. Maybe get there jollys hearing what goes on behind closed doors.
Thanks to this video, Mine is now taken out.
Kevin – awesome! Thanks for the note ;)
Pingback: Monstera Deliciosa Timelapse with Wyzecam – Rob's Blog
Thank You!!!!!
Followed your video instructions.
I ripped the microphone off the circuit board. There should be a physical switch on device. I have two cameras so far. One in a bedroom window watching the front door and driveway. No way I could use this location with a working microphone. Microphone needs to be the user’s choice. 2019.04.07.
Johnny D – You’re welcome!
Thank you, it worked very well!
Worked Great!
You are the best! Thank you for taking the time to make and share this video. Exactly what I needed and as simple as you made it seem.
Cheers!
Becky – Super cool! Glad there’s another happy customer with this how to guide.
That’s a lot of trouble to go through but if it’s set up where no audio is EVER wanted, I get it.
But what if I want to turn audio off and then back on at a later date. Or what if I want to be heard but they can’t speak back.
Question: Do you think there is a way to muffle the mic instead? Some sort of thick foamy material over the speaker (assuming that’s the part with the open lines up and down one side).
Thoughts? Has anyone tried doing this?
Reyanna – yeah – this trick is definitely for those that never want their mic to work again. You could get tricky and try to wire an inline switch so you could turn it on and off! As well, there’s definitely room to stuff something in there to block the mic. It’s so small it wouldn’t take much. Report back if you try anything, I’d love to hear about it!
Tried it. Even encased in an outside weather case, the mic is incredibly effective.
I was able to follow the video and it all went smooth. Thanks! Someone could prob make money removing mic’s and reselling these on ebay for $15 mark up.
Jack – yay – thanks! happy to hear about another happy reader.
Sir can I add external mic on wyze cam ??
Dinesh – I’m not an EE kinda guy, so I couldn’t say for sure. However, if you’re comfy with some soldering – it seems like you could at the least extend the leads off the board to the same mic. A full on 1/8″ mic jack would be really nice, but again, I don’t know the specifics of the board and jack requirements to know if that’s possible. Sorry!
Ot could be done. Just make sure what kind of mic (electret or powered) and use shielded cable to go from the camera to the mic.
I just couldn’t the cable inside plugged back into its socket in any orientation, and eventually the cable ripped while I struggled with it and now I’m out a camera. :(
How the hell are you getting that cable back in?
Will – On no! I’m sorry to hear that. Which cable are you having trouble with? Was it the speaker cable as seen around the 1m 20s mark in the video or the WiFi antenna around the 1m 50s?
Reviewing the video, I’m guessing it’s the WiFi antenna. I spent almost a a full 2 min of the 6 min video trying to get that cable reconnected. I see in the end I positioned as best I could and then used the screwdriver to lever it back into place. By that time, this was the third or fourth camera I’d tried it on, so practice made perfect. Sorry again to hear about your camera!
I’ve added a warning at the top of the post so other users are aware there’s a risk of bricking your camera.
Thank you so much! This video is amazing!
Gabriella – yay! Happy to hear it helped.
Yup, ripped my WIFI connection right off the board :-(.. Close enough to the Office AP, that it still works… Thanks for the knowledge! Will have to kiddy glove the next one :-).
You do not have to disconnect the last wire with the spade terminal.You can maneuver the part enough to get pliers om mic,worked for me.I now have privacy when i share my cam.
i just used a small drill bit to pierce the mic’s diaphragm. super easy.
Hey man! I’m trying to do the opposite here and upgrade the mic. I’m trying to make it an external mic and change it out to a bit beefier one. Any advice? I’m at a loss here and I’m not totally clueless with this stuff but have never done a mic swap.
Reid – Sounds fun! I’m not so much the hardware type, more of a software type (or maybe a destroy hardware type ;). That said, if you can figure the specs of the on board mic, you should be able to replace it with an external one. Maybe you could figure how to wire up and mount a 3.5mm female audio jack?
If you come up with a solution, lemme know!
Best of luck.
Yeah this is what Im trying to do. The audio quality when Im checking in on my employees is not sufficient. OtherwYze I absolutely love these cameras. Ive got this spare lavalier mic sitting here, and am trying to convince myself that it would work.
Is there enough room to get the solder gun next to the mic if you take the front black housing off? I’ve taken the front plastic off with a paperclip before but didn’t actually take notice of the mic at the time. I’m thinking holding two solders on each side and a easing pull would de-seat from the PCB, yes?
Adam – I actually had a shop mate do the de-soldering! Looking at the pictures it appears to be surface mount, so maybe you could do it from only the one side? Sorry! Best of luck.
for an alternative and reversible fix, just placing a very generous glob of hot glue on the microphone effectively disables the microphone. it seems sound waves cannot coherently get to the mic through the glue.
then when going on vacation, you can just peel the hot glue off and you can have sound again to monitor the area.
a drill and a small drill bit is another much easier way to disable the microphone :)
\o/
Extremely helpful! Thank you so much for taking the time to create these instructions!
Yay! Glad that after 4+ years this is still helpful ;)