Category Archives: Linux

Let’s Encrypt TLS & A+ on SSL Labs

1 minute, 23 seconds

As you may recall, around here we like our TLS, and we like it rare!  I have no idea what “rare” means in the context of web encryption, but you know, that’s the way we like it!  We also like it cheap!  Even better than cheap (free) is open (libre)!  So, put it all together, and you get Let’s Encrypt TLS certs on plip.com and related properties.  Yay!

I saw the EFF/Let’s Encrypt crew speak at at DEF CON this past summer,  and it was super inspiring.  I’d already heard about the project, but it was that much more exciting to hear their talk.  I was dead set on cutting over from my old CA, to the new, definitively open, one.

While I was in my server, I went and visited my fave site for secure web server configs, cipherli.st. The only option I can’t run is SSLSessionTickets, as it requires Apache 2.4.11 or later. We’ll get there later with an Apache upgrade.

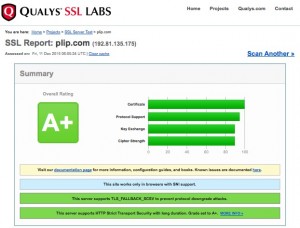
Put this all together?  You get a big fat A+ on SSL Labs.  w00t!

Some caveats are that Let’s Encrypt is just in public beta, so there’s some still some kinks to work out. For example, I mistakenly tried to get a cert for a wildcard vhost (eg “*.foo.bar.com”).  I got back an error:

An unexpected error occurred:
The request message was malformed :: Error creating new authz :: Invalid character in DNS name
Please see the logfiles in /var/log/letsencrypt for more details.

So, while I shouldn’t have selected the domain to get a cert (Let’s Encrypt doesn’t do wildcard certs), the error was a bit cryptic.  Fortunately the fine folks in their IRC channel (web IRC client – #letsencrypt @ Freenode to DIY) quickly pointed out to not use wildcards and that there was issue 1683 already open.

Awesome sauce, thanks Let’s Encrypt!

Using Git on Ubuntu with SSH Tunnels to Mac OS X Host

4 minutes, 9 seconds

Intro & Prerequisites

Are you using Linux but cannot get your LT2P-IPSEC VPN hosted on your Mac OS X server working?   Do you write code on your Ubuntu client and check into a git server behind your VPN? Maybe you should consider ditching the VPN client and using SSH tunnels instead. Really, this will work for any server that’s on the remote LAN that you have SSH access to, but in my case it was the same host as the VPN Server, a mac. As well, this can be any client as well, not just Ubuntu.

In all the notes below, any time you see “mrjones” or USERNAME, replace it with your username.  Anytime you see an all caps computer name that’s SERVER_NAME.com, replace it your server’s name.  The VPN server, SSH jump host and jump host are all the same.

You’ll need:

  • An SSH client you know how to configure. For OS X and Ubuntu clients, this is built in.  For Windows you can use putty.
  • An SSH account the remote server which has access to your remote LAN you want to access.
  • An SSH public key you have put on on your ~USERNAME/.ssh/authorized_keys file on this same remote server.

SOCKS5

You can use SSH to create an SSH tunnel, specifically one that has dynamic ports and hosts as specified by the requesting app – aka a SOCKS5 proxy. To do this, you can use any local port above 1024, but I use 1080.  It looks like this:

ssh -D 1080 mrjones@SECRET_DOMAIN.com

In your browser then, for example FireFox, you set up the proxy by:

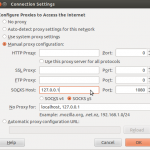
  • socksPreferences -> Advanced -> Network -> Connection -> Settings
  • Choose “Manual Proxy Configuration”
  • In the bottom option for “SOCKS Host” put “127.0.0.1” and for port put “1080”


The benefit of setting up a SOCKS5 proxy is that your URLs are the same as if you were on the VPN. This means that when you copy and paste them into/out of IM chats and emails, they just work as opposed to having localhost in them or trailing, odd ports.

SSH Tunnels with agent forwarding

You may still need to SSH to a production machine via the remote server jump host.  In order to do this and not have to re-federate your private key the SSH jump host (or generate a new private key on the jump host and then federate that out to the production machines), you can just do this:

ssh -A -t -l mrjones SECRET_DOMAIN.com ssh -A -t -l root SECURE_INTERNAL_SERVER.com

After running that you should have a prompt on SECURE_INTERNAL_SERVER.com as root.  This assumes that you have your public on your *local* box added to the authorized_keys of the account your SSHing to on the remote most box (SECURE_INTERNAL_SERVER.com).  This is a thing of beauty.

Checking code out with git over SSH

If you’re like me, you need to git clone for repos hosted on your stash/gitlab/whatever server which is only accessible on the VPN or LAN. You can do this with tunnels as well!  For me, I use  Stash professionaly, so instead of running this command to clone a repo:

git clone  ssh://git@STASH_SERVER.com:7999/path/to/repo.git

You can run this to add a tunnel to the stash host and then clone via a specialized host:

ssh mrjones@SECRET_DOMAIN.com -N -L 7999:STASH_SERVER.com:7999
git clone ssh://git@localhost:7999/path/to/repo.git

subsequent git commands like commit, pull, status etc. work with out modification transparently.

Pushing code with git over SSH

If you’re like me, you need to push using git via awesome git post-commit hooks. You can do this with tunnels as well!  Instead of running this command to add your remote:

git remote add live ssh://git@PROD_WEB.com/opt/git/web.git

You can run this to add a tunnel to PROD_WEB.com and then add a specialized remote:

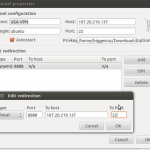
ssh mrjones@SECRET_DOMAIN.com -N -L 2200:PROD_WEB.com:22
git remote add live ssh://git@localhost:2200/opt/git/web.git

subsequent git commands to push new branches work with out modification transparently.

Side note, you can push specific tags using this syntax:

 git push live +TAG_HERE^{}:master

SSH Tunnel manager

gstm

DDG gSTM pic

Managing all these tunnels is a total pain.  You could create a shell script to do it, but the cleanest way by far is to use a tunnel manager.  For me on Ubuntu this gSTM (Gnome SSH Tunnel Manager).  This allows you to, with one click, turn on and off all the tunnels listed above.


Caveats

Right now the biggest caveat with this set up is that *ALL* your web traffic goes over the VPN host (this is actually the same as when you’re on your mac based VPN). Further, your browser will not work *at all* with out the tunnels set up, even for any hosts (not same as VPN ;).  Which means even if you want to use your browser for non-work when you’re not working, all your browser traffic goes through your VPN server.

As well, if you run a vagrant dev environment, you can not access your VMs via their local Virtual Box IP, as they’re not accessible from VPN server.

You can fix both of these issues by either using a different browser for non work/vagrant hosts or disabling the proxy by flipping it back to “no proxy” back in settings.

I believe that Foxy Proxy might solve this, but haven’t tried it yet!

All HTTPS all the time, With HSTS to boot

1 minute, 54 seconds

I’ve been brushing up on my web security best practices recently.  OWASP is a great resource for this!  One of their recommended best practices is to use HTTP Strict Transport Security (HSTS).  This involves redirecting traffic from unencrypted HTTP to HTTPS.  However to ensure that no future Man in the Middle attacks happen with the redirect, it’s best to tell the browser to always go directly to HTTPS regardless of the protocol.  This, in a nutshell is the HSTS solution.

I’ve updated plip.com and blog.plip.com to be served over exclusively over HTTPS.  This is thanks to a *.plip.com wildcard certificate from Global Sign. After setting up Apache to use the certs on the SSL vhosts, I then needed to redirect all traffic away from HTTP.  For plip.com, this was a simple Apache rule in the HTTP vhost:

# send everything to HTTPS
RewriteCond %{HTTPS} off
RewriteRule (.*) https://%{HTTP_HOST}%{REQUEST_URI}

And then for the blog.plip.com, iThemes had this codex entry about a simple plugin to rewrite HTTP to HTTPS, following the second option on their page.  They do caution that this plugin might have performance drawbacks as you’re parsing every post on the fly.  You can fix this if you’re running a caching system, like W3 Total Cache, which I am! W3TC recommends you fix slow HTTPS calls by enabling caching of HTTPS: Go to Performance -> Page Cache and check “Cache SSL (https) requests.” Easy peasy!

Now to add the HSTS to the HTTP header.  For plip.com this is easy as I have a single PHP header file for the entire site. I just added this line:

header('Strict-Transport-Security: max-age=31536000');

For the blog, I extended the simple iThemes plugin by adding these lines:

add_action( 'send_headers', 'add_header_hsts');
function add_header_hsts(){
        header('Strict-Transport-Security: max-age=31536000');
}

Special thanks to the WordPress Codex on how to set headers as well as a random post over at Hakre on WordPress on how to format the HTTP header in PHP for HSTS.

Plip.com has absolutely zero affect on the big players, and the EFF would never care about giving me a report, but I’m scoring 4 out of 5 on EFFs encrypt the web report:

  1. Plip doesn’t have a data center, but all connections for administration are encrypted.
  2. Plip now, of course, supports HTTPS
  3. Plip now supports HSTS
  4. Plip does not support Forward Secrecy
  5. As Plip uses Google Apps, it supports STARTTLS

Looking at what it takes to set up my ciphers, I’m still gonna shoot for getting a perfect 5 of 5!

Meego 1.2, Meego Laptop and a MacBook Air

1 minute, 40 seconds

As many of you know, I’ve had an on again, off again, and then on again affair with Meego. I love that lil’ guy! You may have expected me to be quite excited about the recent release of Meego 1.2, including a netbook refresh. Since I was running Meego on a netbook, you may have then also expected me to be super excited about the very recent announcement of the ASUS Eee PC X101. This is a 2lb laptop that runs Meego and is expected to cost $200. Sweet!

However, as you may have guessed from the title of this post, I’m not running Meego any more. I’m running OS X on a MacBook Air 11″. I had crossed the threshold of tinkering around on a laptop, to wanting to commute with one every day. Indeed, 2lb was my sweet spot for a laptop. I wasn’t that stuck on the OS as my apps are all cross platform enough. I seriously considered many different netbooks and then the MacBook Air came out. The 11″ was just over 2lb, included a full size keyboard, had a 1366 x 768 screen and a 5 hour battery. It was also insanely small. For a relative paltry $1000, there was simply no laptop, regardless of OS, that had had all of the above features. Period. Though I think the new Eee X101 will be very cool, it lacks the screen resolution of the Air. I briefly considered the Sony Vaio X (no longer available) which met all my requirements, but it was a pretty penny to pay for an Atom processor.

“But if you want something super light, what about a iPad?”, you ask? I do agree, an iPad’s insanely long battery life coupled with 1.3lb weight has some handy uses: a cross country plane ride, long regular commutes where you want to read the news and browse email or need a super light weight video conference rig. But what about when you want to run an IDE? What if you want to compose a 3 page (7,500 character) long email? What if you want to flip back forth between the 3 browsers you have open to check how your code renders? The answer is clear: you need a laptop.

I’ve been super happy with my Air and I wish the best of luck to Meego.

How to spam this blog

1 minute, 40 seconds

As a follow up to last week’s post (How to comment on this blog), this week I bring you the results of the no-captcha test.

After much spam slipping through reCAPTCHA, I decided to nix a captcha all together. Originally I thought that just requiring a field via javascript and doing no server side checking would work. This was silly of me, of course. The spammers, having the source code of WordPress, would just blindly submit a comment to any post, bypassing any client side JS checks I had in place.

The fix was to create a field that was not known to spammers like the reCAPTCHA is. Further, if it is appended via javascript, then it is even harder to automate. I wrote the simple-math plugin (have a copy!) and implemented it as follow:

  • Turn off reCAPTCHA
  • Add a field via javascript
  • Ask a simple math question, validated in client side JS
  • Only validate that the field exists, not that the math is right, on the server side

The jury is, and I’m fully vindicated. Here’s the stats:

Hits Comment
Attempts
Comment
Succeses
Attempts
per
Visit
Defense
Success
Rate
Feb 6th-12th 1191 57 17 4.79% 70.18%
Feb 12 11pm – Feb 13 10am 58 20 13 34.48% 35.00%
Feb 13th-Feb18th 1204 132 0 10.96% 100.00%

#spamstats td, #spamstats th {padding:4px;margin:5px}
#spamstats td {text-align:center;}
#spamstats tr:hover {background:#ccc}

The important thing to note is twofold. The first is that the average number of raw hits (excluding me, yahoo and google) was the same week to week. Further, the number of attempts went up 200% of which 100% were thwarted (Defense Success Rate). Again, I suspect this is all possible because it’s not easy, nor worth while (it’s OK, plip isn’t a big blog, I know…sniff) to automate spamming against one off solutions like mine.

I should note that I used the free version of Splunk to garner the ad hoc stats for this post. As I was hemming and hawing on whether to count cookies or IPs or hits, it wasn’t worth while to use the old school command line style stats. Splunk scoffs at this level of stats and reporting. Really, it’s above it, but will happily crank out what you ask for it with ease. Here’s a purty graph:

Caveat Emptor: I work at Splunk.

Meego Redux: 1.1 Released

1 minute, 33 seconds

If you recall, I fell in love with Meego a bit ago. Then, we broke up, and I left Meego for Ubuntu Netbook Remix (UNR). Guess what? Yup, just like the title of this post suggests, I’m back to Meego. Yesterday was their 1.1 release and the netbook flavor with Chrome is ready for the Live USB Key, easy install testing. I skipped over the live USB thing and cut right to the chase to install it over UNR.

I went to go install some of the key apps that I use and bumped into a few problems. I’ll sketch ’em out here in case any one else is an early adopter like me:

  • No more yum: Well, yum is still available to install, but it’s not there by default. Instead the fine folks at Meego are shipping ZYpper instead. Works just the same, but for the not so distro savvy nerds like me, I had to search around in the forums to figure what was what. Thanks physalis!
  • KeepassX: The next problem I found was that Keepassx’s download page had 404 links for the fedora packages. When I found that Fedora 12 page DIDN’T 404, I downloaded THAT version of KeepassX. Welp, that version didn’t like the current version of QT that ships with Meebo. Finally, I searched around and found a slightly out of date version at hany.sk
  • Dropbox: Nothing really tricky here. Their download page has a “Fedora (x86 .rpm)” package. For both KeepassX and Dropbox, it looks like this to install it :
    sudo zypper install nautilus-dropbox-0.6.4-1.fedora.i386.rpm

For those keeping tabs, I did do a write up on configuring Meego mail and calendar which appears to all be the same in 1.1 as it was in 1.0. At first blush, it seems a little tricky to set up with Google Apps, where plip.com’s mail is, but we’ll hack away.

Next up: Installing Skype. Happy Meebo-ing!

Update: Skype installed no problem, and QT warning seems to be around fonts. A forum tip around font hinting worked wonders to make Skype and KeepassX look sharp (actually, look anti-aliased).

Jolicloud OS is just Ubuntu Netbook Remix

0 minutes, 24 seconds

After seeing a post over on Engadget about the new Jolicloud,  I decided to check it out. It quickly became apparent that it is just Ubuntu Netbook Remix (UNR) with a different skin and a nice Jolicloud app.  Looking at some forum posts and the comments on the above Engadget link, my opinion isn’t too novel or new. What is dissapointkng is that Engadget fronts like this is something more amazing than UNR’s latest release, which I run and like.

Me? I’m waiting for Meego 1.1 which is expected to drop in October.

Google: gmail, mail and calendar sync with Meego Netbook (Google Apps Too!)

0 minutes, 36 seconds

Recently a reader inquired about how to set up Meego to sync with gmail mail, calendar and contacts based off me mentioning I got it working.  I use Google apps for mail hosting at plip.com, so this applies to both gmail and Google Apps (domains that use gmail for their email server).  Settings are based off IMAP settings for Thunderbird.

Here’s the steps I took for a clean install of Meego (see matching screenshots below too):

  1. Launch Mail for the first time
  2. Enter your Google Apps or Gmail login info (per google IMAP or thunderbird )
  3. Choose IMAP (again, per google IMAP or thunderbird )
  4. Configure SMTP (again, AGAIN per google IMAP or thunderbird )
  5. Confirm and make sure contacts and calendar are checked
  6. Mail Works!
  7. Launch Calendar and Contacts
  8. Contacts synched!
  9. Calendar synched! (no screenshot :( )

Ubuntu Netbook Remix update

0 minutes, 54 seconds

I know, I know you have been waiting to hear how it is going with new OS on the netbook. Well my dear readers, I have some good news and some bad news.

First the bad news. The bad news is that Meego really felt snappier and more polished. Though there’s a lot of overlap in software like Evolution is standard on both, something about the simplicity of Meego won out. Both come with a simple window manager and both can be easily extended with new apps, but Meego was more of what I wanted and less of what I didn’t. Example: auto hide task bar on Meego is nice because screen real estate is so precious. This I want. Ubuntu entire open office suite, this I don’t want. Also, Meego loads apps faster (eg Chrome) and boots waaaay faster.

Now the good news: the sleep problem is fixed and AIM totally works. The sleep fix was very satisfying, just follow the included script on superuser totally worked. Snap the lid shut and it goes right to sleep. Click the power button and it springs back to life in under a second. In general Ubuntu is quite nice.

I wonder how EasyPeasy is doing these days?