Yearly Archives: 2021

DockStat: Docker stats in a simple to use and easy to read Bash script

2 minutes, 38 seconds

Intro

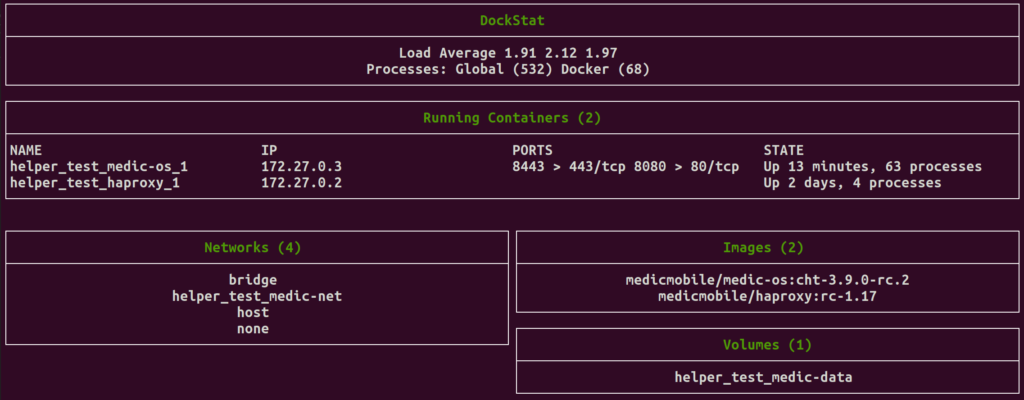
At work I’ve been doing a lot of Docker based projects. I ended up writing a neat little Bash utility which I then recently extended into what I’m calling DockStat. It shows running containers and their related resources. You could use it if you’re repeatedly upping, downing and destroying docker containers over and over like I was. Or maybe you just want a nice little dashboard to see what’s running on your server?

DockStat at work

However, if you have more than say a dozen active containers, this script might not scale nicely (oh, perhaps a monitor in portrait mode might fix this? ;)

Being the good little open source nerd that I am, this is of course available for download with a permissive license in the hopes that some one will find it useful or possibly even offer a PR with some improvements to my nascent Bash coding skills.

Background

With countless primers on how to use Docker out there, I won’t get into what the commands all mean, but the impetus for this script was repeatedly running docker ps to show a list of the active containers. A bit later I remembered you could run endless Bash loops with a one-liner which made the process a bit nicer as it auto-refreshed:

while true; do clear;date;docker ps;sleep 5; done

A bit after that I stumbled upon the glorious watch command! Wow – just when you think that that you know and OS, they come and show you that there’s this awesome command they’ve been hiding from you all these years. Thanks Linux!

watch greatly improved on my Bash one-liner as it was an even short one-liner, could trivially be configured to refresh at what ever frequency you wanted and show a header or not. The icing on the cake was that prevents the flash of a redraw upon refresh:

watch -t -n 1 docker ps

About now I got more cozy with the --format feature built into most Docker command line calls. This was handy because I could reduce the number of fields shown in docker ps that I wasn’t interested in. Here’s maybe the simplest of them which shows JUST the container name and if how long the it has been running:

docker ps --format='{{.Names}} {{.Status}}'

Research continued on how to architect the helper script. I had need to show different data than docker ps had to offer. I branched out into docker inspect as well as finding other Dockeristas one-liners that I shamelessly co-opted (I’d be honored if anyone did the same of my work!!). This allowed me to joined ps and inspect like as seen with this fave that shows all the running containers’ and their internal IPs:

docker ps --format='{{.Names}}'|xargs docker inspect --format='{{.Name}} - {{range .NetworkSettings.Networks}}{{.IPAddress}}{{end}}'

I was ready to assemble all the docker Data dukets I’d gathered into a nice CLI dashboard so our app developers could see the status of our containers booting. Finding a solution for this enabled both the the helper script to spring forth and simultaneously created the nascent DockStat. This was a Bash utility that was both easy to use, automates flash-less refreshes and introduced basic terminal layout functionality with a near zero learning curve (assuming you know Bash): Bash Simple Curses

Thanks

Thanks to James and Russ for reviewing my code and an early draft of this post. I’ve been trying to improve both my posts and code and this won’t happen without folks kind donation of their time and input!

Easy way to play Boggle on a flight

1 minute, 15 seconds

I was taking a flight and wanted to play Boggle while onboard. I looked for a simple “show me a Boggle board” app for my phone, and only found ones of dubious quality, ad laden ones or ones that were something like “play a boggle-like game with friends (account required, has ads, is not boggle)”.

Eventually I gave up when I found this great website that generates .png images of Boggle boards. Even better, I could do a bunch of curl calls (with a 5 second sleep in-between, to be nice) to download a BUNCH of boards. Then I could use ImageMagick’s montage to stitch them all together in a 2×4 layout, which printed out nicely. montage -tile 2x4 -mode concatenate *.png output.png to be exact ;) With 4 or 5 pages printed out, I cut out each board, stapled together and made for the perfect Offline Boggle Booklet. Worked great!

However, on the flight I was thinking that it’d be pretty easy to write a bit of JavaScript and bang out a board that worked well offline. Further, I realized that CSS supports transformations, like transform: rotate(90deg)that could even mimic the rotated dice like the site above I referenced. Indeed, by the end of the flight I had all the hard parts worked out. This was mostly me working offline without Stack Exchange to remember this or that. Special thanks to xuth.net for post the source to the perl app which gave me some good ideas on how to write this!

After landing, and doing some refining, I’m happy to present Offline Boggle Boards. Load up the web page before you take off and you’re good to go! Also, for you coder types, pull requests welcome!

Keys-To-The-Tunnel

3 minutes, 39 seconds

tl;dr – An open source bash script which provisions a server to terminate TLS traffic with a valid certificate and reverse proxies the traffic back to a web based development instance via an SSH tunnel. Enables sharing of a dev instance and testing Android apps.

Intro

Are you an ngrok user (or one of its many competitors)? Do you use GitHub (GH) or work in a GH Organization? Is part of your application a web server? Do you ever need to test an Android application against a web server such that you need a valid TLS certificate? Have you ever wished it’d be easy to share you local dev instances with a colleague? If yes, then maybe Keys-To-The-Tunnel is for you!

Keys-To-The-Tunnel converts a newly provisioned, dedicated Ubuntu instance into a multi-user server that can both terminate inbound TLS traffic as well as gives developers easy to follow instructions on how to connect their web based instance of their app to it. By using easy to get public SSH keys for your users, Keys-To-The-Tunnel takes the legwork out of setting up a reverse proxy.

This post discusses the impetus and some of the background ideas that make Keys-To-The-Tunnel possible. If you’re all ready to get started, the GitHub repository and the FAQ have everything you need!

DNS & TLS via Let’s Encrypt

The first cornerstone to Keys-To-The-Tunnel is that Let’s Encrypt offers free TLS certificates. Once the script creates the certificates, they’re automatically renewed because that’s how certbot works. Free certs with free renewals – love it!

By using valid certificates with root CAs already deployed in Android, the resulting vhosts in a Apache allow you to test your Android apps against the URLs. Further, if you’re working with other members of your organization on the project, they can easily access your local instance via your URL. As well, while desktops allow responsive mode testing, sometimes you just need to see your app/site in a true mobile browser to properly test.

A critical part of making this all work is that you need both an A record and a wildcard in your DNS for the host you’re on. This allows Let’s Encrypt to verify your certificate no matter which hostname it is as hostnames are dynamically generated off GH handles.

Usernames & Keys

The second cornerstone of Keys-To-The-Tunnel is that GH allows anyone to know your public SSH key(s) (e.g. here’s mine). When you couple this with the fact that GH has an API to retrieve all the members of an organization (needs a token), it means that given just the organization name, the script can provision dozens of accounts with just a one liner:

./installTunnelServer.sh domain.com you@domain.com

Any GH users that do not have an SSH key are skipped, but you can simply re-run the script to add a user who has since added an SSH key to their account. In a soon to be released version, you can run the script in a cronjob so it will both add and remove users when your GH organization changes.

SSH

SSH is the final of three corner stones of the project. By using SSH, specifically an SSH tunnel, something which every developer has already installed, it’s easy to quickly set up an ad hoc tunnel. Here’s example command that your users will be given:

ssh -T -R REMOTEPORT:127.0.0.1:LOCALPORT GH-HANDLE@domain.com

So if you had a web app running on http://localhost:8080 and your GH Handle was mrjones-plip and Keys-To-The-Tunnel had assigned you a port of 1234, you would run this SSH command to set up a the tunnel:

ssh -T -R 1234:127.0.0.1:8080 mrjones-plip@domain.com

When you run the SSH command, you know you’re successfully connect when you’re greeted with this text:

Connected to SSH tunnel server
Ubuntu 20.04.2 LTS (GNU/Linux 5.4.0-51-generic x86_64)
Press 'ctrl + c' to exit

When Keys-To-The-Tunnel is done running, it will write an index.html to the root of your bare domain instructing users how to use the service:

Caveat Emptor

There are some gotchas to this script which you should be aware of:

  • Unlike ngrok which generates a random hostname every time your connect, Keys-To-The-Tunnel always uses the same hostnames. While handy for on-going use, it means the URLS may be discovered and scraped/crawled. As developer instances often have weak or no passwords, care should be used to tear down the tunnel when not in use (or use strong passwords – or both!).
  • Highly distributed teams may consider deploying multiple instances of Keys-To-The-Tunnel so they’re closer to the team members. If a developer is in Kenya and is connecting to a server in Canada, their traffic might be MUCH slower than if the server was deployed very close to Kenya from a packet’s perspective.
  • While this should Just Work™, this script was only tested on LXD containers and Digital Ocean (referral link) Ubuntu droplets. Please open a ticket if it doesn’t work!