17 minutes, 42 seconds
Introduction
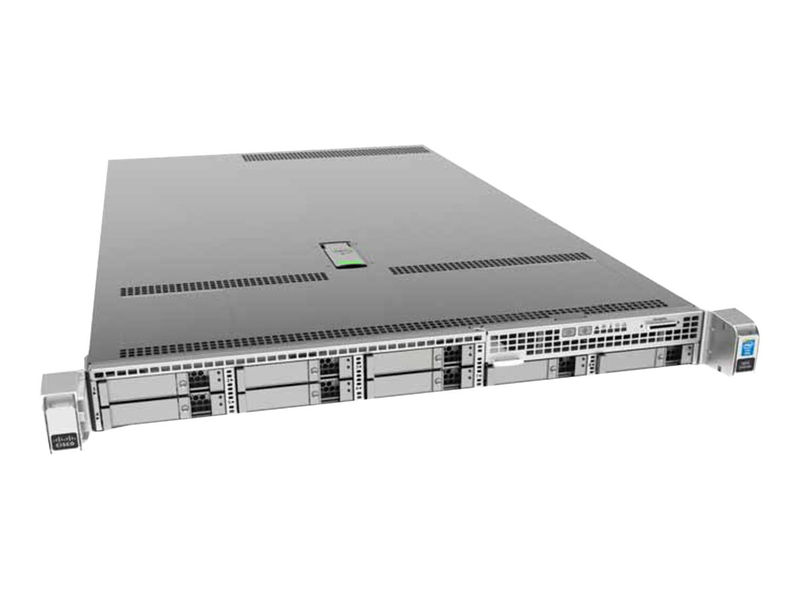
Having some nice server grade hardware on hand, I knew I needed to put it to good use. I’m talking about the Cisco C220 M4SFF:
 This lil’ guy comes with some nice specs. The one I have is configured thusly:
- 1U
- 64GB RAM
- 8 x 240GB SSD
- 2 x 10 core 2.4Ghz E5-2640 v4 Xeon (40 threads)
- 2 x PSU
- Cisco 12G SAS RAID controller (more on this later)
- 2 x 1Gbit on-board NIC
While having only 2 of his 24 RAM slots full, we can make do with this – besides, filling it up to 1.5TB of RAM will cost $14,400 – ouch! Specifically, I think we can make this into a nice host of lots and lots of virtual machines (VMs) via a modern day hypervisor.

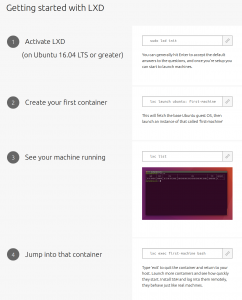
Just 4 steps!!
Looking about at what might be a good solution for this, I cast my eyes upon LXD. I’m already a huge fan of Ubuntu, the OS LXD works best with. As well, with 2.0, Canonical is really pumping up LXD as a viable, production worthy solution for a running your own cloud compute. Given that 2.0 now ships with Ubuntu 16.04, I figured I’d give it for a spin.
I’m guessing a techie at Canonical got a hold of a marketing person at Canonical; they realized that with LXD baked into Ubuntu, anyone comfy on the command could line run 4 steps to get an instant container. This meant that while there’s a lot more complexities to getting a LXD running in a production environment (LAN bridge, ZFS Pools, ZFS Caches, JBOD on your RAID card, static IPs dynamically assigned, all covered below), it was indeed intensely satisfying to have these 4 steps work exactly as advertised. Sign me up!
But what about the other options? Did I look at more holistic approaches like OpenStack? Or even the old, free as in beer vSphere? What about the up and coming SmartOS (not to be confused with the unrelated TrueOS or PureOS)? Given the timing of the demise of SmartOS’s roots in Solaris, maybe it’s time to pay my respects? Finally, there is of course KVM.
While I will still will take up my friend’s offer to run through an OpenStack install at a later date, I think I’m good for now.
This write up covers my learning how to provision my particular bare metal, discovering the nuances of ZFS and finally deploying VMs inside LXD. Be sure to see my conclusion for next steps after getting LXD set up.
Terms and prerequisites
Since this post will cover a lot of ground, let’s get some of the terms out of the way. For experts, maybe skip this part:
- Ubuntu – the host OS we’ll install directly onto the C220, specifically 16.04 LTS
- LXD – say “Lex-dee” (and not this one) – the daemon that controls LXC. LXD ships with 16.04 LTS. All commands are
lxc
- LXC – Linux Containers – the actual hypervisor under LXD. Yes, it’s confusing – even the man says so ;)
- container – interchangeably used with “VM”, but it’s a secure place to run a whole instance of an OS
- ZFS – the file system that allows for snapshots, disk limits, self healing arrays, speed and more.
- JBOD/RAID – Two different disk configurations we’ll be using.
- CIMC – Cisco Integrated Management Interface which is a out of band management that runs on Cisco server hardware. Allows remote console over SSL/HTML.
- Stéphane Graber – Project leader of LXC, LXD and LXCFS at Canonical as well as an Ubuntu core developer and technical board member. I call him out because he’s prolific in his documentation and you should note if you’re reading his work or someone else’s.
- KVM – “Keyboard/Video/Mouse” – The remote console you can access via the CIMC via a browser. Great for doing whole OS installs or for when you bungle your network config and can no longer SSH in.
- KVM – The other KVM ;) This is the Kernel Virtual Machine hypervisor, a peer of LXC. I only mention it here for clarification. Hence forth I’ll always be referencing the Keyboard/Video/Mouse KVM, not the hypervisor.
Now that we have the terms out of the way, let’s give you some home work. If you had any questions, specifically about ZFS and LXD, you should spend a couple hours on these two sites before going further:
- Stéphane Graber’s The LXD 2.0: Blog post series – These are the docs that I dream of when I find a new technology: concise, from the horses mouth, easy to follow and, most of all, written for the n00b but helpful for even the most expert
- Aaron Toponce’s ZFS on Debian GNU/Linux – while originally authored back on 2012, this series of posts on ZFS is canon and totally stands the test of time. Every other blog post or write up I found on ZFS that was worth it’s salt, referenced Aaron’s posts as evidence that they knew they were right. Be right too, read his stuff.
Beyond that, here’s a bunch of other links that I collected while doing my research. I will call out that Jason Bayton’s LXD, ZFS and bridged networking on Ubuntu 16.04 LTS+ gave me an initial burst of inspiration that I was on the right track:
LXD Info:
ZFS Info
Prep your hardware
Before starting out with this project, I’d heard a lot of bad things about getting Cisco hardware up and running. While there may indeed be hard-to-use proprietary jank in there somewhere, I actually found the C220M4 quite easy to use. The worst part was finding the BIOS and CIMC updates, as you need a Cisco account to download them. Fortunately I know people who have accounts.
After you download the .iso, scrounge up a CD-R drive, some blank media and burn the .iso. Then, plug in a keyboard, mouse and CD drive to your server, boot from it with the freshly burned disk, and upgrade your C220. Reboot.
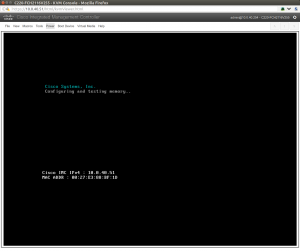
 Then you should plug the first NIC into a LAN that your workstation is on that has DHCP. What will happen is that the CIMC will grab an address and show it to you on the very first boot screen.
You see that 10.0.40.51 IP address in there (click for large image)? That means you can now control the BIOS via a KVM over the network. This is super handy. Once you know this IP, you can point your browser to the c220 and never have to use a monitor, keyboard or mouse directly connected to it. Handy times! To log into the CIMC the first time, default password is admin/password (of course ;).
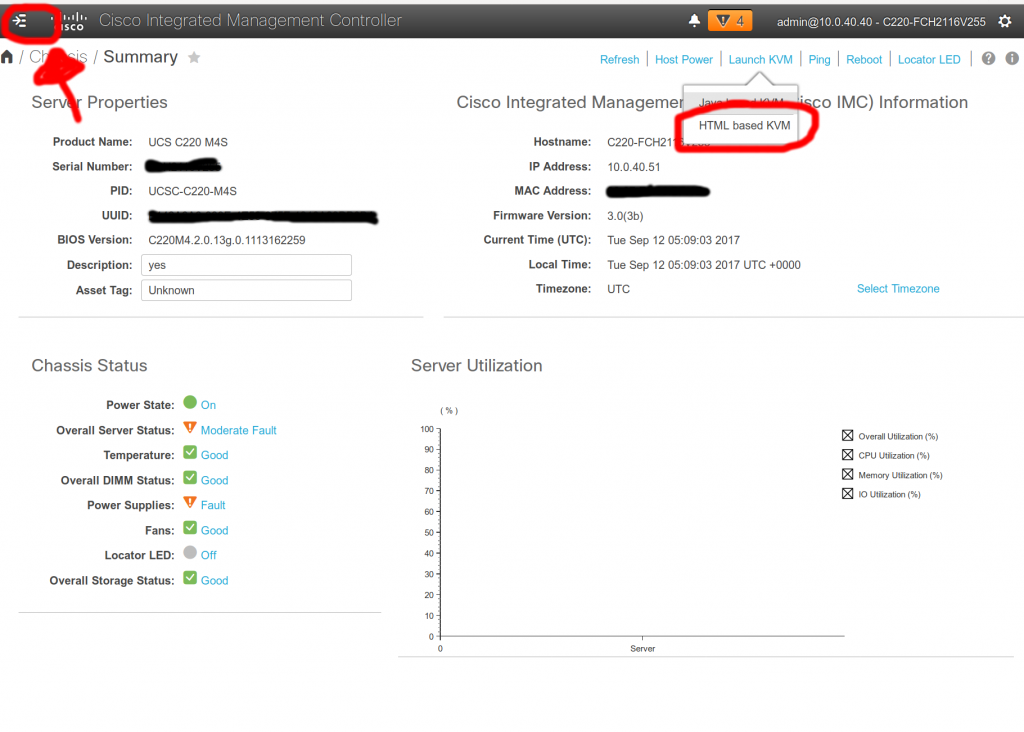
The upgraded CIMC looks like this:
 I’ve highlighted two items in red: the first, in the upper left, is the secret, harder-to-find-than-it-should-be menu of all the items in the CIMC. The second, is how to to get to the KVM.
For now, I keep the Ubuntu 16.04 install USB drive plugged into the C220. Coupled with the remote access to the CIMC and KVM, this allows to me to easily re-install on the bare metal, should anything go really bad. So handy!
While you’re in here, you should change the password and set the CIMC IP to be static so it doesn’t change under DHCP.
Prep your Disks
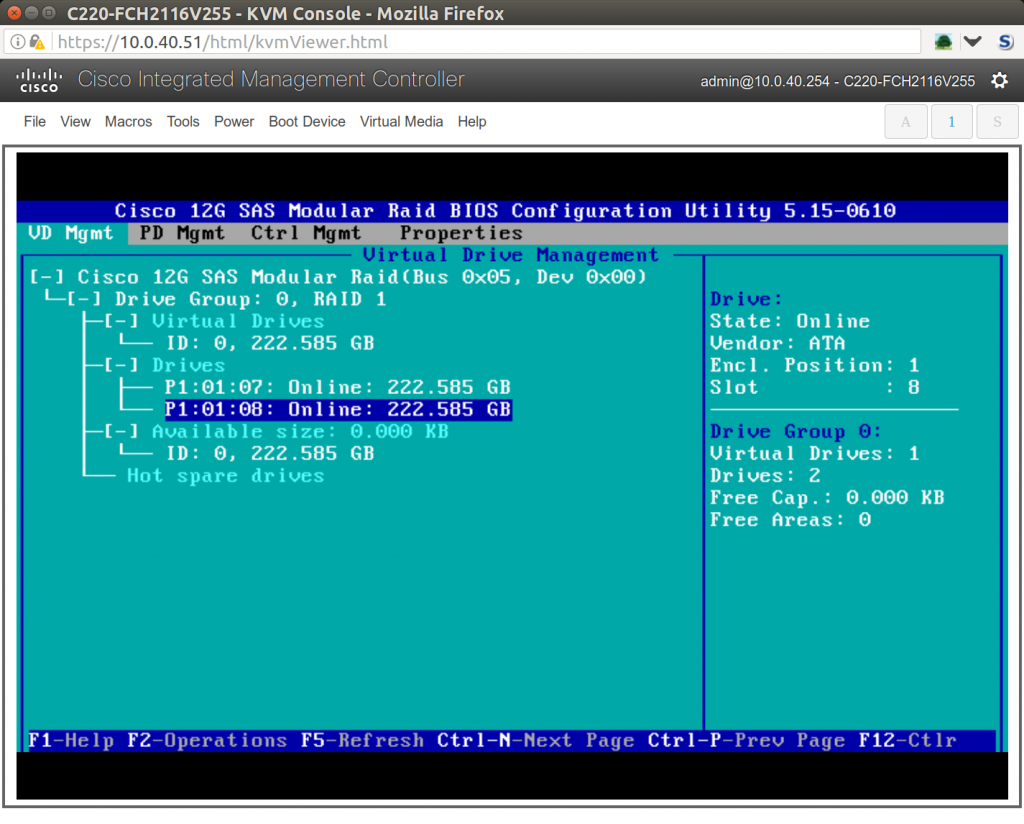
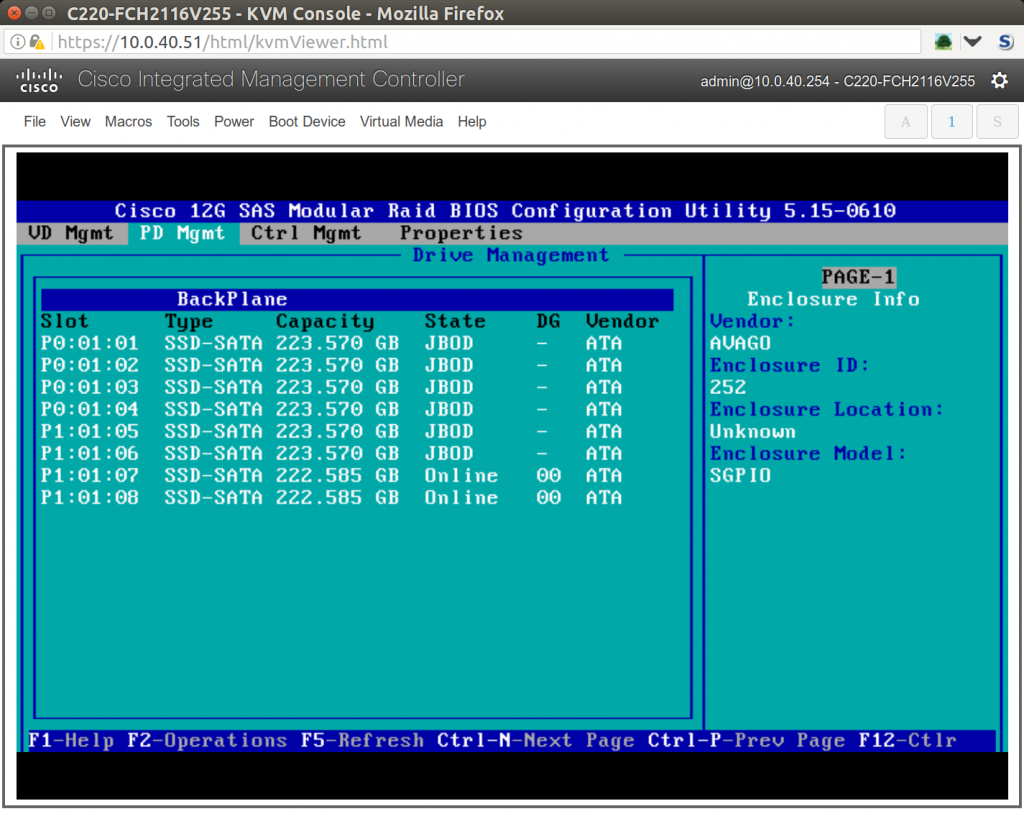
Now it’s time to set up the RAID card to have two disks be RAID1 for my Ubuntu boot drive, and the rest show up as JBOD for ZFS use. When accessing the boot process, wait until you see the RAID card prompt you and hit ctrl+v. Then configure 2 of your 6 drives as a RAID1 boot drive:

And then expose the rest of your disks as JBOD. The final result should look like this:

Really, this is too bad that this server has a RAID card. ZFS really wants to talk to the devices directly and manage them as closely as possible. Having the RAID card expose them as JBOD isn’t ideal. The ideal set up would be to have a host bus adapter (HBA) instead of the raid adapter. That’d be a Cisco 9300-8i 12G SAS HBA for my particular hardware. So, while I can get it to work OK, and you often see folks set up their RAID cards as JBOD just like I did, it’s sub-optimal.
Install Ubuntu 16.04 LTS + Software

F6 to select boot drive
As there’s plenty of guides on how to install Ubuntu server at the command line, I won’t cover this in too much detail. You’ll need to:
- Download 16.04 and write it to a USB drive
- At boot of the C220, select F6 to select your USB drive as your boot device (see right)
- When prompted in the install processtt, select the RAID1 partition you created above. For me this was
/dev/sdg, but will likely be different for you. I used LVM with otherwise default partitions.
- Set your system to “Install security updates automatically” when prompted with “Configuring tasksel“
- For ease of setup, I suggest selecting “OpenSSH Server” when prompted for “Software select”. This way we won’t have to install and enable it later.
- Finally, when you system has rebooted, login as your new user and you can install the core software we’ll need for the next steps:
sudo apt-get install lxd zfsutils-linux bridge-utils
sudo apt install -t xenial-backports lxd lxd-client
ZFS
ZFS is not for the faint of heart. While the LXD can indeed be run on just about any Ubuntu 16.04 box and the default settings will just work, and I do now run it on my laptop regularly, getting a tuned ZFS install was the hardest part for me. This may be because I have more of a WebDev background and less of a SysAdmin background. However, if you’ve read up on Aaron Toponce’s ZFS on Debian GNU/Linux’s posts, and you read my guide here, you’ll be fine ;)
After reading and hemming and hawing about which config was best, I decided that getting the most space possible was most important. This means I’ll allocate the remaining 6 disks to the ZFS pool and not have a hot spare. Why no hot spare? Three reasons:
- This isn’t a true production system and I can get to it easily (as opposed to an arduous trip to a colo)
- The chance of more than 2 disks failing at the same time seems very low (though best practice says I should have different manufacturer’s batches of drives – which I haven’t checked)
- If I do indeed have a failure where I’m nervous about either the RAID1 or RIADZ pool, I can always yank a drive from one pool to another.
Now that I have my 6 disks chosen (and 2 already running Ubuntu), I reviewed the RAID levels ZFS offers and choose RAIDZ-2 which is, according to Aaron, “similar to RAID-6 in that there is a dual parity bit distributed across all the disks in the array. The stripe width is variable, and could cover the exact width of disks in the array, fewer disks, or more disks, as evident in the image above. This still allows for two disk failures to maintain data. Three disk failures would result in data loss. A minimum of 4 disks should be used in a RAIDZ-2. The capacity of your storage will be the number of disks in your array times the storage of the smallest disk, minus two disks for parity storage.”
In order to have a log and cache drive (which can be the same physical disk), I’ll split it so 5 drives store data and 1 drive with two partitions store my log and cache. Read up those log and cache links to see how these greatly improve ZFS performance, especially if your data drives are slow and you have a fast cache drive (SSD or better).
To find the devices which we’ll use in our pool, let’s first see a list of all devices from dmesg:
sudo dmesg|grep \\[sd|grep disk
[ 17.490156] sd 0:0:0:0: [sdh] Attached SCSI removable disk
[ 17.497528] sd 1:0:9:0: [sdb] Attached SCSI disk
[ 17.497645] sd 1:0:8:0: [sda] Attached SCSI disk
[ 17.499144] sd 1:0:10:0: [sdc] Attached SCSI disk
[ 17.499421] sd 1:0:12:0: [sde] Attached SCSI disk
[ 17.499487] sd 1:0:11:0: [sdd] Attached SCSI disk
[ 17.499575] sd 1:0:13:0: [sdf] Attached SCSI disk
[ 17.503667] sd 1:2:0:0: [sdg] Attached SCSI disk
This shows us that sdh is our USB drive (“removable”) and that the rest are the physical drives. But which is our boot drive comprised of a RAID1 volume? It’s the one mounted with an ext4 file system:
sudo dmesg|grep mount|grep ext4
[ 21.450146] EXT4-fs (sdg1): mounting ext2 file system using the ext4 subsystem
So now we know that sdb, sda, sdc, sde, sdd and sdf are up for grabs. The hard part with ZFS is just understanding the full scope and impact of how to set up your disks. Once you decide that, things become pleasantly simple. Thanks ZFS! To set up our RAIDZ-2 pool of 5 drives and enable compression to it is just these two command:
sudo zpool create -f -o ashift=12 lxd-data raidz1 sda sdb sdc sdd sde
sudo zfs set compression=lz4 lxd-data
Note that there’s no need to edit the fstab file, ZFS does all this for you. Now we need to create our log and cache partitions on the remaining sdf disk. First find out how many blocks there are on your drive, 468862128 in my case, using parted:
parted /dev/sdf 'unit s print'|grep Disk|grep sdf
 Disk /dev/sdf: 468862128s
Aaron’s guide suggests we can make both partitions in one go with this command, which will make a 4GB log partition and use the remainder to make a ~230GB cache partition:
parted /dev/sdf unit s mklabel gpt mkpart log zfs 2048 4G mkpart cache zfs 4G 468862120
However, this didn’t work for me. I had to go through the parted using the interactive mode. Run this twice starting both times with the sdf device:
parted /dev/sdf unit s
I forgot to record this session when I formatted my partitions, but you should end up with this when you’re done:
sudo parted /dev/sdf print
Model: ATA SAMSUNG MZ7LM240 (scsi)
Disk /dev/sdf: 240GB
Sector size (logical/physical): 512B/512B
Partition Table: gpt
Disk Flags:

Number Start  End    Size   File system Name Flags
 2     1049kB 3999MB 3998MB zfs         log
 1     4000MB 240GB  236GB  zfs         cache
OK – almost there! Now, because linux can mount these partitions with different device letters (eg sda vs sdb), we need to use IDs instead in ZFS. First, however, we need to find the label to device map:
sudo ls -l /dev/disk/by-partlabel/
 total 0
 lrwxrwxrwx 1 root root 10 Sep 15 11:20 cache -> ../../sdf2
 lrwxrwxrwx 1 root root 10 Sep 15 11:20 log -> ../../sdf1
Ok, so we’ll use sdf1 as log and sdf2 as cache. Now what are they’re corresponding IDs?
sudo ls -l /dev/disk/by-id/|grep wwn|grep sdf|grep part
 lrwxrwxrwx 1 root root 10 Sep 15 11:20 wwn-0x5002538c404ff808-part1 -> ../../sdf1
 lrwxrwxrwx 1 root root 10 Sep 15 11:20 wwn-0x5002538c404ff808-part2 -> ../../sdf2
Great, now we know that wwn-0x5002538c404ff808-part1 will be our log and wwn-0x5002538c404ff808-part2 will be our cache. Again, ZFS’s commands are simple now that we know what we’re calling. Here’s how we add our cache and log:
zpool add lxd-data log /dev/disk/by-id/wwn-0x5002538c404ff808-part2
 zpool add lxd-data cache /dev/disk/by-id/wwn-0x5002538c404ff808-part1
 wwn-0x5002538c404ff808-part2 log
 wwn-0x5002538c404ff808-part1 cache
Now we can confirm our full ZFS status:
sudo zpool iostat -v
                                   capacity     operations    bandwidth
pool                            alloc   free   read  write   read  write
------------------------------  -----  -----  -----  -----  -----  -----
lxd-data                        1.37G  1.08T      0     16  3.26K  56.8K
  raidz1                        1.37G  1.08T      0     16  3.25K  56.5K
    sda                             -      -      0      4  1.04K  36.5K
    sdb                             -      -      0      4  1.03K  36.5K
    sdc                             -      -      0      4  1.01K  36.5K
    sdd                             -      -      0      4  1.02K  36.5K
    sde                             -      -      0      4  1.03K  36.5K
logs                                -      -      -      -      -      -
  wwn-0x5002538c404ff808-part2   128K  3.72G      0      0      4    313
cache                               -      -      -      -      -      -
  wwn-0x5002538c404ff808-part1   353M   219G      0      0      0  20.4K
------------------------------  -----  -----  -----  -----  -----  -----
Looking good! Finally, we need to keep our ZFS pool healthy by scrubbing regularly. This is the part where ZFS self heals and avoids bit rot. Let’s do this with a once per week job in cron:
0 2 * * 0 /sbin/zpool scrub lxd-data
Networking
Now, much thanks to Jason Bayton’s excellent guide, we know how to have our VMs get IPs in on LAN instead of being NATed. Right now my NIC is enp1s0f0 and getting an IP via DHCP. Looking in /etc/network/interfaces I see:
# The loopback network interface
auto lo
iface lo inet loopback

# The primary network interface
auto enp1s0f0
iface enp1s0f0 inet dhcp
But to use a bridge (br0) and give my host the static IP of 10.0.40.50, we’ll make that file look like this:
# The loopback network interface
auto lo
iface lo inet loopback

# The primary network interface
auto br0
iface br0 inet static
       address 10.0.40.50
       network 10.0.40.0
       netmask 255.255.255.0
       gateway 10.0.40.1
       broadcast 10.0.40.255
       dns-nameservers 8.8.8.8 8.8.4.4
       bridge_ports enp1s0f0
iface enp1s0f0 inet manual
This will allow the VMs to use br0 to natively bridge up to enp1s0f0 and either get a DHCP IP from that LAN or be assigned a static IP. In order for this change to take effect, reboot the host machine. Jason’s guide suggests running ifdown and ifup, but I found I just lost connectivity and only a reboot would work.
When you next login, be sure you use the new, static IP.
Set file limits
While you can use your system as is to run containers, you’ll really want to updated per the LXD recommendations. Specifically, you’ll want to allow for a lot more headroom when it comes to file handling. Edit sysct.conf:
sudo vim /etc/sysctl.conf
Now add the following lines, as recommended by the LXD project:
fs.inotify.max_queued_events = 1048576
fs.inotify.max_user_instances = 1048576
fs.inotify.max_user_watches = 1048576
As well, edit limits.conf
sudo vim /etc/security/limits.conf
Now add the following lines. 100K should be enough:
* soft nofile 100000
* hard nofile 100000
LXD
Now that we have our bare metal provisioned, we have our storage configured, file limits increased and our network bridge in place, we can actually get to the virtual machine part, the LXD part, of this post. Heavily leveraging again Jason Bayton’s still excellent guide, we’ll initialize LXD by running lxd init. This go through the first time LXD guide and ask a number of questions about how you want to run LXD. This is specific to 2.0 ( >2.1 has different questions). You’ll see below, but the gist of it is that we want to use our ZFS pool and our network bridge:
lxd init
 -----
 Name of the storage backend to use (dir or zfs) [default=zfs]:
 Create a new ZFS pool (yes/no) [default=yes]? no
 Name of the existing ZFS pool or dataset: lxd-data
 Would you like LXD to be available over the network (yes/no) [default=no]? yes
 Address to bind LXD to (not including port) [default=all]:
 Port to bind LXD to [default=8443]:
 Trust password for new clients:
 Again:
 Do you want to configure the LXD bridge (yes/no) [default=yes]?
Note that we don’t accept the ZFS default and specify our own ZFS pool lxd-data. When you say “yes”, you want to configure the bridge, you’ll then be prompted with two questions. Specify br0 when prompted. Again, refer to Jason Bayton’s guide for thorough screen shots:
Would you like to setup a network bridge for LXD containers now? NO
Do you want to use an existing bridge? YES
Warning: Stopping lxd.service, but it can still be activated by:
 lxd.socket
 LXD has been successfully configured
Success! LXD is all set up now. Let’s prep the host OS for a bunch of open files now.
Hello world container
Whew! Now that all the hard parts are done, we can finally create our first container. In this example, we’ll be creating a container called nexus and put some basic limitations on it. Remember, do not create these as root! One of the massive strengths of LXD is that it’s explicitly designed to be secure and running containers as root would remove a lot of this security. We’ll call lxc init and then pass some raw commands to set the IP to be .52 in our existing /24 subnet on the bridge. If you run lxc list our new container shows up. That all looks like this:
lxc init ubuntu: nexus
echo -e "lxc.network.0.ipv4 = 10.0.40.52/24\nlxc.network.0.ipv4.gateway = 10.0.40.1\n" | lxc config set nexus raw.lxc -
lxc start nexus

lxc list
+-------+---------+-------------------+------+------------+-----------+
| NAME  | STATE   | IPV4              | IPV6 | TYPE       | SNAPSHOTS |
+-------+---------+-------------------+------+------------+-----------+
| nexus | RUNNING | 10.0.40.52 (eth0) |      | PERSISTENT | 0         |
+-------+---------+-------------------+------+------------+-----------+
Finally, we want to limit this container to have 4 CPUs, have 4GB of RAM and 20GB of disk. Like before, these commands are not run as root. They are imposed on the container in real time and do not require a restart. Go LXD, go!
lxc config set nexus limits.cpu 4
lxc config set nexus limits.memory 4GB
lxc config device set nexus root size 20GB
You’re all done! From here you can trivially create tons more containers. You can let them have an ephemeral IP via DCHP on the bridge or easily set a static IP. If you have a resource intensive need, you don’t set the limits above, the container will have access to the full host resources. That’d be 40 cores, 64GB RAM and 1TB of disk. If you created more VMs with out resource limiting, LXC would do the balancing of resources so that each container gets it’s fair share. There’s a LOT more configuration options available. As well, even the way I declared a static IP can likely be done via dnsmasq, (see this cyberciti.biz article), but I had trouble getting that to work on my setup, hence the raw calls.
Next steps
Now that you you’ve bootstrapped your bare metal, dialed in your storage back end, specifically deployed your LAN, you should be all set, right? Not so fast! To make this more of a production deployment, you really need to know how (and practice!) your backup and restore procedures. This likely will involve the snapshot command (see post 3 of 12) and then backing those snapshots off of the ZFS pool. Speaking of the ZFS pool, our set up as is doesn’t have any alerting if a disk goes bad. There’s many solutions out there for this – I’m looking at this bash/cron combo.
Having a more automated system to provision containers integrated with a more DevOps-y set up makes sense here. For me this might mean using Ansible, but for you it might be something else! I’ve heard good things about cloud-init and Juju charms. As well, you’d need a system to monitor and alert on resource consumption. Finally, a complete production deployment would need at least a pair, if not more, of servers so that you can run LXD in a more highly available setup.
Given this is my first venture into running LXD, I’d love any feedback from you! Corrections and input are welcome, and praise too of course if I’ve earned it ;) Thanks for reading this far on what may be my longest post ever!
 For E’s birthday two months ago I made him a laser cut spirograph. It works pretty well and I really enjoyed making it! I tried downloading some existing plans for them, but they didn’t mesh well. I ended up using Inkscape to draw the gears. That tutorial makes them look pretty for an illustration, but they’re real gears and the mesh well! Not perfect, but well enough. For the case I started with a basic box-joint box from the ever awesome MakerCase, and then used Inkscape to add the florishes.


 This lil’ guy comes with some nice specs. The one I have is configured thusly: