Category Archives: Hacking

MapTable.js for all your table and map needs!

2 minutes, 13 seconds

I’m proud to announce that I played a small role in releasing a great new JavaScript library called MapTable. This is an open source JavaScript library that accepts longitude and latitude data (CSV or JSON) as input, and outputs beautiful maps in native SVG with table of the data used to generate the map.  I said I played a small role in this release because Mohammed “Simo” Elalj did 99% of the coding of the library and I just swooped in for testing, PCH specific feature requests and pushing out new builds to GitHub. Version 1.0 of MapTable was technically released way back in December of 2014, but it has been greatly improved since then (again, almost entirely by Simo :).

pch.ixpdir.maptable
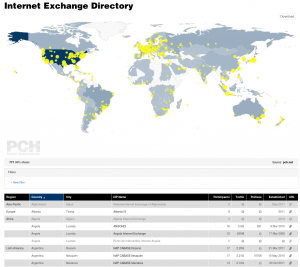
Version 1.1.1, the current version, was developed specifically so it could be used on PCH’s next generation Internet Exchange Point directory (IXP Dir). PCH’s IXP Dir was also the original use that MapTable was conceived for, so it has been a long journey until just now (as of Monday, July 25, 2016) that it has been pushed live!  My main role as an employee of PCH was to complete the nascent integration done a while ago and ensure that all feature requests were made on GitHub so that the improvements would be made upstream of us for all to benefit from. It was great fun to do a deep dive into a well though out and highly function JS library.

pch.homepage
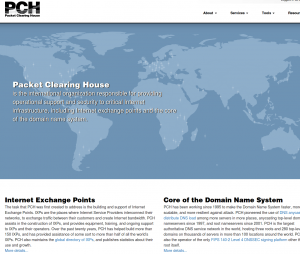
While I was in the IXP Dir, I also replaced the code on our home page which used an outdated version of MapTable. Fortunately, Simo had done PCH the huge favor of making one of the MapTable demo pages be based almost entirely on our home page. The ability to set an entirely custom color palette topped with icing on the cake of being able to specify an arbitrary SVG shape to use as markers on the map was just delightful!

While I’m wildly biased, MapTable is quite easy to use. Here’s the simplest incantation, taken directly from our docs:

Looking at the two examples I cited above, our home page and our IXP Dir, you can see that this simple snippet can be greatly extended to show either a stand alone map or an interactive, zoomable, filterable, printable, map downloadable, tooltipable and sortable map and table. The library is super awesome, and I recommend you start using it today! And yes, I just add “able” to tooltip. Try that in some other JS lib. I think not!

And, before I end this post, if you’re a JS developer and have some spare time, we’d love some help! I’m looking at you Issue #25!

Scanning multiple subnets for SSH servers that accept passwords

1 minute, 25 seconds

At work I was tasked to see if any of our servers are running SSH which allow passwords instead of strictly only allowing SSH keys.  You can tell if they allow passwords when you get a password prompt like this:

$ ssh user@example.com 
user@example.com's password:

Of course we’ll use nmap to scan for open SSH ports. I suspect I should have have used nmap NSE to do scripting, but we’ll plod ahead with out it.  Here’s the call I used to scan each subnet for open SSH ports and append it to ‘open.raw.txt’. Run this for each of your subnets:

nmap -PN -p 22 --open -oG - 1.2.3.0/24 >> open.raw.txt

Here’s an example line from open.raw.txt:

Host: 1.2.3.1 ()	Status: Up
Host: 1.2.3.1 ()	Ports: 22/open/tcp//ssh///

To get that all formatted nice for the next phase, we’ll just cut out dupe and grab just the IPs:

grep 'Up' open.raw.txt |cut -d' ' -f2 > open.ips.txt

Finally, taking much inspiration from this script on StackOverflow, I wrote a bash script to check for servers with a password prompt on SSH called ssh.test.sh:

#!/usr/bin/expect
proc isHostAlive {host} {
set timeout 5 
spawn ssh -o StrictHostKeyChecking=no -o UserKnownHostsFile=/dev/null -o LogLevel=QUIET -o PasswordAuthentication=yes ssh-testing@$host
expect {
    timeout {puts "Timeout happened"; return 'TIMEOUT'}
    eof {return 'NO'}
    -nocase "password:" {send "exit\r";return 'YES'  } 
}
}

# Lists to maintain the each host's information 
set serverList {1.2.3.1 1.2.3.2 1.2.3.3 1.2.3.4 1.2.3.5}

# Looping through all the servers and checking it's availability
foreach server $serverList { 
    puts "\n$server : [isHostAlive $server]\n"
}

To execute and log the results, call:

ssh.test.sh > password.accepted.raw.txt

And finally, to clean up those results into a file with “YES”, “NO” or “TIMEOUT” for each IP, just use this final grep

egrep  'YES|NO|TIMEOUT' password.accepted.raw.txt > password.accepted.txt

The final results will look like this:

1.2.3.1 : 'YES'
1.2.3.2 : 'NO'
1.2.3.3 : 'YES'
1.2.3.4 : 'YES'
1.2.3.5 : 'TIMEOUT'

Happy SSH testing!

Web App Security Cheat Sheet

1 minute, 36 seconds

I recently documented best security practices for writing a web app. Since I was most of the way there for a nice tidy blog post on the topic, I’m using the contents of those docs as a cheat sheet for web app security. Best to refer to OWASP for a more exhaustive list, but here’s mine in PHP/Apache:

title description sample
No Traffic on Port 80 Always use an encrypted channel for web traffic, never send a session cookie in the clear RewriteEngine On
RewriteCond %{HTTPS} off
RewriteRule (.*) https://%{HTTP_HOST}%{REQUEST_URI}
HSTS Set header so after 1st redirect, client goes directly to SSL connection Header always set Strict-Transport-Security
“max-age=15768000”
Forward Secrecy Use ephemeral keys for TLS connections to prevent wholesale decryption if private key is compromised SSLCipherSuite EECDH+AESGCM:EDH+AESGCM:AES256+EECDH:AES256+EDH
SSLProtocol All -SSLv2 -SSLv3
SSLHonorCipherOrder On
Anti-Clickjacking Prevent your site from being included in an iframe Header always set X-Frame-Options DENY
Anti-CSRF Nonces No one getting tricked to submit pre-filled forms using their existing session cookie $_POST[$NONCEKEY] == $_COOKIE[$NONCEKEY]
(but more to it – see this gist)
XSS escaping NEVER TRUST USER INPUT, save raw values to DB, cleanse on display print htmlspecialchars($user_string_here, ENT_QUOTES, ‘UTF-8’)
Secure cookies Never transmit cookies in the clear, works well with HSTS setcookie( ‘session’, $sessionId, 0, ‘/’, ‘www.example.com’, isset($_SERVER[“HTTPS”]), true);
HttpOnly cookies don’t allow JavaScript/XSS to access your cookies setcookie( ‘session’, $sessionId, 0, ‘/’, ‘www.example.com’, isset($_SERVER[“HTTPS”]), true);
bcrypt hashes Use a *slow* hashing method instead of a *fast* one (I’m looking at you MD5…) password_hash(“rasmuslerdorf”, PASSWORD_DEFAULT)
Though Argon2 is up and coming!
strong session ID don’t store anything but pseudo random ID in the cookie. Again NEVER TRUST USER INPUT! bin2hex(openssl_random_pseudo_bytes(50))
no session fixation on logout, delete cookie **and** server side entry in DB so session is dead dead dead NA
re-prompt for passwords on email, password or username change or when showing/changing sensitive data NA
no SQL injection still NEVER TRUST USER INPUT, parameterize all queries $dbh = new PDO(…);
$stmt = $dbh->prepare(‘SELECT * FROM users where username = :username’);
$stmt->execute( array(‘:username’ => $_REQUEST[‘username’]) );

Penance for forgetting basic debugging

1 minute, 56 seconds

I was working on implemented a nonce to fight CSRF requests on all our forms. The nonce worked liked you expect: by setting a cookie and then putting the same value in the form. When the form was submitted, the back end checked that the form nonce matched the cookie nonce and, bam, bob is your uncle.

The HTML for the form was hosted on foo.domain.com and was fetched via an AJAX call to render it in a modal on bar.domain.com. It used a JavaScript function that looked like this:

  $('.login_action').click(function(){
    Modal.init({
      id: "login",
      primary_button_action: function(){
        $('form #loginform').submit();
      },
      url: URL_ROOT + "modal/login",
    }).open();
  });

Now, you can’t quite tell, but this is ultimately a wrapper for Twitter’s Bootstrap’s Modal call:

$('#login').modal(options)

For the life of me I could not figure out when the AJAX call from foo subdomain to bar subdomain was not setting the nonce cookie. I thought it would be a CORS issue, but quickly dismissed that because we all know that “AJAX Requests Get And Set Cookies Like Any Other HTTP Request“, right. RIGHT?!!?

I did follow the best practice of putting in poor man’s PHP break points to trace the $_POST and $_COOKIE values, but to no avail.

After far too long, but after a healthy discussion with a friend about how we learn and how we trouble shoot, I remembered my mantra I always tell junior engineers: “Simplify the problem! Distill it down. Ideally, continue to cut the code in half again and again until just the bare minimum manifesting the problem remains.”

This lead me to reproduce the problem in two lines of code on foo.domain.com to call bar.domain.com:


The problem was still there! No nonce cookies getting set. Let’s remove jQuery then and go to raw JS requests:

var xhr = new XMLHttpRequest();
xhr.open('GET', 'https://bar.domain.com', true);
xhr.withCredentials = true;
xhr.send();

Wait ah second! What was that I see in the console?!@@!#%$:

Cross-Origin Request Blocked: The Same Origin Policy disallows reading the remote resource at https://bar.domain.com. (Reason: CORS header 'Access-Control-Allow-Origin' does not match '*').

Oh…CORS…the thing I dismissed upfront. So, yes, AJAX calls are just HTTP requests per bennadel.com’s blog post, but of course if foo subdomain is calling the modal on bar subdomain via AJAX, it’s an XHR request to another (sub)domain which needs to play by CORS rules.

If any one is interested, I published a gist with our PHP code to do nonces.

How to test PHPs memory_limit setting

0 minutes, 42 seconds

So, we all know that in PHP, you configure it with a php.ini file. And in there, you can set the amount of RAM a script can use with the memory_limitsetting (remember this is “M” not “MB”!).  And if you get this error:

PHP Fatal error:  Allowed memory size of 134217728 bytes exhausted (tried to allocate 234881025 bytes)

Then you can increase the memory_limit to be larger (don’t forget to restart apache!). However, what if you want a script to hit that limit to see how your error logs and such are set up?  I had more fun than I thought I would writing a textbook solution to a textbook problem.  Here it is in it’s 4 line glory:

$str = 'memory!';
$i = 1;
while ($i++ != 100) $str .= $str  ;
print "done!";

When you run this you should see an error as this will exceed 128M of memory. If not, so salt to taste ($i++ != 200) if you run with a higher memory_limit setting!

Named anchor navigation using JavaScript

1 minute, 31 seconds

Recently I wanted to implement simple way to load a number of gallery images on an a static HTML page.  JavaScript was my go to, specifically jQuery.  I started by including jQuery on my page:

<script src="//code.jquery.com/jquery-1.11.2.min.js"></script>

After noodling on which way to build this, I decided to use the anchor name (“#”) in the URL.  We register a jQuery listener like this:

$( document ).ready(function() {
    $(window).on('hashchange', function() {
        changePhoto();
    });
});

What this code does, is on page load (“ready()”), we listen to changes to the “hashchange”.  When we hear a change to the anchor name, run the “changePhoto()” function.

I then have a single img HTML tag which we’ll update:

<img  id="changable" src="Image1.jpg"  />

And some links which control which image the user can see:

<a href="#" class="go-photo" photo="1">Photo 1</a> - 
<a href="#" class="go-photo" photo="2">Photo 2</a> - 
<a href="#" class="go-photo" photo="3">Photo 3</a>

To handle these clicks, we just have a function which looks for the “go-photo”:

$('.go-photo').click(function(e) {
        e.preventDefault();
        window.location.hash = $(this).attr('photo');
 });

This simply intercepts the default action of clicking a link and instead updates the anchor based of the ID of the “photo” element in the link.  Any time the hash is updated in the URL, our listener will fire our own “changePhoto()” function.

Finally, we have our changePhoto function which handles changing the image source upon a hash change in the URL:

function changePhoto( base){
    photoid = window.location.hash.replace("#", "");
    $('#changable').attr('src', 'Image' + photoid + '.jpg');
    return true;
}

And, bam, you have a tidy, JS based photo navigator. My main goal of having both a JS call to change the anchor and the browser back button  trigger a call to changePhoto() as achieved. To add a new photo to your page, just upload a new Image4.jpg image and add a new link with the right “photo=4” value and you’re good to go!

On The Register’s security posts

3 minutes, 12 seconds

Intro: 2 posts, 1 bored security tinkerer

I was stuck on a cross-country plane trip recently, and I started reading up on some security posts.  I found two interesting ones, both of which happened to be written by Darren Pauli:

As a best practice, from way back in my journalism undergrad days, I try to always go to the source of news articles I read.  So, for both of these posts I dug in and tried to see the facts and chronology as the articles reported them vs what the actual sources said. Let’s dig in and see what we find!

Article 1: How unresponsive and culpable was CyanogenMod?

The first article  was published by The Register on 13 October 2014 and claimed that 10 million phones were vulnerable to a Man in the Middle (MitM) attack and it was a zero day exploit.

On October 14th CyanogenMod (CM) responded, ‘In Response to The Register “MITM” Article.

Then McAfee jumped on the bandwagon of an exploit possibly affecting a lot of Android users. On October 17th the McAfee blog published a piece on this vulnerability as well saying, “it appears easily fixable once it’s actually acknowledged and addressed by the CyanogenMod team.”

The issues I see with the scenario painted in these articles are threefold:

  1. The initial piece by Pauli states that the source of the attack is open source code in a 2 year old vulnerability. How can this be both a zero day exploit AND a 2 year old vulnerability?  Unsurprisingly, CM’s response cites this point as well.
  2. A whole 3 days had passed when McAfee posted their blog piece stating that CM hadn’t responded when, in fact, they had.  CM’s response was published 24 hours after the original Register article.
  3. The issue purportedly affected “10 million users” already sounds good, so there was no need to erroneously report that it affected “12 million” as the McAfee piece did.

Article 2: Was TOR really vulnerable?

In the second post, Pauli’s title starts off with, “STAY AWAY” and the subtitle “USB plugged into Atlas, Global servers.” He goes on to pull a quote from the tor-talk mailing list, citing Thomas White saying, “the chassis of the servers was opened and an unknown USB device was plugged in.”

More so than the first article, there’s a number of issues with this piece. Some are minor, but some are egregious:

  1. The only link to the thread about the incident on the tor-talk link is wrong.  He cited a thread about hidden services instead of the one on possibly illicitly inserted USB devices.
  2. The subtitle “USB plugged into Atlas, Global servers” references White’s instances of Atlas and Globe as if they were the one and only ones, when in fact they’re not. The Tor Project instead links directly to atlas.torproject.org, from their homepage no less.
  3. By the time the story was published, the issue had been fixed and Tor users at large didn’t even notice:
    1. Dec 21 20:17 UTC  – Initial post to the tor-talk list is made by White
    2. Dec 21 20:55 UTC  – White posts the fingerprint of all the servers he felt could have been compromised.
    3. Dec 21 21:05 UTC – Jacob Appelbaum rejects the possibly compromised nodes so that general public Tor users won’t unknowingly use them.
    4. Dec 21 23:54 UTC – White gives an extensive update.
    5. Dec 22 05:58 UTC – Pauli writes his piece for The Register.
  4. The title of the article, “STAY AWAY” goes against a explicit request from White in his 23:54 update, “Tor isn’t broken. Stop panicking.” White’s request was penned before Pauli even published his article.

Clicks clicks clicks

I feel like The Register’s articles, and the related McAfee piece, though having quite a bit of truth to them, take advantage of the facts.  The Tor piece borders on fearmongering.  Put it all together and I think that tech writers and bloggers can easily shoot out a piece that gets the clicks.  To make matters worse, both Register pieces haven’t been updated to reflect not-so-recent updates:  issues cited aren’t of concern by the developers and maintainers of CyanogenMod and Tor respectively.

Given I’m new to critiquing news pieces, I reached out to Pauli for comment. He didn’t get back to me. If he does, and it turns out I’ve gotten any of the facts wrong, I’ll be sure to post an update!

Root on Verizon Galaxy S5 on NK2 Firmware

4 minutes, 19 seconds

Galaxy-S5After my S3 took a quick, but not quick enough, drink in the kitchen sink, I upgraded to an S5. It’s a really great phone. However, I had been running Cyanogenmod 11 on my S3 and I missed all the perks of root access. I’ve rooted my S5, and it’s awesome. Here’s a write-up for those who want to know how to do it. In my guide below, I take a bit more time than some of the threads in XDA to describe each step, which will hopefully make it a bit more beginner friendly.

Rooting is always a bit of a risk and ***YOU SHOULD NOT DO IT UNLESS YOU ACCEPT THE RISK OF TURNING YOUR PHONE INTO A PAPERWEIGHT***. Also, though, you already have a good backup system, (right!?), ***BE SURE YOU HAVE A BACKUP OF YOUR DATA ON YOUR PHONE***. With those warnings out of the way, root was a snap following bdorr1105‘s excellent write-up on xda developers. On top of it all, I had zero data loss as the root process doesn’t require you to reset android, which was super handy.

Preparation:

  • Have a windows machine and install Odin on it.
  • Double check you’re on NK2 baseband: Settings -> About Phone -> Baseband version -> last 3 characters are “NK2”.
  • Install latest Samsung USB drivers on your windows machine
  • Download both G900V_NCG_Stock_Kernel.tar.md5 and NK2_Firmware_Only.zip to your windows machine. Extract the NK2 zip file so it’s an md5 file (extracts to NK2_Firmware.tar.md5).
  • Have a micro USB cable
  • Allow unknown sources on your phone: Settings -> Security -> Unknown sources – checked
  • Read through all these steps and prep items. Ask questions *BEFORE* you start if you’re confused.
  • If you’ve never used Odin, maybe check out this youtube video to see how it works. There’s a 1080p option, and you can really see exactly which buttons to click and what Odin looks like in action. Note: the steps in this video differ from mine and you shouldn’t follow the video’s steps; follow mine instead. The video is for NI2 not NK2.
  • Be patient. Don’t get frustrated!

At a high level, we’re going to be doing 4 things which I’ll label below broken into 12 steps:

  1. Prep root kit: Installing a the towelroot root kit. Steps 1 and 2 below.
  2. Revert: Reverting back to the old NCG kernel/baseband which is vulnerable to a root kit. Steps 3 through 7 below.
  3. Root: Rooting the phone. Step 8 – just one easy step!
  4. Update: Updating back to the current NK2 kernel/baseband. Steps 9 through 12 below.
Odin v3.09 configured to install Ni2 firmware.

Odin ready to install NI2. Click to see larger version.

Now, the steps, again from the great guide that bdorr1105 wrote:

  1. Prep root kit A: Install Towel root to your phone. To download the APK, open Chrome and go to towelroot.com. Hold down on the big red lambda icon and choose “Save Link.” When you click the link in Chrome it creates an infinite redirect. If you click it in Firefox, it loads the text of the APK in the browser instead of saving the file :(.
  2. Prep root kit B: After the download, click the APK and install it. Also, add a shortcut of the towelroot APK to your phone’s home screen so that it’s easy to launch (more on this later).
  3. Revert A: Put your phone in Odin mode: hold down power button and then choose “Restart.” When the phone turns off, hold down power button, home button(button on front) and down volume at the same time. When prompted, choose to continue by pressing up volume.
  4. Revert B: Connect your phone to your laptop with the micro USB cable and launch Odin. If this is the first time you’ve connected your phone in Odin mode it might take a few minutes to find all the drivers. Possibly even longer. Be patient!
  5. Revert C: Once your phone shows up in Odin in the upper left in the ID:COM section (see screenshot), click the “AP” button and navigate to where you download the “G900V_NCG_Stock_Kernel.tar.md5” file. Click “Start.” Your phone will show a progress bar on the screen, and then it will reboot. Once Odin app says, “PASS” in green, unplug your phone.
  6. Revert D: Your phone will reboot and update the apps. This will take a few minutes.
  7. Revert E: Once it’s done updating, your phone will be slow. A ton of apps will force close. This is expected. Click “OK” or “Close” to any dialogues that pop up.
  8. Root: Click on the towelroot icon we made on the desktop. Click “make it ra1n” and wait. Towelroot will confirm you have root.
  9. Update A: Restart your phone and hold down the down + power + home buttons. Press up to get into Odin mode again
  10. Update B: Plug your phone in to the USB cable again. In the Odin app on your computer, press “AP” button and select “NK2_Firmware.tar.md5”. Click “Start.” Your phone will show a progress bar on the screen, and then it will reboot. Once Odin app says, “PASS” in green unplug your phone.
  11. Update C: Your phone will reboot and update the apps for a second time. This will take a few minutes, same as before.
  12. Update D: Go to the Play Store on your phone and install “SuperSU.” Open and choose to install SU. When prompted, choose “Normal” mode instead of “TWRP.” When prompted, disable Knox and reboot.

You’re done, congrats! You can install “Root Checker Basic” if you want to have warm fuzzies of seeing you have root. To clean up, go back into settings and uncheck “allow unknown sources” as well as uninstall towelroot. Google will flag this as an unsafe app and ask you to uninstall it anyway.